Dear Vienna MIR Pro Users,
After having received many requests about making Vienna MIR Pro usable more like an "ordinary reverb", we added a separate plug-in version: Unlike standard MIR Pro, it can be used in any sequencer capable of hosting AU, VST, RTAS, or AAX plug-ins, both on 32-bit and 64-bit Windows and OS X. That way it can be applied to any audio source most easily. This allows you to benefit from most of MIR Pro's features without using Vienna Ensemble Pro.
While this will make integration of Vienna MIR Pro much more straight-forward under most circumstances, some advanced features are not available in this new plug-in mode. This manual will point out all important differences between the two operational modes. Please refer to the dedicated Vienna MIR Pro manual for detailed coverage of all functions and the underlying concepts.
Important
First of all, please make sure that you have a valid license on your eLicenser. To transfer the licenses to your Vienna Key (or any other compatible eLicenser USB device), please follow the steps as presented on the VSL Product Registration page in your VSL User Area. You will also need the most recent version of the [https://www.elicenser.net](eLicenser Control Center).
While the original Vienna MIR Pro comes built-in with Vienna Ensemble Pro, the Vienna MIR Pro Plug-In needs to be installed separately. The installer is available for download in [https://www.vsl.co.at/MyVSL/MyDownloads](your VSL User Area).
Download and run the installer that fits your operating system. Follow the on-screen dialogue, and you will be ready for some "spacious" action.
The MIR Pro Plug-In should now be listed in the plug-in menu of your DAW. Make sure that the path information points toward the folder that contains it.
Tip
The MIR Pro Plug-In uses the same RoomPacks as the standard version. Please assign the path to the respective folder in the Preferences!
The workflow of MIR Pro Plug-In is similar to that of the standard version within VE Pro 5. There are however some key differences to how the MIR Pro Plug-In is operated.
Most importantly, the plug-in version of MIR Pro relies on two different parts, namely the actual plug-in, and a common control user interface (UI) shared by all instantiated plug-ins. The Control UI panel resembles standard MIR Pro's Main Window in its visual appearance as well as its usage, so that seasoned users of MIR Pro will be familiar with it from the very beginning.
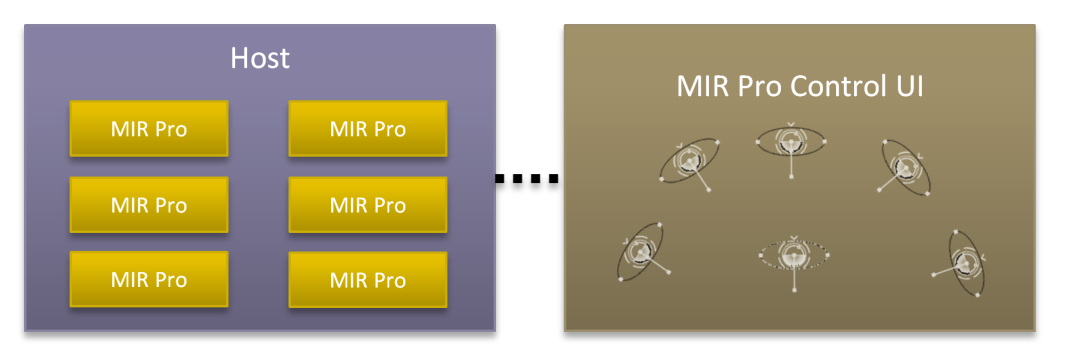
This separation allows you to keep the MIR Pro Control UI at a fixed position, maybe even on a separate screen in full-screen mode, without interfering with the window management of your host application.
As opposed to the Vienna Ensemble-based version of MIR Pro, the plug-in does not offer dedicated wet signal routing. Please take into consideration that this makes it much harder (and in certain cases impossible) to do sub-grouped stem-mixing.
With MIRacle, MIR Pro introduced a dedicated, built-to-the-task algorithmic reverb plug-in for further sweetening the results achieved by the use of multiple impulse responses. This plug-in is now available in all conventional plug-in formats, too (VST / AU / RTAS /AAX for 32-bit / 64-bit Windows and OS X). It will get installed together with the actual MIR Pro Plug-In. You will find it in the plug-in menu of your DAW.
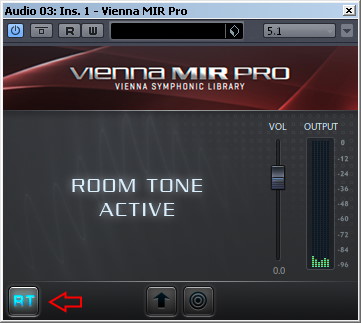
To enable the playback of the MIR Venues’ unique Room Tones, you need to insert a MIR Pro Plug-In and activate Room Tone mode by pressing the "RT" button. Only one plug-in instance can be designated for Room Tone playback.
The pre-rendered Venue Previews can be played back through any MIR Pro plug-in active in your host application. Instead of choosing an audio output for previewing, like done in Vienna Ensemble Pro, any selected MIR Pro plug-in instance is available as output for the preview sounds.
The feature that allows standard MIR Pro (as part of VE Pro 5) to "Guess" an appropriate Instrument Profile for a loaded Vienna Instrument on the same track are quite understandably not available within a foreign host. Instrument Profiles have to be selected manually by right-clicking on the MIR Icon’s context menu.
The MIR Pro Plug-In has no way of knowing about the DAW's track name where it is inserted, so the name of the MIR Icon on stage has to be set either from the icon itself (right-click, choose "Rename") or from the plug-in's interface.
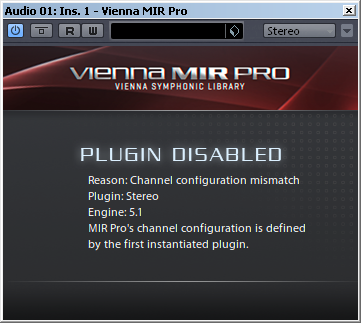
Inside of Vienna Ensemble Pro, the channel configuration is selected when creating the project. With the MIR Pro Plug-In the channel configuration is decided when inserting the first plug-in. In hosts that support different channel configurations per track, you should make sure that every track that uses Vienna MIR Pro has the same channel configuration. Inserting a MIR Pro plug-in on a track with a different channel configuration will disable that plug-in.
Please find some implementation hints at the end of this manual ("How To Use MIR Pro Plug-In").
The mute & solo functions in Vienna Ensemble Pro rely on the host’s mixer channel. The plug-in now has this functionality implemented directly, in order to allow soloing and muting of plug-in instances directly from the Control UI.
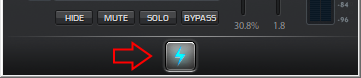
A dedicated Bypass button in the Instrument Panel of the Control UI allows for a quick check of the incoming dry signal. This will not bypass the plug-in inserted in your DAW’s audio track!
The following parameters are available for plug-in automation: Volume, Dry/Wet, Hide, Mute, Solo. They will appear in your host's automation system and can be treated like any other available parameter.
Note
Due to the high CPU demands of MIR Pro's proprietary positional IR pre-rendering, neither Icon positions nor Main Microphone settings are available for automation.
All data related to the plug-in will be stored inside your hosting DAW, so you never will have to worry about saving anything from the MIR Control UI itself. But of course you can build up a library of your preferred settings easily:
A preset saved with the MIR Pro Plug-In contains the full venue information, plus data specific to the instrument (position, width, volume, etc.).
If a preset is loaded when only a single plug-in is instantiated, the MIR Pro Plug-In Control UI will load the Venue data contained in the preset. This is how a sequencer project loads back the venue data on project opening.
If a preset is loaded in any other than the first plug-in instance, the Venue data will not automatically be loaded. If the Venue data is the same as current venue settings, nothing will happen. If Venue data in the preset differs, a blinking "Load Data?" arrow appears in the Control UI’s Main Menu. Pressing this arrow will allow for loading the incoming Venue data, or for discarding the process. MIR Icon-specific data, on the other hand – such as position, with, dry/wet ratio etc. – will always be loaded from a plug-in preset.

Apart form that, the File menu in the Control UI's Main Menu will allow for saving and loading Venue-specific data (chosen Venue, Main Microphone Position, Output Format, Room EQ settings, etc.) independent of any settings saved with a plug-in's preset.
Note
MIR Pro settings from VE Pro-based projects (so-called VI-Frames) cannot be loaded into MIR Pro Plug-In!
Instantiating the MIR Pro Plugin will subsequently start the Control UI and create a MIR Icon on the chosen Venue's stage. Its controls are:
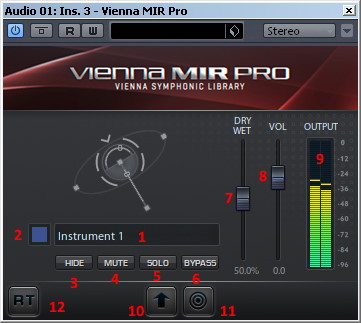
Instrument Name
Names the instrument's MIR Icon.Color Picker
Click to open up a color palette allowing you to select a few preset colors for the MIR Icon on stage. Color selection (with more choice of colors) can also be done from the MIR Icon inside the Main Window (i.e., Control UI).Hide
Hides the MIR Icon from the Venue View.Mute
Mutes this instrument inside the MIR Venue.Solo
Solos this plug-in, also silencing all other MIR Pro Plug-Ins. Please note that the plug-in will only be soloed amongst other MIR Plug-Ins, your host might still have tracks producing sound.Bypass
Bypass will route the dry, but readily positioned audio signal through MIR Pro. This is not the same as bypassing the plug-in altogether!Dry/Wet Balance
Adjusts the balance of dry and wet signal. 100% means fully wet, 0% means fully dry.Volume
Adjusts the volume.Output Meters
Digital PPM meter with falloff, measuring levels from -96dB to 0dB. It shows the output after MIR Pro's processing.Raise Control UI
Raises the MIR Pro Main Window to the front. You might hardly ever need this function as soon as you use a dedicated screen for the Control UI.Focus Instrument
Focuses the MIR Icon connected to this plug-in on a MIR Venue's stage. Useful to locate a specific instrument on stage.Room Tone Enable
Sets the plug-in in Room Tone mode. When a plug-in is set as Room Tone, most other controls will be disabled. Click on the button again to turn the plug-in into a normal instrument.
![IMPORTANT] There can only be one MIR Pro Plug-In set to Room Tone mode within one and the same project.
Most of the controls in the MIR Pro Control UI remain exactly the same as in MIR Pro built into VE Pro 5. The most notable differences are:
- Instrument Panel
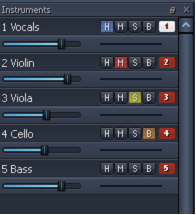
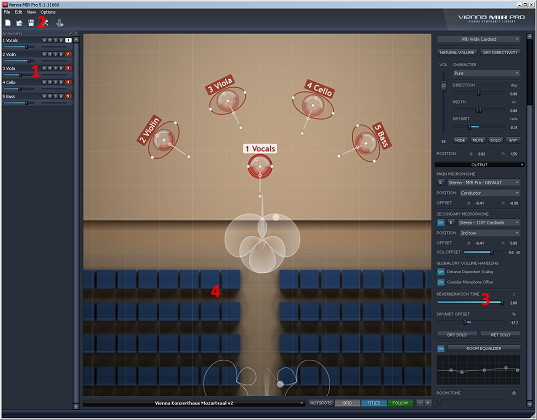
The Instrument Panel of the MIR Control UI replaces the VE Pro Channels List. Since MIR Pro is no longer the main mixer for your application, the Instrument Panel will only reflect the plug-ins you have inserted in your host. Typical mixer controls such as panning, effect inserts and sends are also not available from the MIR Pro Instrument panel. (See screenshot on next page.)
Each channel strip allows to control the Hide, Mute, Solo and Volume parameters of the respective MIR Icon. The Instrument Panel also provides a level meter, allowing to see the output level of each active plug-in.
The Instrument Panel orders plug-ins/instruments by the order which they were inserted in the host. Like in VE Pro, the Instrument panel allows reordering of channels by drag'n'drop.
The panel can be detached from the main window or closed completely by means of the controls in the top right corner. A detached Instruments panel can be re-attached to the Control UI by double-clicking its frame at the top.
- Main Menu

Since the MIR Pro Plug-In has no means to interact with Vienna Instruments directly (Vienna Ensemble Pro 5 is used for these tasks), many of the related entrances from the standard version's Main Menu were omitted.
- Room Tone Control
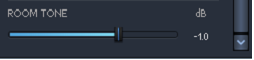
The Room Tone Control is disabled by default. Like mentioned before, a MIR Pro Plug-In needs to be switched to Room Tone mode to enable the Room Tone Control in the Main Window.
- Venue Previews
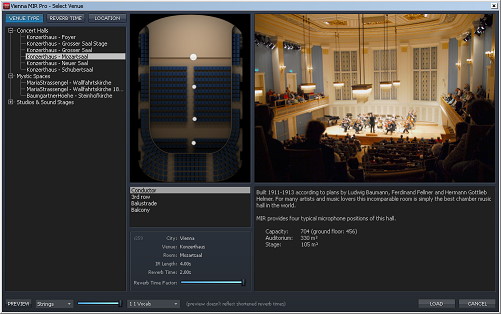
Since MIR Pro UI doesn’t actually output any audio (only your host does), the playback of all Venue Preview in MIR Pro's Venue Selection Window is now routed to a Vienna MIR Pro Plug-In directly inside your host. Simply choose a instantiated MIR Pro Plug-In, and it will used for the playback of the pre-rendered Venue Preview examples in your host.
As you see, the MIR Control UI contains just a subset of the Preferences from standard MIR Pro / VE Pro. Three additional settings were added, though:
1 is for automatically focusing on the MIR Icon on stage when its corresponding plug-in GUI is opened in the host application.
2 will shut down the Control UI / Main Window when there is no MIR Pro Plug-In in the active project/song/ session of your hosting DAW.
3 determines the convolution latency of all MIR Pro Plug-Ins.
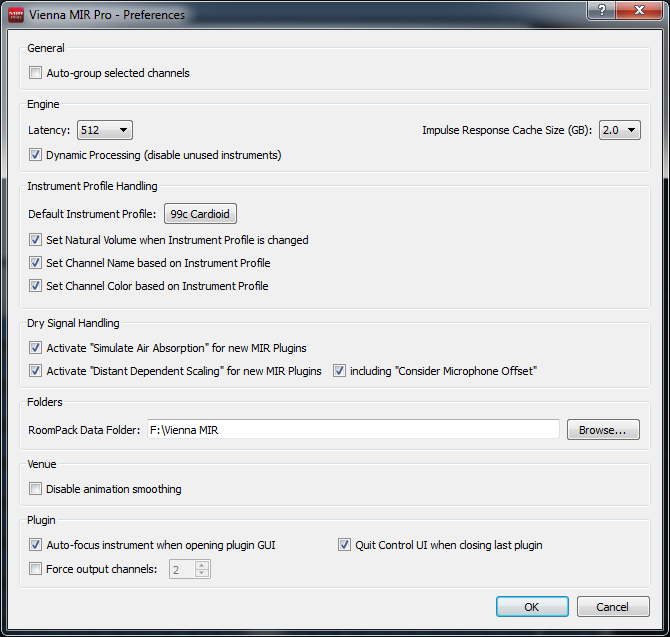
Important
Please keep MIR Pro's latency setting higher than your host application’s soundcard buffer setting. Alternatively, setting this to zero (0) will synchronize the convolution latency to the sound card buffer size. This gives a zero-latency convolution process, but especially in the case of small system latency settings it will increase the CPU load considerably.
For information about other available settings, please refer to the main MIR Pro manual.
To use MIR Pro in your host application, simply insert a MIR Pro Plug-In on your track of choice. The MIR Pro Control application will start in the background, connecting to the plug-in once it has finished loading. When the control application is loading, a blinking "Connecting" button (1) will show at the bottom of the plug-in's interface.
Once the control application has opened and the plug-in is connected, the button will disappear and show the normal plug-in interface. Closing the control application will make the connect button reappear.
A MIR Pro Plug-In will not produce any sound if the Control UI / Main Window has not been started yet!
Important
Please remember that the channel-configuration of the first instantiated MIR Pro Plug-In will determine the number of output channels supplied by the MIR Pro engine. In other words: A mix using a stereo MIR Pro setup can not be converted to a multichannel format easily.
All tracks that contain a MIR Pro Plug-In will have to have the same basic channel configuration. Inserting a MIR Pro plug-in on a track with a different channel configuration will disable that plug-in.
This is especially important for hosts like Cubase and Nuendo which do not allow for automatically converting a track to another channel-configuration by inserting a plug-in (e.g. mono>stereo). You will either have to create a stereo track and move the mono audio-data to it, or you re-route the mono track to a dedicated stereo-group, where you will insert the MIR Pro Plug-In.
Other DAWs like Logic or ProTools offer the possibility to insert configuration-changing plug-ins (mono>stereo, or stereo>surround), thus you may mix and match mono>stereo and stereo-stereo plug-ins freely.
- We hope you enjoy the new possibilities of MIR Pro!
Your Vienna Symphonic Library Team.
On this page
- Installation
- Workflow Changes
- Graphical User Interface (GUI)
- Wet signal routing
- MIRacle
- Room Tone
- Venue Preview
- Instrument Profile Guessing
- Track Naming
- Channel Configurations
- Mute & Solo
- Bypass
- Automation
- File Management
- The Plugin Interface
- The MIR Pro Plug-In Control UI (Main Window)
- MIR Pro Plug-In Preferences
- How To Use The MIR Pro Plug-In