Edit View
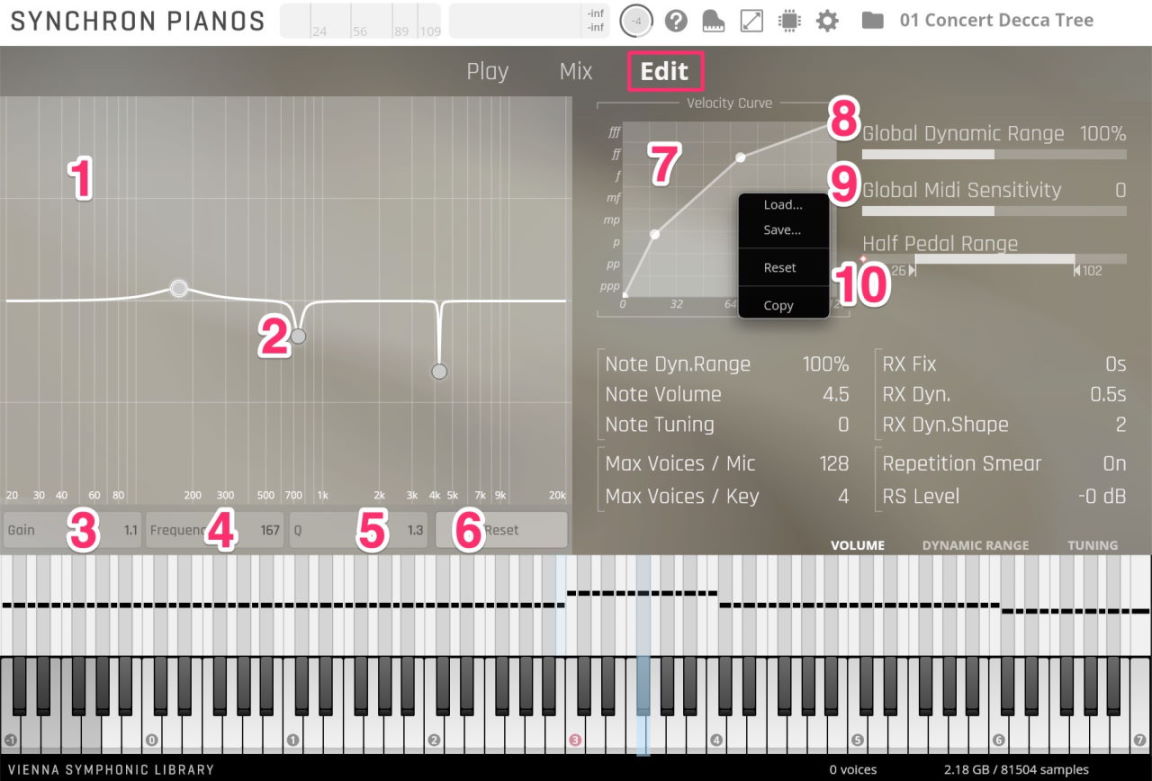
According to its name, the Per-Note Equalizer works on a per-note basis. The per-note EQ is only available when the adjustment values of the selected notes are identical!
Additionally, the volume, dynamic range and tuning of selected notes can be modified.
EQ Display: Shows the EQ graph of the selected notes.
EQ Node: Double-click to activate the corresponding node. Use your mousewheel to change the Q value, Alt-click to lock frequency, Shift-drag to fine-tune the settings, Command/Ctrl-click to reset.
Gain: Gain value of the selected node in the EQ display window. Shift-click-drag to fine-tune. Click-drag or double-click to edit. Command/Ctrl-click to reset.
Frequency: Frequency of the selected node in the EQ display window. Shift-click-drag to fine-tune. Click-drag or double-click to edit. Command/Ctrl-click to reset.
Q: Q value of the selected node in the EQ display window. Shift-click-drag to fine-tune. Click-drag or double-click to edit. Command/Ctrl-click to reset.
Reset: Resets the EQ for the selected note(s).
Velocity Curve: Adjusts the mapping for keyboard velocities. With integrated velocity histogram. Double-click to add, Command/Ctrl-click to delete. Click-drag to select multiple nodes. The context menu (right-clic) lets you load/save presets, reset the Velocity Curve and Copy/Paste to another preset or Synchron Pianos instance.
Global Dynamic Range: Mirrors the Dynamic Range controller in Play View.
Global MIDI Sensitivity: Mirrors the MIDI Sensitivity controller in Play View.
Half Pedal Range: Sets the up/down pedal positions for the continuous sustain pedal controller (must be activated in Settings)

Note Dynamic Range: Displays the dynamic range of the selected key(s). Values are also displayed in the Dynamic Range slider area when the Adjustment area is switched to Dynamic Range (see below).
Note Volume: Displays the volume level of the selected notes (if the levels are identical). This is a duplicate of the sliders in the Volume Adjustment area (depending on the selection).
Note Tuning: Displays the tuning settings of the selected key(s). Values are also displayed in the Dynamic Range slider area when the Adjustment area is switched to Tuning (see below).
Max Voices/Mic: Adjust the maximum played voices per microphone. Lower settings might help in very busy performances. Default: 128.
Max Voices/Key: Adjust the maximum played voices per key. Higher settings may be of value in very slow performances. Default: 4.
For advanced users, the Release Sample settings and the Repetition Smear feature will help to fine-tune the performance of the Yamaha CFX.
RX Fix: Fixed release extension time, added to release samples. Default: 0 seconds.
RX Dyn: Adjusts the note/velocity dependent release extension time, added to the note-on samples. Default: 0.5 seconds.
RX Dyn.Shape: Adjusts the transfer curve for the note/velocity dependent release extension time. Default: 2
Repetition Smear: Turns repetition Smearing on/off. Default: on.
RS Level: Adjusts the volume level of the release samples. When using algorithmic reverb, it can be useful to lower the value a bit. Default: 0 dB
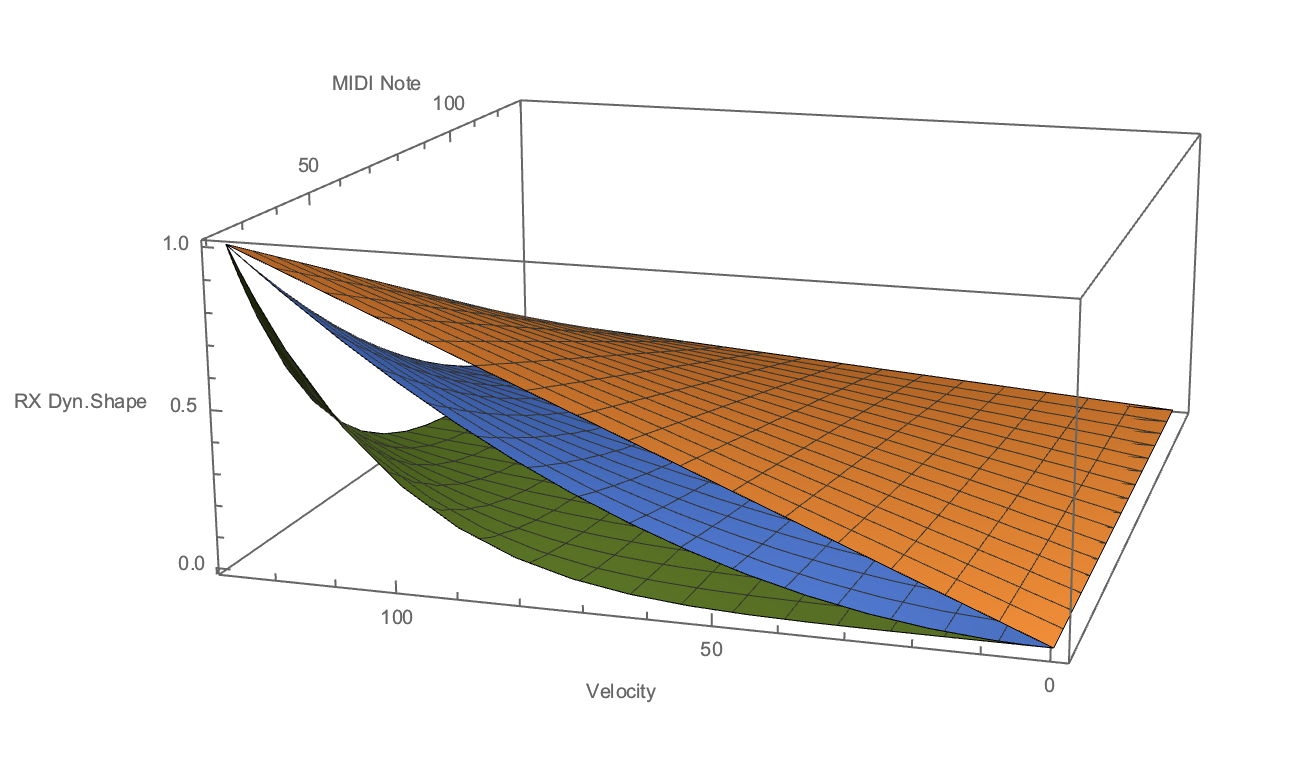
The graph above shows the behavior of the RX Dynamic Shape parameter, where 1.0 is the orange area, 2.0 is the blue area, and 5.0 is the green area.
MIDI note and velocity are plotted on X/Y axis, and the resulting RX multiplier on Z axis.
This value on Z-axis is multiplied with the "RX Dynamic" parameter to make up the release time added to sustain samples.
The lowest note and the highest velocity will always produce a value of 1.0, thus exactly the time set for RX Dynamic.

Volume: Shows the Adjustment area for volume below (17).
Dynamic Range: Shows the Adjustment area for Dynamic Range below (17).
Tuning: Shows the Adjustment area for tuning values below (17).
Adjustment Area (see below): Drag the handles to adjust. Command/Ctrl-click to reset handle.
Selection Area (keyboard): Use the shift key to select a key range, Command/Ctrl to add single keys, Alt to deselect.
Adjustment Area
Single-click outside the selection changes the selection to that note.Range: -10 to +10 dB.
Dragging the handles within a selection adjusts the levels for all selected notes.
Right-click or double-click resets the levels to zero.
Alt-drag draws a line, creating a smooth linear ramp from one note to another. When using Alt-drag, the selection is irrelevant.
Selection Area (keyboard)
Drag across to change the selection.
Shift-drag to add to the existing selection.
Alt-drag to remove notes from the existing selection.
Ctrl-drag (WIN) or Cmd-drag (macOS) to auto-toggle, based on the first note clicked.
Starting from a non-selected note will add to the selection (like the shift key).
Starting from the selected note will remove the selection, as if holding the Alt modifier.