Synchron Harp GUI
As indicated by its name, the pedal harp has pedals. These allow the player to tune individual notes of a scale up or down by a half tone – for instance, tuning from C to C# on all octaves. On the keyboard, it would probably be rather confusing if we had merely attempted an analog implementation of this system. Therefore, the Vienna Synchron Harp has two modes, Pedal and Chromatic.
Pedal Mode:
In Pedal mode, the harp’s 7 strings per octave are mapped to the keyboard’s white keys, and can be tuned to different scales. These tunings required by a piece are called pedalings. The black keys and keys outside the harp’s playing range serve as function keys, e.g., to tune all C’s up as mentioned above. This allows the player to play glissandos by swiping across the white keys and thus get as close as possible to emulating a natural harp glissando. There even is a safeguarding function against accidentally hitting a black key during a glissando swipe.
Chromatic Mode:
In Chromatic mode you just select the desired articulation and play melodies, chords, etc. in the customary "keyboard" way on white and black keys.
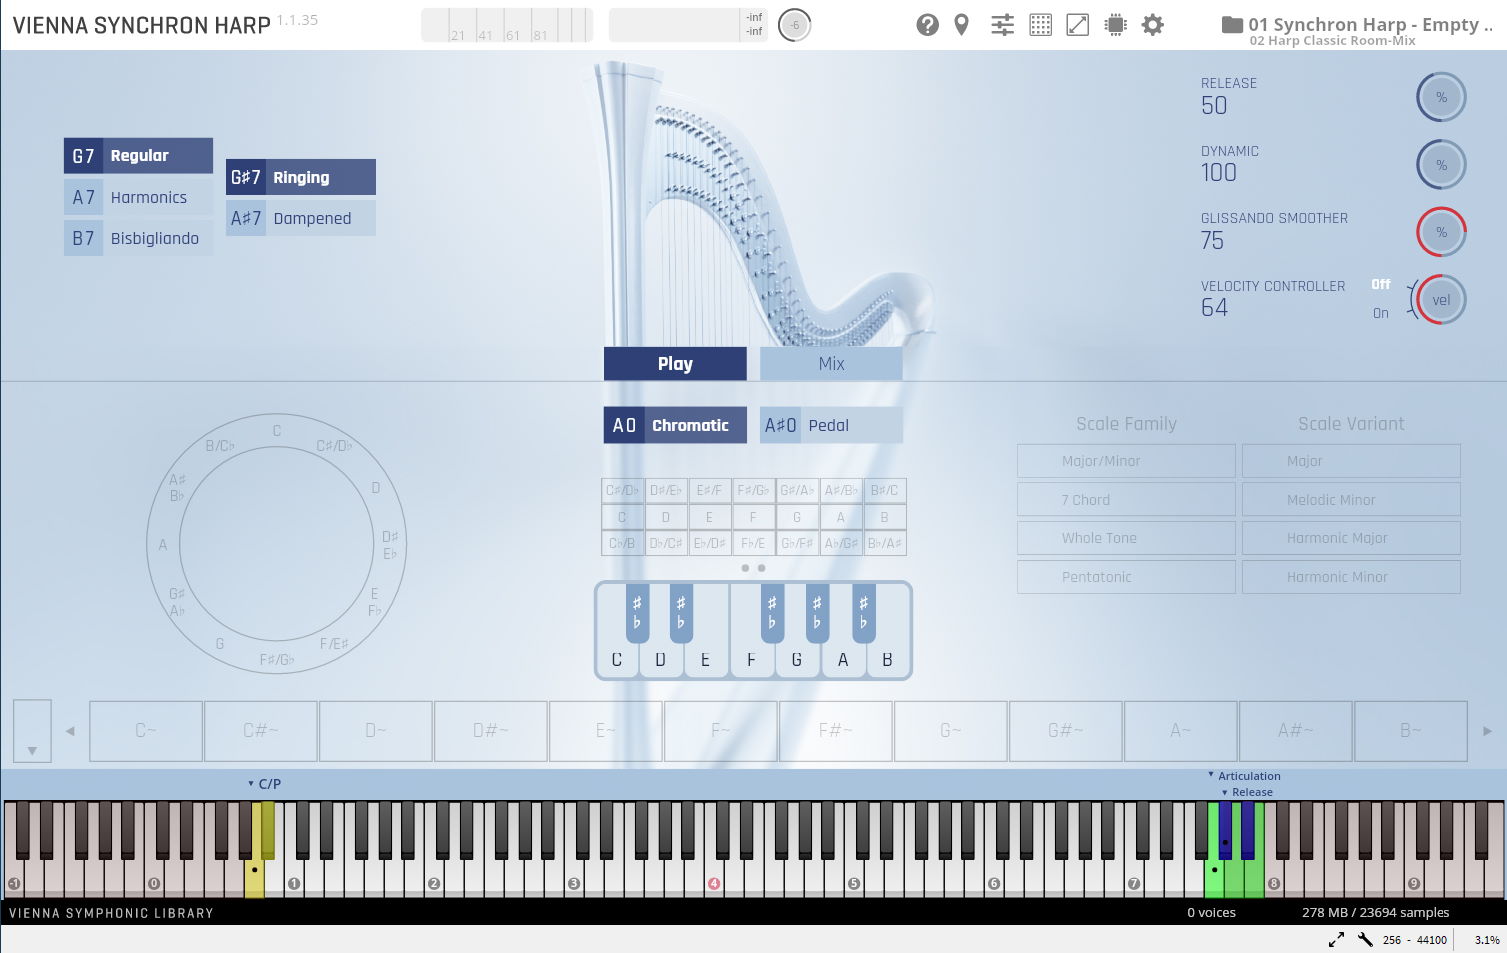
Apart from Pedal and Chromatic mode, there are two main tabs called Play and Mix, which give you access to the harp’s playing features and the integrated mixing engine with its channel strips, respectively.
PLAY
As Chromatic mode shares the few options it has (Articulation choice and Mode switching) with Pedal mode, these will also be covered in this section. Play has four main sections: the menu bar on top, the harp area (whose upper half features tonal parameters, and the lower half contains all the settings you need for playing), the virtual keyboard showing the play area and keyswitches, and the info bar.

Menu Bar

- Velocity meter: Shows the MIDI velocity of the note played. The boundaries shown in this field mark the changes of sample sets belonging to the same velocity layer.
- Volume meter: Displays the stereo output volume. Clipping will be indicated by a red display.
- Volume knob: Adjusts the player’s master volume.
- Help button: Click on this button to go to our info site and view the online manual.
- Send sampler slot selection: Sends the current sampler slot selection(s) using the currently assigned MIDI keyswitch, through the virtual MIDI port.
- Controller overview: Opens an additional window where you can see all assigned MIDI controllers and make changes to these assignments and adjust volume, articulation, pedal, and other controls individually.
- Pedaling bank window: A window display showing the structure of the currently loaded Preset with all pedaling banks at once, where you can organize your harp setup for different pieces and requirements.
- Scale button: The scale button lets you adjust the size of the Synchron Harp GUI in steps from 75% to 200%.
- CPU real-time display: Opens a CPU meter that shows the actual CPU load on your computer. Lower latencies and higher voice counts will result in a higher CPU load.
- Settings: Lets you adjust your Interface and Engine settings, thus affecting general performance. Here you can also assign the correct sample content in the Database tab.
- Browser / current preset display: Click the folder button to hide/show the harp’s browser, where the currently loaded preset is highlighted. Below the browser you will find an information display that shows more elaborate mouseover texts or information regarding the currently loaded preset.
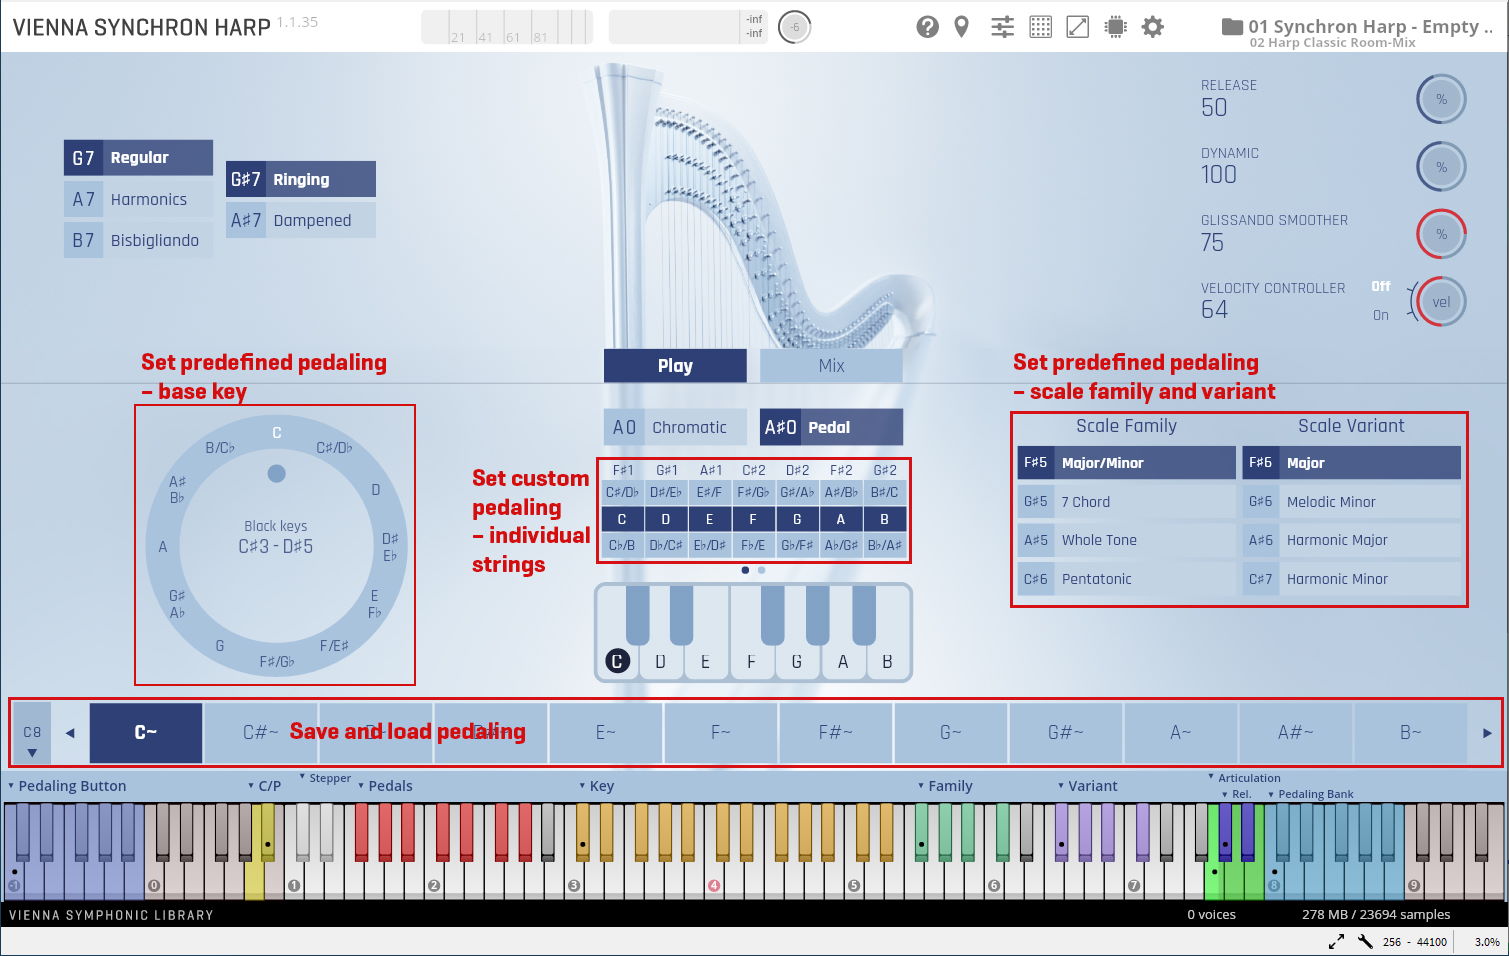
Harp Play Area
Here you can find all parameters directly connected with playing the Synchron Harp. The majority of these are controlled by keyswitches, and therefore are mirrored on the virtual keyboard at the bottom.
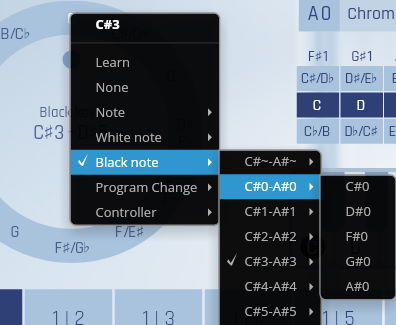
Controllers:
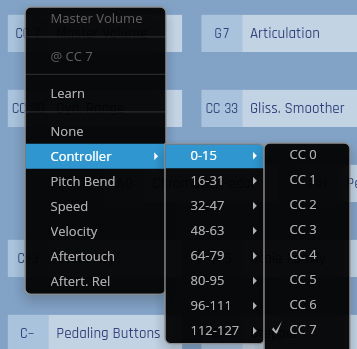
You can change controllers to suit your workflow and preferences by right-clicking on an item, e.g., key selection as in the screenshot below.
Upper area:
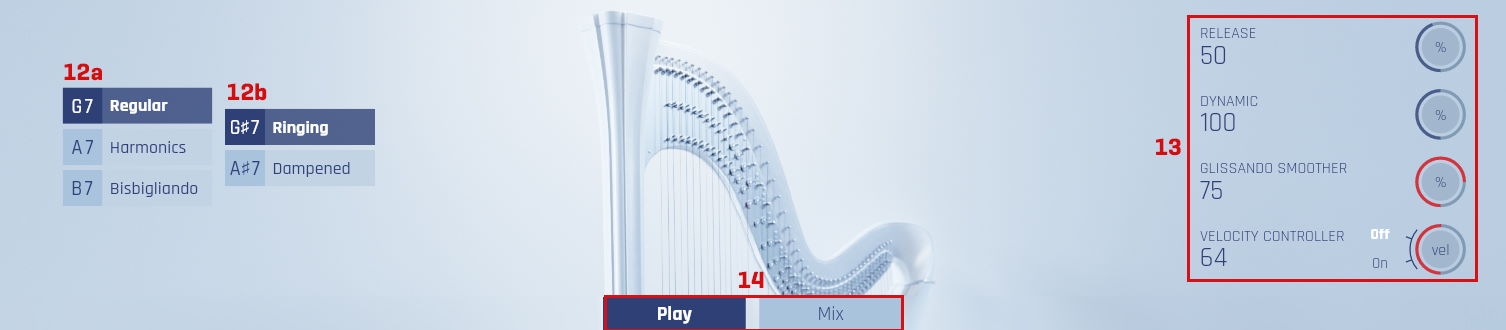
- Articulation and release: The three basic articulations Regular, Harmonics, and Bisbigliando all can be played with ringing release or dampened.
- Sound controllers: With these four knobs you can adjust parameters for advanced sound control.
Release allows you to scale the duration of ringing release.
Dynamic lets you extend or decrease the dynamic range of the instrument.
Glissando smoother softens the attack of glissando notes, thus making them sound more glissando-like, as it is not at all easy to play harp-like glissandos on a keyboard. Smoothing kicks in automatically when a glissando is recognized depending on the grace time defined in Settings / Interface. Active glissando smoothing is indicated by a blue knob.
Velocity controller when activated, allows you to use MIDI CC instead of keystroke velocity for velocity control. Moreover, the volume of bisbigliando notes can be changed while playing. Use the off/on buttons to toggle. In Settings / Interface you also get the option always to use a velocity controller when Bisbigliando is selected. - Tab selection: Choose your customizing options.
Play: All parameters and settings affect the entire Synchron Harp instance.
Mix: Displays the integrated mixer with the harp’s available microphone and aux channels in the Synchron Harp’s lower area.
Lower area - Play:
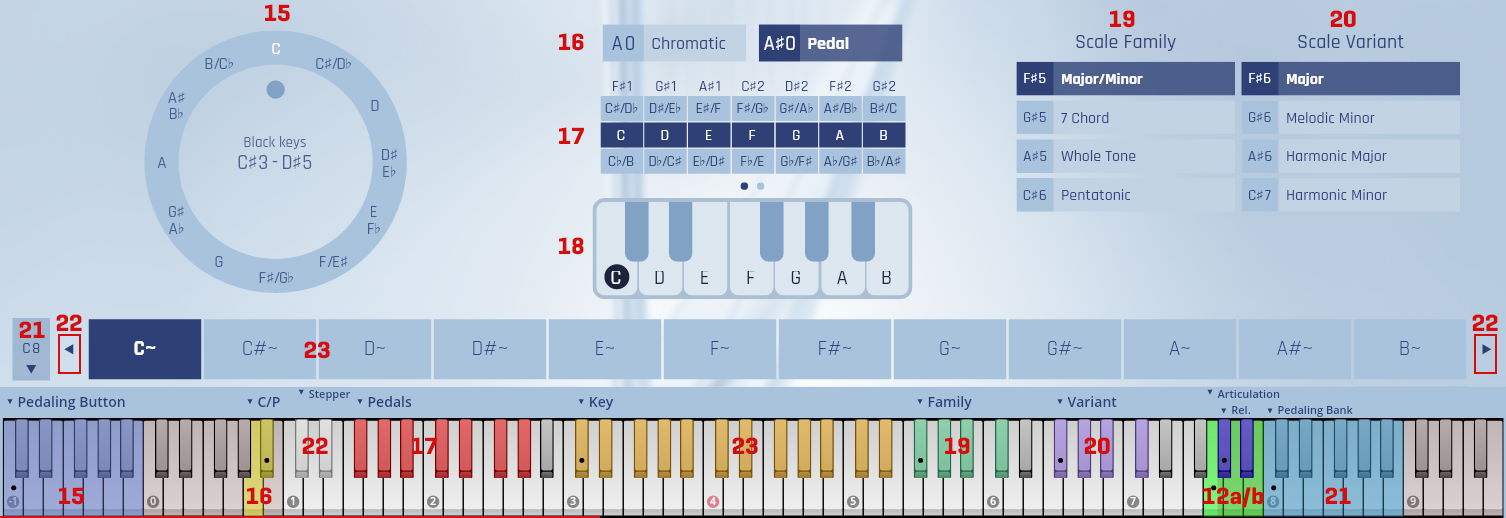
- Key selection: Select the base key you want to play in by clicking the respective entry, or striking the black keys from C#3–D#5 (default setting). The root note is also marked on the one-octave keyboard further right.
- Chromatic/Pedal: In Chromatic Mode, the harp can be used for melodic play just like a keyboard instrument. In Pedal Mode, its special glissando and arpeggio strengths take effect. Default keyswitches: A0/A#0.
- Pedal buttons / diagram: Strings playing the same note (in octaves) can be tuned up or down by a half tone, i.e., you can set all D’s to D sharp or D flat by clicking the respective field. Click the little dots below to switch between the note display and an advanced harp pedal diagram as used in harp notation.
Alternatively, you can use the black keys from F#1–G#2 (default) to make these settings – higher keystroke velocity tunes the note up, lower tunes it down, and medium velocity will reset it to its middle tuning. - One-octave keyboard: Shows the currently selected root note and the notes that will play on the keyboard. Click the keys to hear the samples of the middle octave.
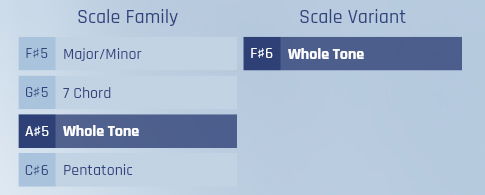
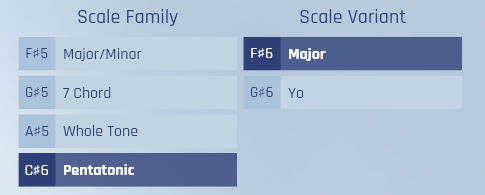
- Scale family: Select one of the four scale options: major/minor, 7-chord, whole tone, and pentatonic. Default keyswitches: F#5–C#6.
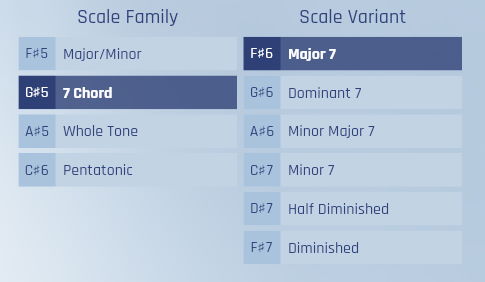
- Scale variant: Offers further scale options depending on the scale family selected as shown below. – Naturally, the whole tone scale does not allow for much variation. Default keyswitches: F#6–C#7.
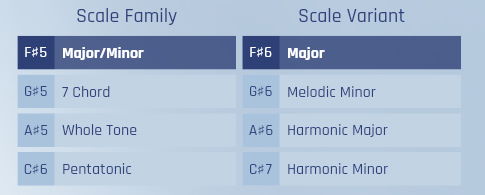
Major/minor scales: major, melodic minor, harmonic major, harmonic minor.
7-chord scales: major 7, dominant 7, minor major 7, minor 7, half diminished, diminished.
Whole tone scales: whole tone (no possible variants).
Pentatonic scales: major, yo (a scale that does not contain minor notes and is often used in Japanese music).
- Bank selector: Displays the keyswitch (or assigned controller) of the currently selected bank. To switch banks, click on the selector’s up/down arrows. Default keyswitches: C8–B8.
- Pedaling stepper: Clicking these two arrows to the right and left of the pedaling bank provides a quick way to step to the next or previous pedaling. Default keyswitches: C#1 down / D#1 up.
- Pedaling: The row of 12 buttons shows the selected bank with its different pedalings, which ideally will be arranged in the sequence they are required for a certain piece. Shift-click on a pedaling button to save the current pedal and scale setting to it. Right-click to access naming, color, and controls. If enabled in the settings, the changes made to a pedaling will be saved atuomatically when you switch to another pedaling or bank. In this case, saving is indicated by a color fade effect when you change to another button. Default keyswitches: C~–B~.
Info Bar

- Short mouse-over information: Gives a short description of the control element under the mouse pointer.
- Voices: The number of currently played voices on all active channels.
- RAM load / Overall loaded samples: Currently used RAM and sample count.
- Full screen / Preferences: Click on the double arrow button or press F11 / Cmd-Ctrl-F to toggle full screen mode. Clicking the wrench icon opens the Audio/MIDI Preferences window. The numbers next to this icon show the latency in samples, the current sample rate, and the CPU load in percent.

Controller overview
![]()
The controller overview opens when you click the fader symbol in the menu bar. It provides information about the controllers used to run the Synchron Harp, and allows you to assign them according to your preferences.
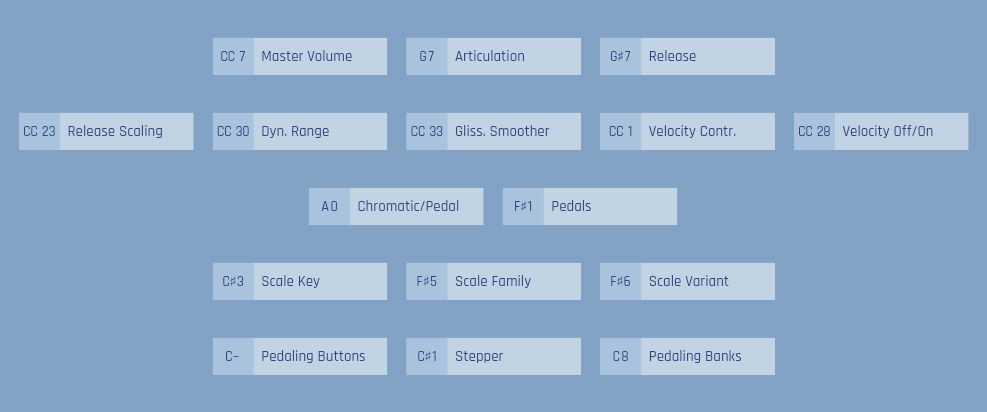
Click on a controller field to open its controller options. Continuous controllers like Master Volume have different options than "switching" controllers such as Articulation, which can also be assigned keyswitches or MIDI program changes. Click on this area to set controller type and number:
Controllers can also be assigned by right-clicking the respective item in the Play or Mix view.
Pedaling Banks
![]()
When you click the grid symbol in the menu bar, this window opens to display the pedaling structure of the currently loaded preset. Here you can organize your harp setup for different pieces and requirements. The image below shows the preconfigured "all scales banks" preset. The buttons can be edited just like in the pedaling bank of the main GUI.
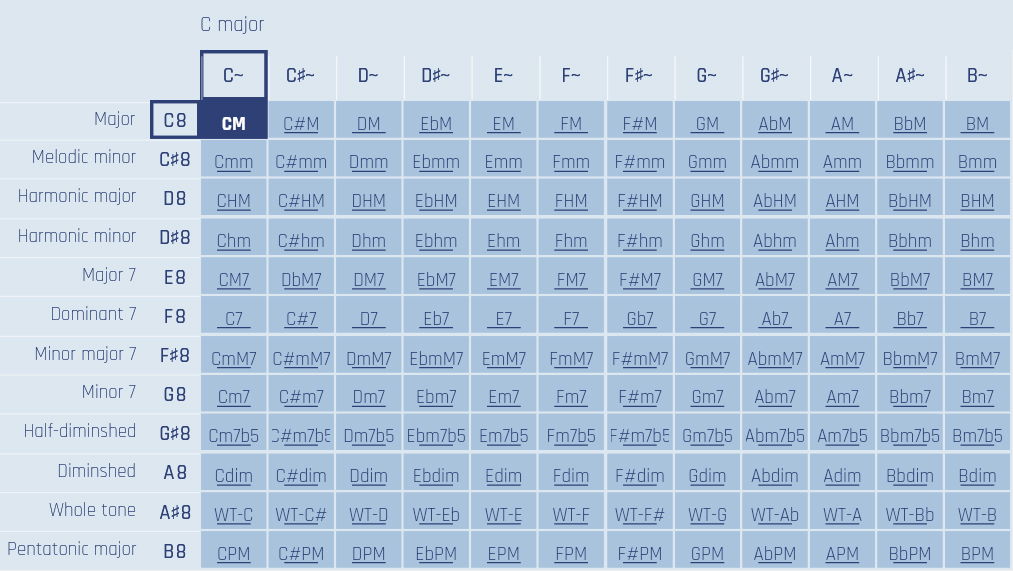
The caption above the selected button displays its long name, the button itself shows the abbreviated name. The horizontal lines of the array display the contents of the different banks, which are by default mapped to the keys from C~–B~. You can also change bank names (to the left of the array) by double-clicking on them.
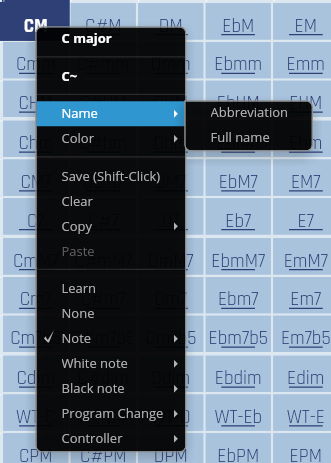
Right-clicking on a pedaling button opens its options menu, where you can change names and lettering colors, as well as assign controllers, clear the current button, and copy pedalings and banks. Pedalings can also be saved by shiftclicking.
Assigning another key or controller to a pedaling button will affect the entire matrix accordingly!
Empty pedaling buttons default to the C major scale.
MIX
The MIX tab hosts the Synchron Harp’s audio routing. There are dedicated audio channels for each microphoning position, which you can configure to suit your requirements.
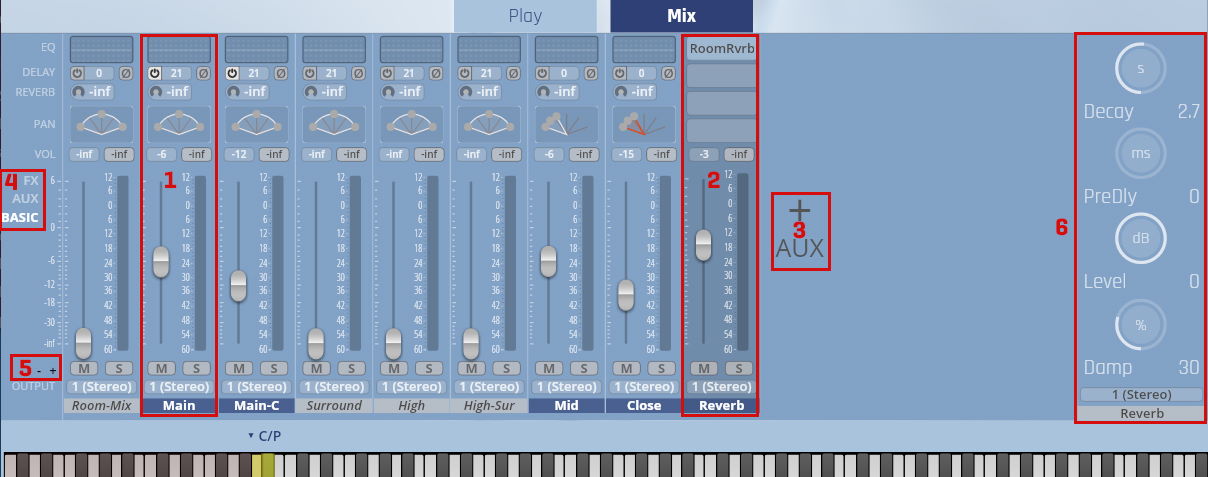
- Dedicated microphone channels.
- Aux channel.
- Add an aux return channel by clicking the "+" sign. You can define up to 4 return channels.
- BASIC / AUX / FX view switch.
- Add a return channel / remove the last return channel by clicking on the "–/+" signs, respectively.
- Algorithmic reverb settings.
As customary, the lower half of a channel shows the volume meter, mute and solo buttons, channel output and its name. In the upper half, you will find different parameters according to whether you’re in BASIC, AUX, or FX view.
Right-clicking on an audio channel opens its options menu.
Channel mappings are saved together with the preset they are linked to.
BASIC view
Basic view features the channels’ "daily use" parameters such as volume, EQ settings, etc.
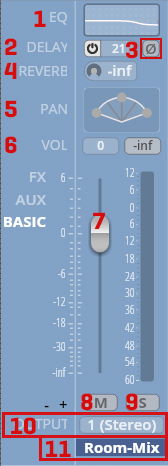
- EQ: A 5-band channel equalizer. On double-clicking, a window with all available settings will open. The power button is integrated in the channel view and becomes visible on mouse-over.
- Delay: Channel delay. Adjust these settings to add runtime to a channel, for impressive results in room perception. Values from 0 to 200 milliseconds.
- Phase: Here you can invert the channel phase – the phase icon turns orange when inverted.
- Reverb: Determines the amount of algorithmic reverb added to the signal.
- Pan: Channel panning can be set to balance or power panning. Doubleclick to edit parameters.
- Volume slider value / volume display: Click into the numerical field to enter values between -inf and +6 dB.
- Volume slider: Grab the handle to adjust, or double-click to enter value.
- Mute: Mutes the selected channel. Turns yellow when muted.
- Solo: Solos the selected channel. Turns red when in solo mode.
- Output: Output assignment. Click to choose from the available outputs.
- Channel name: This also functions as an on/off button. Click to activate/deactivate. Right-click to rename or assign a MIDI CC.
Parameters with numerical values can be edited either by click-dragging or double-clicking to enter the value, some (e.g., dB values) allow Shift-dragging for finer adjustment . Cmd/Ctrl-click to reset.
Channel EQ:
Double-click a channel’s Mixer EQ to open the EQ window. As usual, the parameters can be changed via click-drag or double-click to edit, shift-click-drag to fine-tune, and Cmd/Ctrl-click to reset.
By clicking on a free space in the EQ window, you can copy and paste the EQ’s settings.
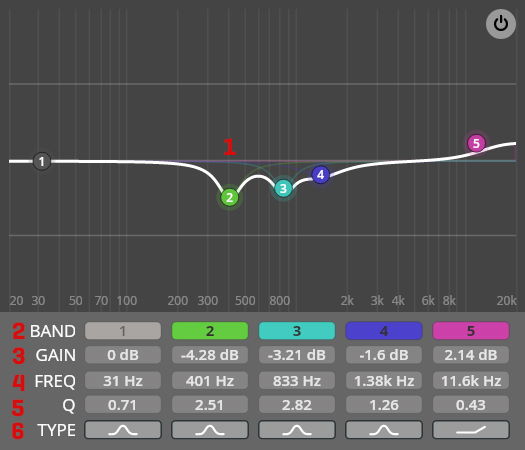
- EQ Node: Double-click the BAND nodes to activate the corresponding band, or right-click to change the filter type. Use your mousewheel to change the Q value, Alt-click to lock frequency, and Cmd/Ctrl-click to reset gain to zero.
- BAND: Activate/deactivate the filter band by clicking on the corresponding button.
- GAIN: Gain value of the selected node in the EQ display window.
- FREQ: Frequency of the selected node in the EQ display window.
- Q: Q value of the selected node in the EQ display window.
- TYPE: Click to choose from these available filter types: Peak, Low-Shelf, High-Shelf, High Cut, Low Cut, Bandpass, Notch.
Pan:
By right-clicking on a channel’s pan image, you can choose between balance panning and powerpan. Open the powerpan window by double-clicking on its icon.
Global Pan Law can be adjusted in Settings => Engine.
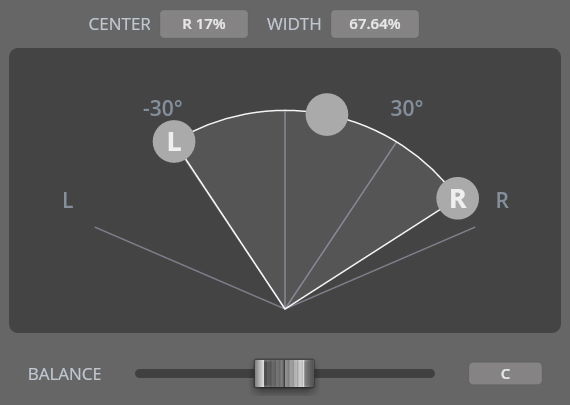
Balance panning allows values between 0 and 1, with 0.5 as center position. You can drag the panner, double-click to enter a numerical value, or Cmd/Ctrl-click to reset it to center position.
Power panning lets you define individual values for the signal width and center position. Naturally, the latter can only be changed if the signal width is less than 100%. Drag the handles to adjust width and center, or enter values in the respective fields.
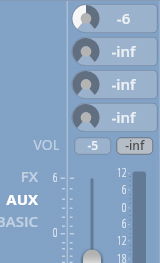
AUX View
By clicking on AUX, the upper half of the channel strip changes to display the 4 send channels hard-wired (so to speak) to the 4 aux returns. Their signal strength can be adjusted between -inf (mute) and 6 dB. As with other numerical values, click-drag or double-click to edit, and Cmd/Ctrl-click to reset. The 4 sends correspond with the up to 4 return channels. This means that if there is no Aux 4 defined, changing the value of Send 4 will have no effect.
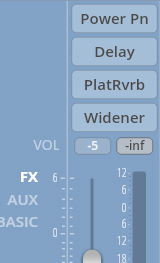
FX View
Likewise, when clicking FX the view changes to the 4 FX slots, which can be used to apply insert effects of your choice to the channel. Hovering over a slot gives you the options to switch it on or off and to select the effect you want. Moreover, you can move effects by dragging them to another position, or copy them by Alt-dragging.
Preset Browser
Clicking on the folder icon on the right side of the top bar toggles the browser display of your harp and mixer presets. Below the browser there is a display area with additional information.
Presets
As the name says, this is your gateway to selecting different Harp presets, and also to save your own in the dedicated User folder.
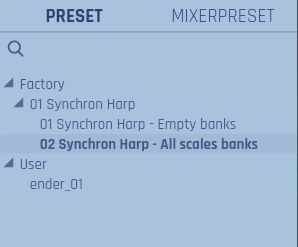
Right-clicking on a preset (including user presets) gives you the option to set it as default preset to be loaded on starting the player software or refresh the loaded instance.
If you hover over the User folder (or other subfolders), you will see the option to create new folders or to save the current preset (in the corresponding folder). Subfolders can also be deleted, and therefore will display a bin icon. Please note that Presets contained in a folder will also be deleted!
Right-clicking on a user preset provides other options apart from setting it as default preset or refresh the instance. In addition, you can delete, overwrite, or rename the preset. Moreover, there is the option to open an Explorer/Finder window of the User preset folder on your computer.
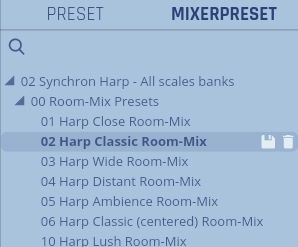
Mixer Presets
To shape the sound of your instruments, mixer presets are a good starting point, and can also give you ideas how to achieve where you would like to go. Click on the browser’s mixer preset tab.
As with your user presets, you can delete mixer presets or save the current settings under a new name. You will be warned if that name already exists. Since mixer presets are saved together with harp player presets, make sure that you save your custom preset whenever you’ve made changes to your mixer presets.
When you save a new mixer preset, the parent preset will be saved automatically.
Mixer preset folders:
There are dedicated folders for the mixer presets of Standard and Full library. Naturally, if you have the Full library, you can also use the stereo presets of the Standard library.
Standard: 00 Room-Mix Presets, 01 Decca Tree Multi Mic Presets, 11 Signature Presets Standard.
Full: 02 Surround to Stereo Downmix Presets, 03 Surround, 12 Signature Presets Full.
Apart from these, you will find a single ‘default’ preset which has all microphones active with neutral settings that can be used as a starting point for your own ideas.
When you exit the Synchron Harp, you will be asked whether you want to save the current state in a custom preset.

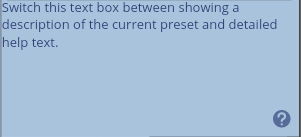
Info Area
Below the preset browser you will find an information display that shows more detailed mouseover texts or information regarding the currently loaded preset. To toggle between mouseover and preset information, click on the question mark button in the lower right corner of the area. The default setting is to show mouseover info.