Introduction
What is Vienna MIR Pro?
Vienna MIR Pro / MIR Pro 24 is an innovative, highly integrated software package for mixing, spatialization (distribution in space) and reverberation of virtual orchestral instruments. Vienna MIR Pro / MIR Pro 24 is meant to be used "stand-alone", much like you would use a mixing console in the analogue world. Vienna MIR Pro / MIR Pro 24 offers integrated sample players, advanced stage positioning possibilities, sample-based reverb (so-called impulse responses), and individually assignable signal processing.
Its main goal is a fast and intuitive, yet highly realistic approach to the realisation and mixdown of virtual orchestral music as well as any other kind of digital audio production.
Vienna MIR Pro / MIR Pro 24 's main components and core technologies are:
- a host and MIDI interface for Vienna Instruments (Vienna Ensemble Pro 5)
- unique instrument-conscious (signal dependent) directivity handling
- a mixing and spatialization tool for any kind of digital audio sources on detailed virtualizations of real halls and stages
- a host for 3rd-party VSTi's (virtual instruments adhering to the VST and / or AU standards)
- a host for VST / AU effect and signal processing plug-ins with full latency compensation
- a convolution-based reverberation tool, derived from world class orchestral venues
- an advanced multi-format mixing engine with instrument-specific, hand-tuned presets
- an inviting, hands-on graphical user interface
- LAN capabilities and direct DAW integration
- a built-to-the-task algorithmic reverb add-on for hybrid reverberation and sound design
Walkthrough Video
11 Easy steps to work with Vienna MIR Pro / MIR Pro 24
- Please make sure that your audio system, your Vienna Instruments (or any other virtual instruments), Vienna Ensemble Pro 5 and MIR Pro RoomPacks are installed properly; make sure that all dongles are in place and that all drivers are up-to-date.
- a) Open Vienna Ensemble Pro 5, create a new Project, and chose the appropriate speaker configuration (Stereo, 5.1 Surround ...)
b) Alternatively, select a previously saved Template Project (*.viframe32,*.viframe64).
If you haven't done so already, configure MIDI and audio connections according to your needs. Make sure the VE Pro / MIR Pro engine is started. - Select MIR Pro / MIR Pro 24's Main View by clicking the Vienna MIR tab.
- Select the MIR Venue of your choice, then the preferred Microphone Position within the Venue and load it.
- Choose the Main Microphone's Output Format or create your own (unless you have loaded an existing Project and want to use its Output Format).
- Activate the "Auto add Vienna MIR" option from the "Channel"-pull-down in VE Pro's Main Menu, or just click the respective icon. – This will instantiate the MIR Pro / MIR Pro 24 Connector plug-in in any newly created channel.
- a) Add a Vienna Instruments (Pro) channel – select the proper Instrument Profile, load the samples of choice, connect MIDI port and channel and apply name.
b) Alternatively add a 3rd-party virtual instrument channel – select a General Purpose Instrument Profile, load the samples or patches of choice, connect MIDI port and channel and apply name. c) Alternatively add an Audio Input channel – select a General Purpose Instrument Profile, connect it to the the physical audio inputs of VE Pro and apply name. - Drag the instrument's (or audio channel's) Icon to the desired position on the stage of the selected Venue and adjust its direction, as well as volume and stereo width (if the default values don't fit).
- Press Play on your MIDI Sequencer, or play some notes on your MIDI keyboard. Adjust any parameters of the Icon in real-time, or use the sliders in Instrument Channel View. Choose appropriate Instrument Character Presets from the pull-down, and/or add audio processing plug-ins in VE Pro's Main Mixer.
- Repeat steps 6 to 8 to set up your orchestra.
- Adjust the Master Bus's output volume in VE Pro's Main Mixer.
- ... hear your virtual orchestra play in full depth and glory!
– And don't forget to save your Project.
Main GUI Components
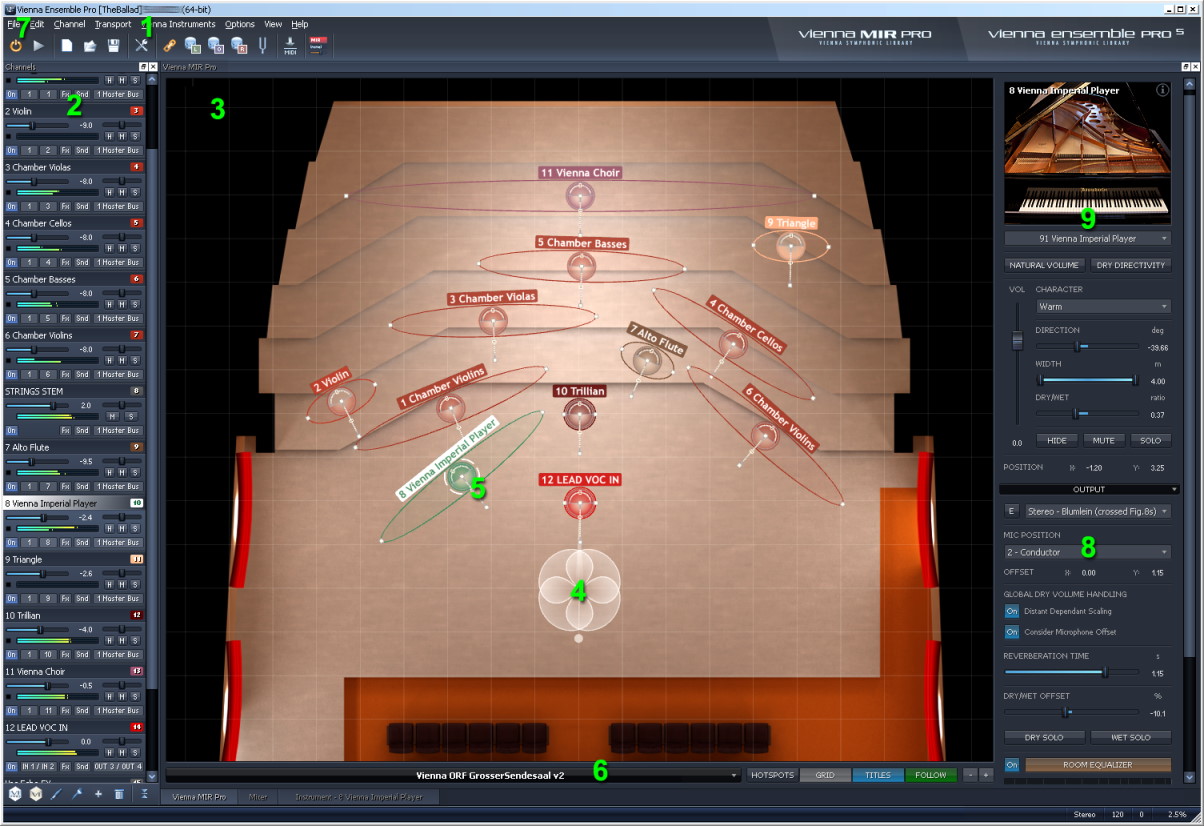
- Main Menu
- Channels List Panel
- Venue View (Main Window)
- Microphone Position Indicator
- MIR Instrument Control Icon
- Venue Selection
- Engine Start Button
- Channel Strip Panel: Output Channel
- Channel Strip Panel: Instrument Channel
- Venue View Controls