Starting a project
When starting a fresh MIR project, you will first see the so-called “Default Venue”, which is just there because it looks better than an empty screen. It consists of a single impulse position of the Vienna Konzerthaus’s Grosser Saal (i.e., “Great Hall”) and isn’t meant to be used for any serious work. :-)
If the path to your RoomPacks is defined properly (which it should be after installing them with the Vienna Assistant), you can now select a Venue from the installed RoomPacks. If not, please open MIR Pro 3D’s Preferences and make sure that the path to your RoomPacks is set correctly.
Note
MIR Pro 3D relies on a massive amount of convolution processes, which is why the engine has its own latency settings to optimize CPU load. As a rule of thumb, more latency means less CPU load, but there are two numbers to be taken into account here, namely the host buffer size (as reported by your audio system drivers) and latency setting.
Venue Selection
Once your MIR Pro 3D instance is raised, you can select an appropriate Venue for your project. Clicking the Venue Selection bar under the Venue view will open the Venue Selection dialog.

- Venue list (click tabs for sort order). First you will have to decide which Venue will fit your needs. You may sort the list of Venues displayed by location, average reverb time or room type.
- Venue Presets. In the field below the Venue list, you can see whether a Venue Preset exists for the Venue selected in the browser – these not only facilitate setting up an orchestra, but also guarantee an easy transfer from one Venue to another.
- Floor plan with microphone locations. The image in the middle shows the selected Venue’s floor plan with its original microphone positions. You can grab the image with the mouse and rotate it to get different viewing angles.
- Main Microphone selection. With the chosen Venue, you have the choice from up to four Main Microphone positions, of which a typical one is selected by default. Pick the one that seems to be appropriate, but don’t worry too much: You can change to a different microphone position on the fly later on.
- Some general Venue data – where the original venue is, which of its rooms you’re just looking at, its Ambisonics order in MIR Pro 3D, length of impuls responses, and reverb time.
- Venue description + photos. A little slideshow and some words on the architectural and historical background of the selected Venue are always available to make the decision easier.
It is possible to change Venues even in an existing arrangement. Depending on the layout and size of the available HotSpot area, some instruments may not play without either manual repositioning or applying the new Venue Preset. Of course, the overall sound might change considerably.
Once you’ve defined the basic settings of your project, it would be a good idea to save it under a meaningful name.
Venue Navigation
To move around in your Venue, just grab it anywhere with the mouse and drag it until you like what you see. Turning the mouse wheel scales the Venue view up or down, and with Ctrl/Cmd-grabbing you can rotate the view in all directions as far as the graphic representation allows.
HotSpots
Not all areas in a room are possible positions for an instrument or other signal source. As soon as you grab a MIR Instrument icon with the cursor, you will see certain parts of the room highlighted in a warm yellowish tone. These are so-called HotSpots, showing all valid areas for an instrument’s position in a certain room. In a hall, this is of course the stage, but most of the time there’s some more eccentric places, too, like balconies or selected spots within the auditory. If you prefer to see those valid areas all the time, simply switch on the dedicated “HotSpots” button in the Venue Map Controls at the bottom.
If you try to put an Icon into a spot outside the valid areas, it will be muted. (You can employ this behavior as a kind of “parking lot" for instruments that haven’t found their place yet.) Especially after changing the Venue for an existing setup, Icons may suddenly reside outside the valid HotSpot areas. While this won’t do any harm, it is advisable to pull those Icons back onto the stage or other valid areas; otherwise, the auditory results will be unpredictable since Instruments outside the valid areas remain muted. If you already took the trouble to assign Roles to your signal sources, transferring them to another Venue will become much easier.
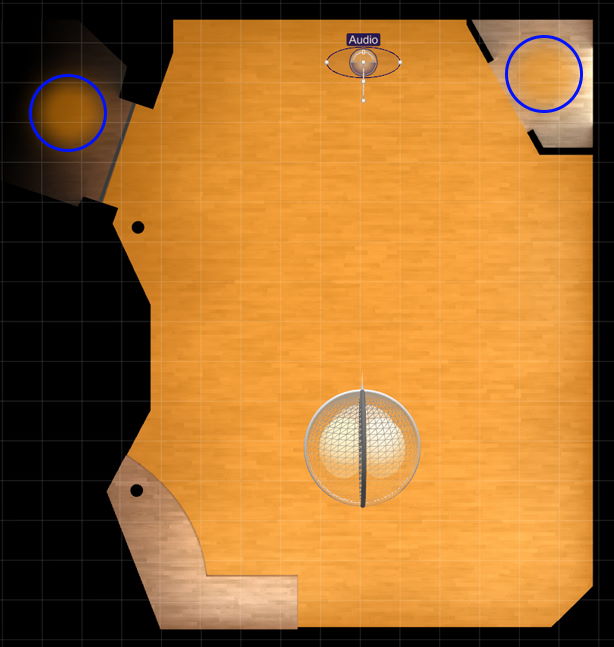
Icons can be positioned freely on the Venue’s main stage area. Depending on the chosen Venue, there may be several off-stage HotSpots available, too. The image above shows the main recording area and the two additional HotSpots of Studio Weiler’s Live Room. Any Icon placed outside the HotSpot areas will be muted.
Output Format Selection
It is important to understand (we even risk repeating ourselves for this) that MIR Pro 3D’s impulse responses are recorded in a meta format called Ambisonics, which allows for decoding of a recorded signal to literally any possible delivery format. In its most basic form, this encompasses the number of “virtual microphones”, their polar patterns, the direction they are oriented towards, as well as their individual volumes. In other words: we can use the microphones of our choice even after recording has taken place.
This gives us the unique possibility to arrange individual playback setups depending on the size and form of a hall, the type of arrangement, and the desired output format (stereo, quadro, surround, ...).
The treatment of input signals in MIR Pro 3D’s Venues should match the treatment of the decoded impulse responses exactly; therefore, every signal source on a MIR stage is encoded to Ambisonics, too. Consequently, the choice of a proper Main Microphone setup is as crucial as it would be in the case of a recording session with an orchestra in a real hall.
The Main and Secondary Microphone’s Output Format can be selected on the fly from the pull-down in MIR Pro 3D’s Output Panel. We supply a number of presets with the most typical setups. As the changes are applied close to real-time (depending on the number of instruments already positioned on the stage, it might also take a few seconds – please mind the indicator in the lower right corner of the Venue Map), just try which of them best fits your needs.
Using the mouse, the Microphone icon can be dragged to different positions on the stage.
Important
These changes affect only the dry signal components, not the decoding of impulse responses! The feature is mostly used for centering and/or widening the acoustic imaging of an orchestra on the stage. The sonic result achieved also depends on the setting for “Consider Mic Offset” in each Icon’s Dry Signal Handling panel, which should be switched “On” under normal circumstances.