Instrument Settings
At the top right of the Venue view, you will find the detailed instrument settings, which are subdivided into four sections. The last of these, with basic channel parameters, is always visible, while the others can be folded for more convenient handling.
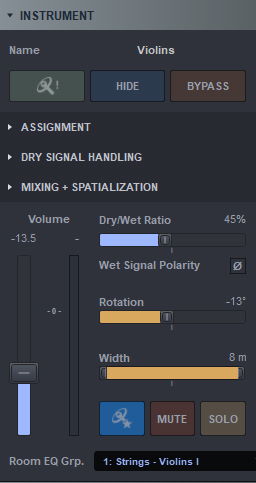
The instrument panel’s first items are its Name and the green “Find Icon on Venue’s Stage!” button which focusses on the Instrument in the Venue view, followed by – in correspondence with the channel parameters (see above) – Hide and Bypass. Further down you will find the Volume slider as well as the Mute and Solo buttons.
Dry/Wet determines the ratio of dry and wet signals for the channel. When MIR Pro 3D is in “Classic Mode” and “Distance Dependent Scaling” of the dry signal is On, the default value at the center position should roughly match the signal’s natural sonic impression in that Venue. You can change the Wet Signal Polarity by clicking on the polarity button Ø, which might come in handy on certain occasions, e.g., if you want to shape the texture of combined wet signals in ensembles.
Important
“100% wet” is NOT the sound you would hear in the Venue, as all impulse responses used in MIR Pro 3D had their initial direct signal removed in order to avoid ugly phasing artifacts. In other words: MIR Pro 3D expects some dry signal component mixed in to sound “natural”!
Rotation allows you to change the instrument’s direction in the Z axis – i.e., you can let the player (or an entire ensemble) turn around on the stage, which will of course influence the sound of the instrument. For fine-tuning, use the more detailed placement and rotation parameters in the “Mixing + Spatialization” section (see below).
Width controls another important sound factor. A 14-player violin ensemble takes up several meters on the stage, a piccolo flute less than its player, which also results in a narrower signal that is easier to pinpoint.
Important
The left and right handles of the ellipse defining the width of the MIR Icon on stage are the ones which will trigger the positional impulse responses!
On the left side of the mute and solo buttons, there is the Natural Volume button for Vienna Instruments, which is blue in its active state. Clicking it will set the channel volume to the (Vienna) instrument’s natural volume according to the Instrument Profile assigned. If you change the volume again, the button will turn dark.
Warning
Depending on your channel group assignments and settings, setting an instrument to Natural Volume will change the volumes of other instruments in the group accordingly, i.e., relative to the selected instrument’s natural volume! If you want to know more, check out the Natural Volume Overview in this manual!
Room EQ Group: this lets you quickly assign one of 32 (33 counting the default setting) different settings for the RoomEQ in each chosen Venue to the instrument, and corresponds with the Output section’s Room Equalizers.
Assignment
This section controls the more physical aspects of the instrument.
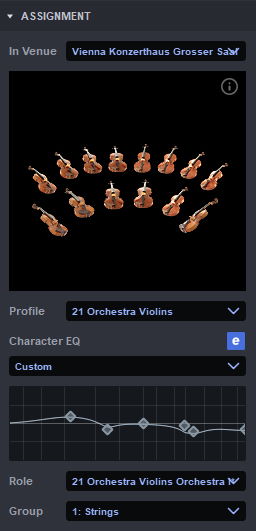
In Venue tells you in which of your open locations the instrument plays. Here you can also reassign it to another Venue in your project.
Instrument Profiles
One of MIR Pro 3D’s outstanding features is the concept of Instrument Profiles. MIR Pro 3D’s impulse responses are not only taken from a multitude of sources and Main Microphone positions. It handles directionality (i.e., “room”) both from the listener’s (microphone) and the signal source’s (instrument) perspective.
Note
Assigning a profile to a channel sets it to appropriate values, thus facilitating the setup of an instrument without having to think about things like how wide the 1st violin section on the stage might be, or what the natural volume of a piccolo flute is. If you want to know more about the workings behind this, you might look up the section Think MIR! in the legacy MIR Pro user manual.
To achieve this, we implemented detailed, individual Instrument Directivity Profiles for almost every Vienna Instrument, resulting in an enormous database of spatial frequency profiles for all kinds of instruments and other sources. Taking into account these directivity-dependent changes in sound, MIR Pro 3D is supplied with a direction-dependent acoustic fingerprint. Instrument Directivity Profiles are not directly visible to the user, but selected from a list in accordance with the required Vienna Instrument’s samples. Besides, there is a number of general purpose Instrument Profiles relating to different microphone setups for use with any source MIR Pro 3D is able to process.
Instrument Profiles also contain data about an instrument’s natural volume, the stereo width inherent in the original recording, instrument and/or ensemble size, natural timbres and possible changes to them, as well as typical playing techniques and ways of sound production. In combination with all these aspects saved in an Instrument Profile, the directivity patterns greatly enhance the possibilities of MIR, and thus the realistic impression of a virtual orchestral performance.
Important
All Instrument Profiles were carefully crafted for Vienna Instruments! They contain very specific settings that may wreak havoc on other signals. For any third-party source it is highly advisable to select a fitting “General Purpose” Profile.
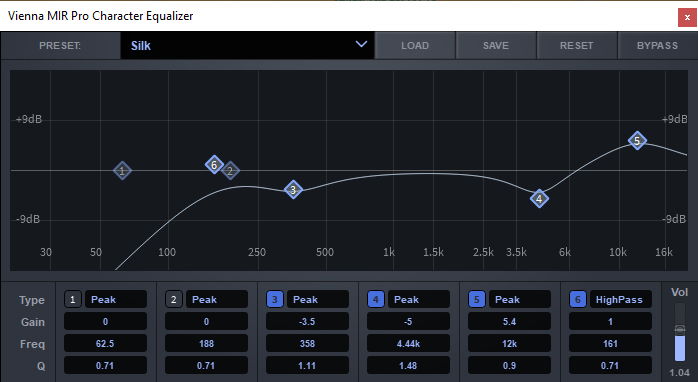
Character EQ
Applying one of the integrated Character EQ Presets is a seemingly simple but highly efficient way to shape an Instrument’s timbre or “character”.
Individual Character EQs are available for most Vienna Instruments (with the exception of a few less commonly used percussions). Usually there will be at least five “colors” to choose from by clicking on the pull-down menu bar. In addition, depending on the instrument there may be one or several special settings.
In cases where there are no customized settings for an instrument, or if a General Purpose profile is employed, more generalized presets are used. These presets are marked with an asterisk (*) after their name.
To edit an EQ, you can grab the handles in the small EQ display. For more detailed work, double-click the display or click the “e” button next to the EQ description to open the detailed Character Equalizer window, where you can also load and save Character EQ presets as .mircheq files.
Role Presets
Instrument Roles are an important feature introduced with MIR Pro 3D, a powerful, user-editable, and much more versatile successor of the former MIRx settings.
Note
MIR 3D treats every setup from two perspectives – the instruments’ and the listener’s, or more generally spoken: The signal source and the surrounding room.
Consequently, we need presets to handle the settings for the Venue (hence the name Venue Preset), and another preset layer for the sources we want to put in there. This is why the concept of “Roles” was introduced.
Why “Roles”? Imagine an instrument like a solo violin. You could decide to use your favorite Instrument for a solo part in Venue Preset A1 in Venue A. The same instrument could be used as “1st chair” in Venue Preset A2 in Venue A, or as second violin in Venue Preset B1 in Venue B. In other words: Same source, different task. The term “Function” for Roles would have worked, too, but it sounded a bit awkward to us.
The great thing is: As soon as you (or someone else) have created the Venue Presets A1, A2, B1 mentioned above, your favorite violin sample will immediately find its proper settings when you switch Venue Presets. Now imagine this happening for a whole Orchestra ...
Of course, all of the above will work with 3rd-party virtual instruments, real recordings, actually anything you throw at it – provided it yields an audio signal.
Using the Preset Management, you can create and save, or assign a general Venue Preset to your currently active Venue, and then furnish your instruments with a Role within that Venue. This is not mandatory – not every instrument has to have a Role. Of course, there are factory presets for Vienna Instruments – some even with several Roles for use as solo instruments or part of the orchestra. Click on the Role field to open Preset Management, which can also be opened by pressing F7 or clicking the theatre icon in the menu bar.
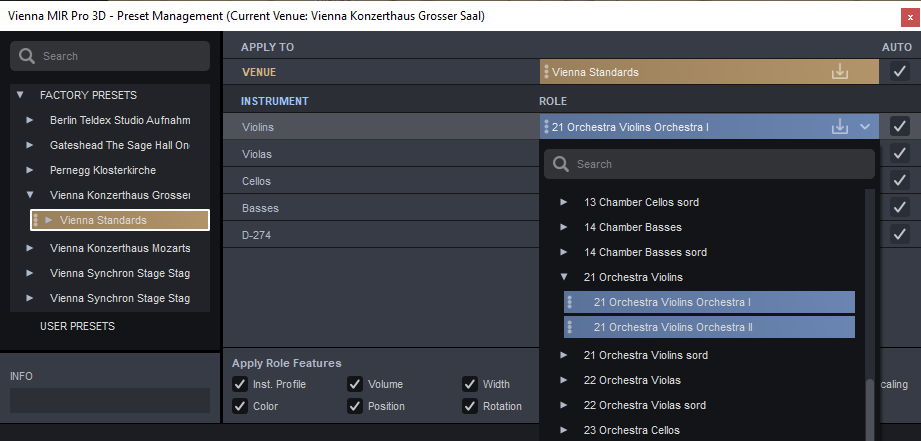
In the box on the bottom, you can check which channel parameters will be influenced by assigning Role Presets. If you made changes to a Venue’s layout to adapt them to your requirements, or created an entirely new setting from scratch, you can save a new Venue Preset with the Roles it contains by clicking on the disk icon. If you make changes to an assigned Instrument in the Venue, an asterisk will appear next to its name.
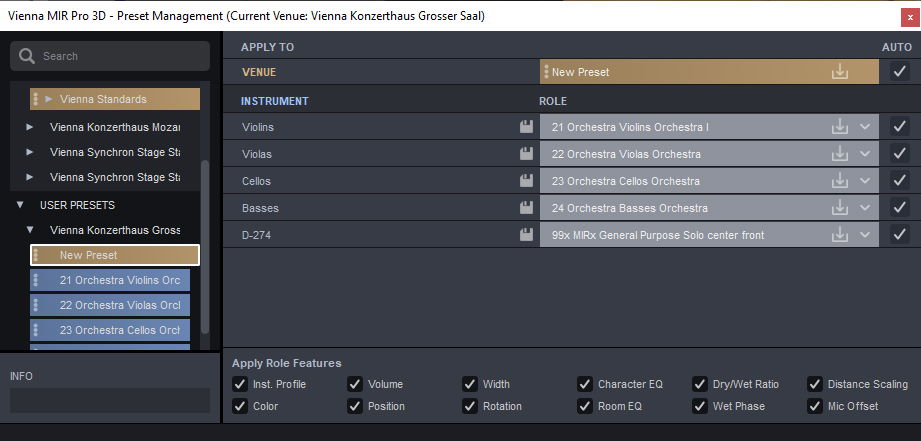
If you hover with the mouse over the User Presets caption in the Preset list, it will display buttons for saving the current Preset and for creating a new folder, or you can discard the current entry including its substructure. When you’ve saved a Venue Preset, its Roles are displayed in grey, and a disk icon appears next to them. The Roles can be saved individually, and once saved, the role name fields turn blue again. The current state of all instruments can also be saved by clicking the save icon next to the Preset name in the User Presets. If you grab a User Preset on the left side of its Name (the three buttons will light up when you’re in the right area), you can move it to another location in the structure.
By checking the Auto box of a Venue or instrument, you can make sure that these settings are applied automatically when an instrument is moved to another Venue.
Important
If you grab a Venue Preset from the Preset Browser and drag it onto your desktop, a .mirpreset file will be created which you can exchange between computers or with other MIR Pro 3D users. Drag the file back into your User Presets wherever you want to use it.
Group
Here you can create groups and assign them to instruments, which will then be influenced together by changes made to one of a group’s instruments according to your preferences. See Channel List – Group settings.
Dry Signal Handling
The parameters in this section are all on/off items and determine processing conditions of the incoming dry signal only.
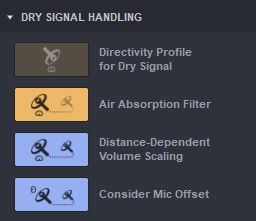
Directivity Profile: enables / disables the Directivity Profile for the dry signal. By default, MIR handles direct signals as if they were always recorded with a perfectly positioned spot microphone that rotates together with the instrument. This option keeps the spot microphone in a fixed location when the Instrument Icon is rotated, so that the musician turns away from the microphone.
Under normal circumstances, the Directivity Profile controls only the way a source interacts with the room. This option will use the same Profile for the dry signal, too. If enabled, the instrument’s changes in timbre in connection with directivity are taken into account for the dry signal, so that a trumpet facing away from the listener will not only have less volume, but also sound differently – an effect that may enhance the illusion of spatialization in some cases but should usually remain deactivated.
Air absorption Filter and Distance-Dependent Volume Scaling do exactly what the captions say, i.e., they take into account the influence of air absorption and distance on the instrument with regard to the dry signal component. With Volume Scaling, you can also check the option to Consider Microphone Offset.
The option can be switched off when the volume balance of instruments is not supposed to follow the strictly “natural” behavior of sound. This might be useful for typical pop/rock mixes with a more traditional approch to “adding reverb”. Consequently, Distance Dependent Scaling is switched off for all (!) Instances in a Venue when global Dry/Wet Handling is set to “POP”.
Mixing + Spatialization
Here you can adjust the instrument with regard to its position and rotation in the Venue.
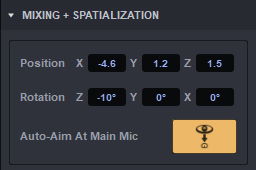
- Position: X determines the lateral position, Y the longitudinal one (i.e., front to back) measured from the Main Microphone. Z sets the height from the floor of the Venue. Please note that the Z distance is relative to the floor surface in the Venue’s recordable area, so if you place an instrument at 1.5 m height on the stage and then move it to the balcony, it will still be at 1.5 m, only from the balcony.
- Rotation: rotation on the Z axis changes the Instrument’s angle horizontally, on the Y axis sideways, and on the X axis it would do somersaults if the rotation was not limited to +/- 180 degrees.
- Auto-Aim: if activated, the Instrument will automatically change direction to align with the position of the Main Microphone. This option will come in handy when you want your Instruments always to point towards the Main Microphone. This might seem a natural way to position individual Icons – sometimes however, apparently “wrong” directions (e.g., towards the rear of a hall or its ceiling) may lead to great-sounding, useful results. When you deactivate Auto-Aim again, the instrument will revert to its last setting.