Slot Rack
The Slot Rack is a container for Patches. It always displays the contents of the selected Matrix Cell and is divided into 8 slot rows (1-8) that are in turn split into an "a" and "b" section. The whole section below the Slot Rack (Slot Editor and Humanize Area) offers many options to influence the behavior and interaction of these slots. The selected slot is always highlighted!
When you are dragging a Patch from the Patch Browser onto a Matrix Cell, each slot will display a number (1-0, A-F). If you press a number or letter on your computer keyboard while you drop the Patch onto the Matrix Cell, the corresponding slot will be loaded. Of course you can also drag Patches directly onto each slot.
8 Slot rows only become visible when dragging patches onto the Slot Rack.
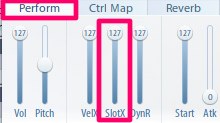
Cross Reference: One essential controller for the Slot Rack is the Slot Xfade Controller that can be found in the "Perform" tab of the Advanced View:
- Slot:
- Load slot by dragging & dropping a patch from browser.
- Unload slot by clicking and holding slot while pressing
DelorBackspace - Set current slot by clicking.
- Slot Xfade:
- Loading both (a) and (b) slots will reveal the xfade button.
- When active, slots can cross-fade into each other using the "Perform Slot Xfade" controller.
- When inactive, the "Perform Slot Xfade" controller adjusts the level of (b) slots.
Patch Link (Link by patch name): Activating the Patch Link will link editing of all slot parameters with the identical patch name. Similarly, replacing a patch when "Patch Link" is activated, will replace the patch in all occurences throughout the instrument.
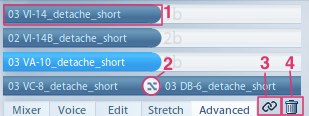
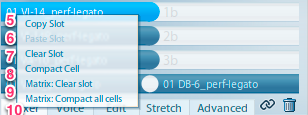
Trash-can: Clears selected slot.
Copy Slot: Copies selected slot to clipboard.
Paste Slot: Pastes selected slot from clipboard, replacing current values.
Clear Slot: Clears selected slot.
Compact Cell: Gets rid of unwanted spaces between slots, moving patches closer.
Matrix: Clear Slot: Clears selected slot in all cells of a matrix.
Matrix Compact all cells: Gets rid of unwanted spaces between slots in all cells of a matrix.
Slot Editor – Mixer
The level and panning of each Slot can be controlled with this convenient mixer:
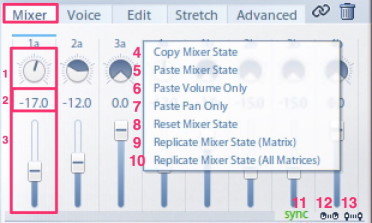
- Pan Control:
- Click-drag to adjust value.
- Hold down
Ctrland drag to adjust left channel. - Hold down
Altand drag to adjust right channel. - Double-click resets to default value (max width).
- Volume Edit:
- Click to edit.
- Enter confirms value input.
- Volume Slider:
- Drag to set value.
- Double-click to set default value.
- Mouse wheel to set value.
- Hold down shift modifier key for precise movement.
Copy mixer state: Copies the mixer state to clipboard.
Paste mixer state: Pastes the mixer state from clipboard, replacing current values
Paste volume only: Pastes volume settings from copied mixer state.
Paste pan only: Pastes pan settings from copied mixer state.
Reset mixer state: Resets the slot mixer to default settings.
Replicate Mixer State (Matrix): Apply mixer settings to all loaded slots of the selected matrix
Replicate Mixer State (All Matrices): Apply mixer settings to all loaded slots of all loaded matrices of an instance
Slot Mixer Sync:
- Shows the chosen Synchronization in Mixer Sync / Options Tab.
- No sync: Mixer only affects the selected cell
- Sync (green): The slot mixer for all cells in the Vienna Instruments instance is globally synchronized.
- Sync (orange): The slot mixer for all cells in a matrix is synchronized.
Link Volume: Link the volume of a and b slots of the selected cell, activated by default
Link Panning: Link the panning of a and b slots of the selected cell, activated by default
Slot Editor – Voice
Auto Voicing is a new way to distribute the voices of a chord to different Slots in the Slot Rack. Great for short articulations and chords with ensembles:
Important
Auto Voicing is not designed to work with Legato Patches, as each overlapping note (even if is just 1 ms overlap) is interpreted as a new voice.
The 8 Slot Rows are on the left-hand side and you can assign up to 8 voices of a chord to these slot rows. In this example, the first two notes would trigger Slot Row 1, the 3rd and 4th note would trigger Slot Row 2 and so forth...Of course only if Auto Voicing is activated!
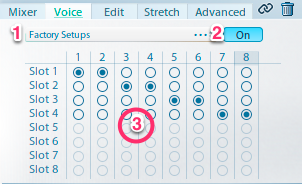
Factory setup: Loads one of the default auto voicings.
On/Off: Enables/disables auto voicing.
Slot Area Setup: Clicking a number or click-dragging resizes the auto voice matrix.
Each subsequent voice can be routed to any of the 4 slots.
Slot Editor – Edit
As the name implies, the Slot Editor influences only the selected slot. Transposing the loaded patch in octaves or half-tone steps will be displayed on the keyboard.
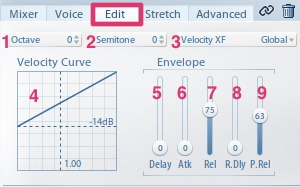
Octave: Sets slot octave offset.
Transpose (Semitone): Sets slot transposition in semitones.
Velocity XF:
- N/A – If no patch in a slot is selected, or patch does not contain velocity xfade mapping.
- Global – Slot follows setting of [Perform > VelocityXFade].
- On – Forces slot to Vel XFade enabled.
- Off – Forces slot to Vel XFade disabled.
- Velocity Curve:
- Velocity floor handle.
- Curve shape handle.
- Clicking and dragging in middle of control adjusts floor and curve simultaneously.
- Ctrl-click anywhere on curve to reset floor and curve to patch default.
- Delay:
- Click-drag to set value.
- Delays the played notes of the selected patch.
- Attack:
- Click-drag to set value.
- Influences the attack of the patch (fade in).
- Release:
- Click-drag to set value.
- Reduces or extends the release time of the patch.
- Release Delay:
- Click-drag to set value.
- Adds a delay after letting go of the note (note-off).
- Overlap:
- Click-drag to set value.
- Sets legato note overlap time between two notes when playing intervals.
Slot Editor – Stretch
The new Enveloped Time-Stretching expands the possibilities of the File Browser Stretching that was available in Vienna Instruments Pro Version 1. Now you can control the envelope for 3 advanced stretching algorithms that will multiply your articulations!
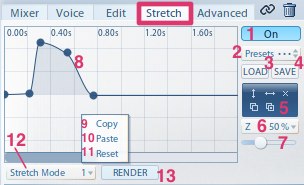
On/Off: Activates stretching for this slot.
Presets:
- Click to display saved presets.
- No factory presets available.
Load: Loads a stretch preset file from disk.
Save: Saves current stretch settings to disk.
Toolbox:
- Inverse Curve
- Reverse Curve
- Reset Curve
- Copy Curve
- Paste Curve
Zoom level: Sets vertical zoom level (10-25-50).
Zoom slider: Zooms stretch graph horizontally
Stretch Curve:
- Double-click to add stretch point
- Click and drag point to adjust its setting
- Click and drag outside of point to create a multi-selection rubberband
- Click and Alt-drag between selected points to "stretch" the graph horizontally
- Click and Shift-drag between selected points to stretch the graph vertically
- Control-Click (OS X: Cmd-Click) on selected point(s) to delete.
- Use mousewheel to zoom stretch area horizontally.
- Use scrollbar to adjust the range/view of the stretch curve.
Copy: Copies stretch envelope to clipboard.
Paste: Pastes stretch envelope, replacing current.
Reset: Resets stretch envelope.
Stretch Mode: Sets the stretching algorithm used. Algorithm 1 is best for strings, while algorithm 2 and 3 usually sounds better for winds and percussion.
Render: The Render button will be activated (and blinking) whenever the patch needs to be re-rendered. Pressing the Render button will apply the current stretch graph and settings to the slot.
Slot Editor – Advanced
The Advanced Settings of each slot are a good way to create new versions of patches – which results in more natural variations. The intricacies of this section are best explained in our Video Tutorials.

- Patch information:
- Patch name
- Wave count. Actually shows sample regions, and thus may show more than actual samples, since some samples are mapped twice, e.g., release samples.
- Velocity layers.
- Release samples (not necessary with some articulations such as staccatos).
- AB switch: Decides between contrary movements like crescendos/diminuendos or runs upwards/runs downwards. With select patches only.
Start Offset Mode: Defines which samples should be affected by "Start Offset" setting. (All, First, Repetitions, Legatos, Repetition+Legato samples).
Start Offset: Sets sample start offset in ms. Any value above 0 ms will also enable the "Start Offset Attack" setting.
Start Offset Attack:
- Applies a volume smoothing to Start Offset, to get rid of clicks.
- Only available when Start Offset activated.
AB Mode: Forces AB setting for this slot to the specified setting. The Global setting will make slot follow the main AB controller setup.
Repetition threshold: Time from note-off to retrigger starting note.
Interval Mode:
- Sets the interval mode to be used for this patch. "Global" means that the interval mode set in "Options" will be applied, will take whatever patch was mapped to use.
- This setting will show "N/A" for patches that don't incorporate any legato mappings.
- Interval threshold: Sets the interval detection time limit. Releasing a key, then pressing another one within this time limit, will give an interval transition.
- Poly Chord Threshold:
- Chord detection threshold time for polyphonic legato/intervals.
- All notes that are triggered after the set threshold will be triggered as interval samples.
Release sample limit: Limits the number of simultaneous release samples for each separate key to the set value. Mostly useful for patches with long releases, such as the Vienna Konzerthaus Organ.
Release mode: Enables forcing release mode for this slot to On or Off. The Global setting will make the slot follow the setting in the Perform tab.
Repetition Control
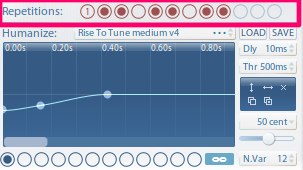
Repetition Control lets you decide which notes of a Repetition Performance you'd like to hear, and which ones you'd like to skip. Available repetitions will appear as red buttons, disabled repetitions will appear as greyed-out buttons. Alt-click on the first repetition button will disable 2nd Cycle Mode, which makes repetitions cycle from the second sample onwards.
As all short notes in our Vienna Instruments Collections offer at least 2 variations, you can also choose which variations you like better with these Patches.