MIRx Mode
What it is
MIRx Mode is a dedicated function layer inside Vienna MIR Pro for the handling of prefabricated, Venue-dependent settings previously only available as a separate product, extending Vienna Instruments Pro. It gives access to more than 1,700 tailor-made presets for Vienna Instruments samples and dozens of general purpose settings for other signal sources. When used in MIR Pro as part of Vienna Ensemble Pro, the most necessary steps of setting up a virtual orchestra or ensemble are carried out automatically (more manual interaction will be needed when working with the MIR Pro plug-in version). On top of it, all instantiated MIR Pro Icons will find their proper positions almost "magically" when switching between MIRx-enabled Venues.
MIRx settings are just that: Tailor-made settings for MIR Pro Icons, carefully adapted for certain MIR Pro Venues. You can invoke and / or modify them whenever you need them, so your individual solution is always just a few mouse-clicks away. Nothing is carved in stone, but MIRx Mode and the presets it supplies will get you started faster than ever.
Note
MIRx Mode is not a different product, but a new feature set of MIR Pro, available for all its existing and prospective users, without additional charge.
How to get hold of it
To gain access to MIRx mode and its presets, make sure to install the latest version of MIR Pro. If you're planning to use MIR Pro inside Vienna Ensemble Pro, please make sure to install the latest version of this application as well.
Important
Please note: MIRx Presets depend on properly installed RoomPacks with valid Venue licenses on your Vienna Key/eLicenser!
How to use MIRx Mode
- Open an existing MIR Pro project or create a new one
- Activate MIRx Mode (press Shift-x or click the respective button in the top bar of the MIR PRO user interface)

- Select a MIRx Venue
- Apply MIRx Preset settings to any number of selected MIR Pro Icons (they depend on the chosen Instrument Profile)
- Use MIRx Preset Alternatives when needed (e.g., for soloists)
...enjoy the sound of your Vienna Instruments in perfect spatial balance!
Of course there's more to MIRx Mode than just that basic stuff. Feel invited to read the following pages to make the best use of MIR Pro's new features!
Good to know
MIRx Presets are available for these MIR Pro Venues:
- Vienna Konzerthaus / Grosser Saal (RoomPack 1 - Vienna Konzerthaus)
- Vienna Konzerthaus /Mozartsaal (RoomPack 1 - Vienna Konzerthaus
- Teldex Studio Berlin / Aufnahmesaal (RoomPack 2 - Studios & Sound Stages)
- The Sage Gateshead / Hall One (RoomPack 4 - The Sage Gateshead)
- Pernegg Monastery (RoomPack 5 - Pernegg Monastery)
- Synchron Stage Vienna
Individually shaped MIRx Presets are available for most (if not all) Vienna Instruments. In addition, there are specific general purpose profiles for 3rd party ensembles, solo instruments and any other kind of signal source.
MIRx Presets consist of several layers and aspects: Venue related settings, Instrument related settings, and global MIRx Mode options and features.
1. Venue related settings
- Output Format (stereo, in all cases)
- Main Microphone selection, setup and position offset
- Secondary Microphone selection, setup, position and volume offset (relative level)
- Global Dry / Offset (actually set to 0.0 in all cases)
- Reverberation Time (actually set to 100% in all cases)
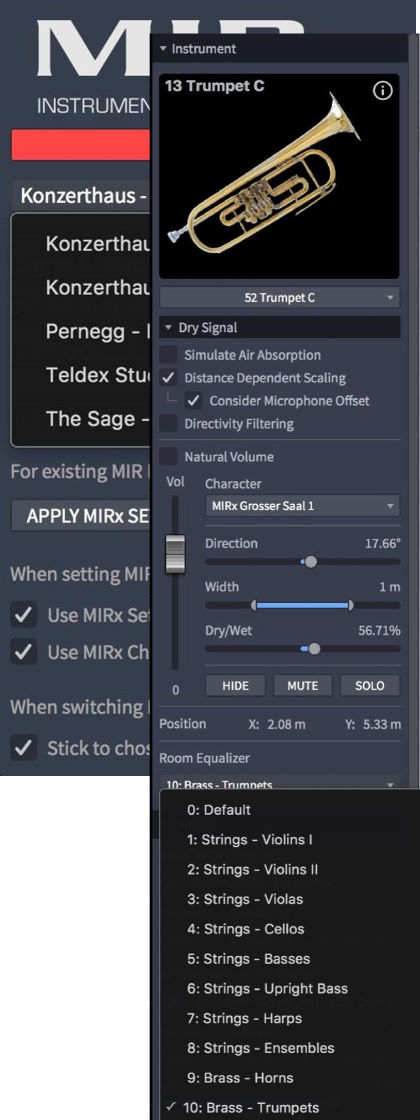
- 24 dedicated Room EQ busses with individual settings for all typical main instrument families within an orchestra.
Important
RoomTone is not part of the MIRx Preset structure and therefore has to be enabled and adjusted manually. When using Natural Volume for Vienna Instruments, leveling the RoomTone volume to -10 to -12 dB might be a good starting point.
MIRacle - MIR Pro's Algorithmic Reverb Add-On - is not part of the MIRx Preset structure, either.
2. Instrument related settingsProfile)
- Position, Direction, Width, Dry/Wet Ratio
- Room Equalizer assignment
- MIRx Preset Alternatives (e.g., positions such as 1st and 2nd Violins, dedicated Solo positions, or just different Characters such as "warm" or "bright")
- Position-dependent Character settings (a.k.a. "Pre-EQ" in MIRx for Vienna Instruments Pro)
Note
HINT: Using MIR Pro's Natural Volume feature for Vienna Instruments together with MIRx Presets will yield great results. Please note that Natural Volume is not restricted to MIRx Mode and can be used with all MIR Pro Venues!
3. Global MIRx Mode features
- When changing to another MIRx Venue within the MIRx Settings window, all relevant instrument settings are either retained or adapted to the respective Venue-specific values.
- Existing MIR Pro-based projects may be converted to MIRx Mode globally or just for selected MIR Pro Icons.
- Newly instantiated MIR Pro Icons either may adapt to MIRx Preset settings automatically, or they can be set manually one by one.
GUI elements and options
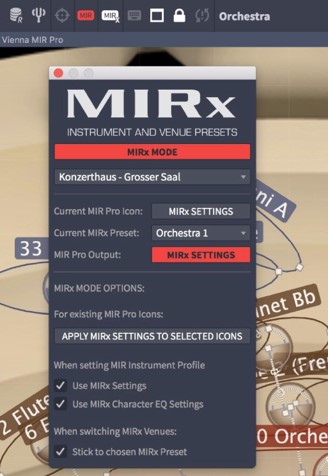
The MIRx Mode On/Off-button
Clicking this button will put MIR Pro into MIRx mode. The button will be lit in bright red, and the MIRx Settings Window will open if it isn't already. Click the button again to turn off MIRx Mode.

You can also use the keyboard shortcut "Shift"-X to toggle the state of MIRx Mode.
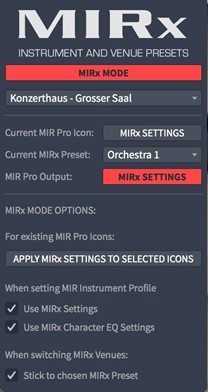
The MIRx Settings Window
In this floating window you may control all important aspects of MIR Pro in MIRx mode. The window will open as soon as you switch on MIRx Mode, or by using the keyboard shortcut "F7".
You can put this floating window wherever it fits your needs. Once you have finished your MIRx-related work you can close the window safely without changing your settings or switching off MIRx Mode.
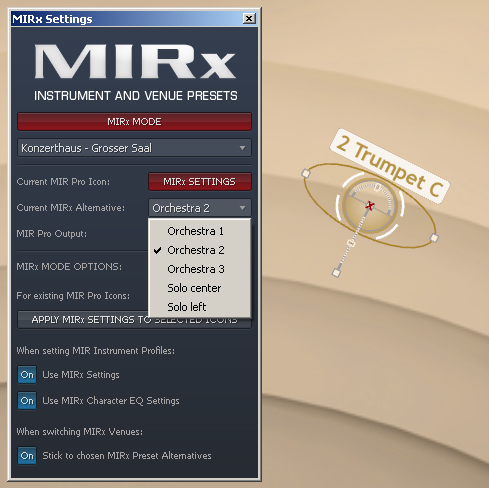
The MIRx Settings Window offers functions to recall MIRx Presets for MIR Pro Icons ("Instruments") and the Main Microphone/Output section of MIR Pro. In addition, some options will determine how MIRx Presets will be handled by MIR Pro.
The big button right below the MIRx logo will switch MIRx Mode on or off. It simply reflects the status of the On/Off button in the menu bar. As soon as it is lit red, all functions and options of the window will become active and accessible.
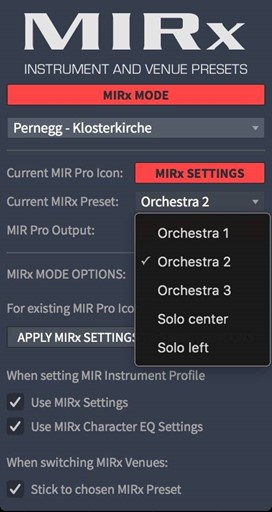
The pull-down menu allows for choosing from up to three sets of MIRx Presets, depending on the MIR Venues available. Once you have set up a project in MIRx Mode, you can switch between the available Venues here - without any other manual re-adjustments! All necessary changes are applied automatically according to the selected Venue.
The "MIRx Settings" buttons next to the labels "Current MIR Pro Icon" and "MIR Pro Output" actually serve two purposes: When lit red, they indicate that the current MIR Pro Icon (shown in the "Instrument Channel" on the right side of the Main Window) and MIR Pro's Output Channel match the settings of the chosen MIRx preset. In case any parameter has been changed manually, the button will go dark; clicking on it again will re-assign the default MIRx Settings to the selected item.
Pressing "X" on your computer's keyboard will assign MIRx Settings to the current MIR Pro Icon, too.
In most cases there is more than one typical "Orchestra" position available for a selected instrument (e.g., Violins 1 and 2, Triple Horn 1 to 4, or soloist positions at the center of the stage). These additional settings are called "MIRx Alternatives" and can be selected by using the right-click context menu directly on a MIR Pro Icon, or by using the pull-down menu in the MIRx settings window. MIRx Alternatives literally double the amount of available MIRx Presets!
By default, the first "Orchestra" position and the applicable Character Preset are assigned to a MIR Pro Icon according to the selected Instrument Profile. Switching MIRx Alternatives will change the Character settings, too.
MIRx Mode Options
The MIRx Mode Options accommodate a button to manually assign the MIRx Settings of the chosen Venue to all selected MIR Pro Icons. This is how existing setups and templates can be brought into MIRx Mode with just a few clicks. Just be aware that MIRx Settings always depend on the chosen MIR Pro Instrument Profile!
Normally, MIR Pro will choose the proper MIRx Preset automatically for any selected MIR Pro Icon with a valid Instrument Profile as long as MIRx Mode is on. The same is true for the Character settings. There may be situations when you would like to do this on a case-by-case basis rather than completely automated - which can be achieved by switching these options off.
As mentioned before, there are many cases where more than one typical "Orchestra" position is available for a selected instrument (e.g., Violins 1 and 2, Triple Horn 1 to 4, or soloist positions at the center of the stage). These additional settings are called "MIRx Alternatives" and can be selected by using the rightclick context menu directly on a MIR Pro Icon, or by using the pull-down menu in the MIRx settings window. MIR Pro will stick to the chosen MIRx Alternatives when switching Venues, unless you deactivate the respective option in the MIRx Settings window. This might be useful when you want start from a fresh perspective rather than from a previous version of a similar setup.
Tip
As a rule of thumb, all MIRx options can be left "on" for most applications. This is also the default setting.
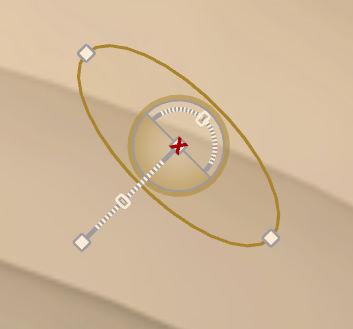
3. MIRx Settings Indicators on the MIR Pro Venue Map
Once the MIRx Settings have been assigned to a MIR Pro Icon, a little red "x" appears across the Position Handle at the center of the Icon. Changing any parameter will cause the "x" sign to disappear. Click the "MIRx settings" button in the MIRx Settings Window to get back to the preset values. As mentioned before, Instrument Volume is not part of the MIRx Preset structure.
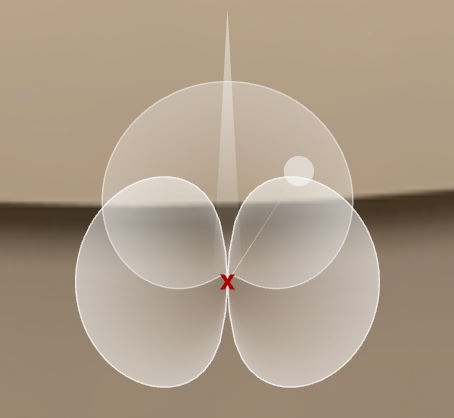
Similarly, the center of the Main and Secondary Microphone Icons are marked with a little red "x" as soon as the Output Channel's parameters all comply with the MIRx Preset's values. Changing any value will make the "x" sign disappear. Click the "MIRx settings" button in the MIR Settings Window to get back to the preset values.
Note
The MIRx settings for the Output Channel are assigned automatically when a MIRx Venue is selected.
How to use
First of all: RELAX! Actually there's nothing new to learn. MIRx Mode is only a tool to recall handcrafted, instrument-specific settings for MIR Pro Icons and optimized Output Formats for some MIR Pro Venues. Once assigned, you may switch off MIRx mode if you want - it won't do any harm. (In other words: MIRx Mode isn't needed to actually run MIR Pro, just to access its settings). Likewise, you can re-activate MIRx Mode whenever one or several aspects of your project need access to the Preset settings again.
Important
Currently MIR Pro's undo function doesn't work for choosing MIRx settings! This might change with an update in the near future.
Here are some examples of how to integrate and employ MIRx Mode in your work:
Tip
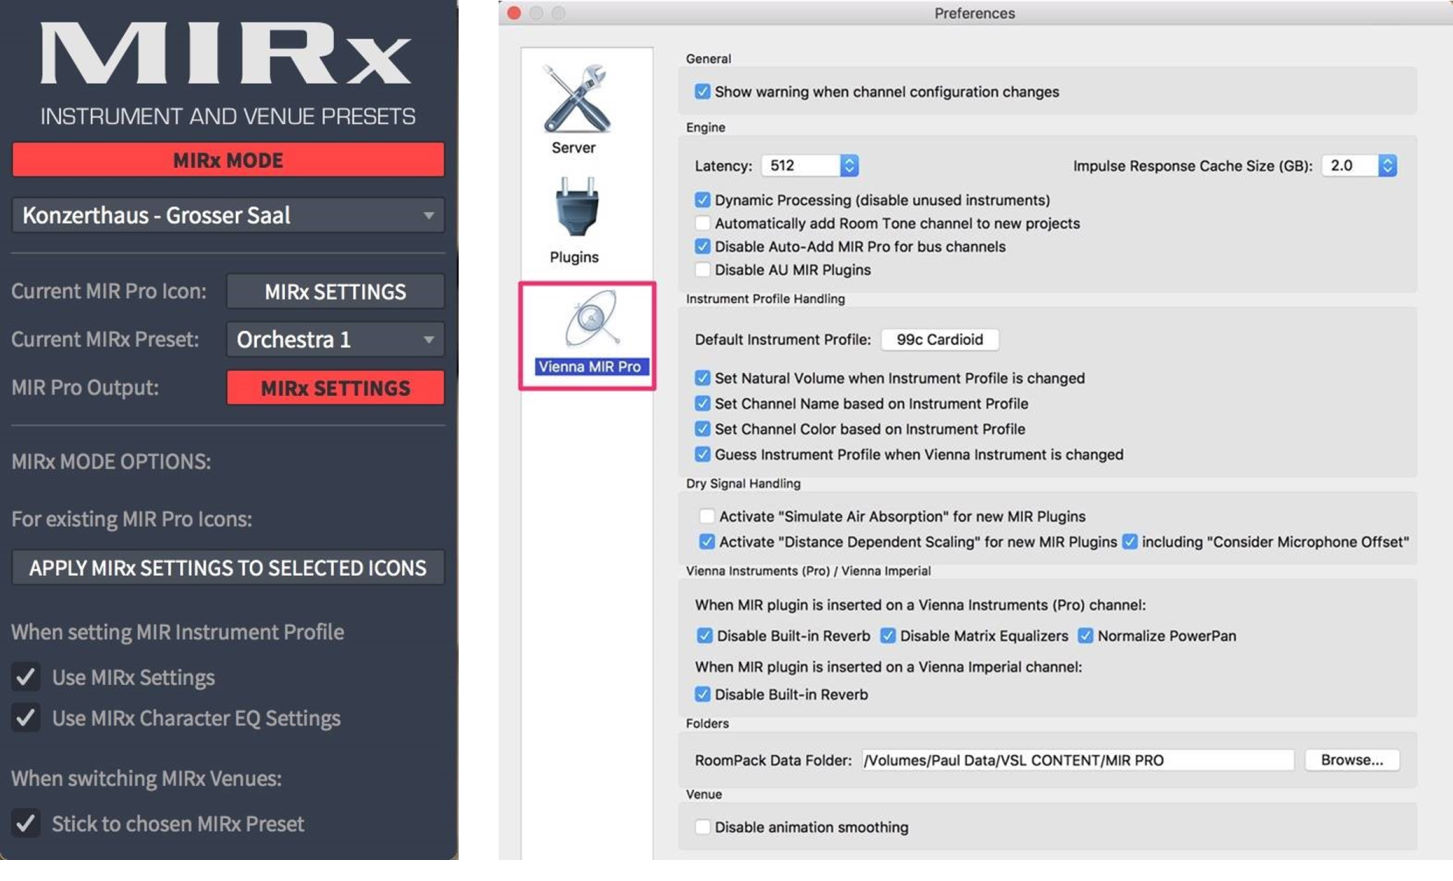
For the most convenient workflow please switch ON all MIRx Mode options in the MIRx Settings window, and make sure to enable all options in the MIR Pro Preferences section called "Instrument Profile Handling".
Example 1A: Creating a new MIR Pro setup using MIRx Mode in Vienna Ensemble Pro
- Start a new MIR Pro project in stereo configuration (at this time, multi-channel setups are not supported by MIRx Mode)
- Add a Vienna Instrument (Pro) Player to this project; if you haven't activated the Auto-add MIR Pro function, replace the channel's Stereo Pan plug-in with MIR Pro.
- Activate MIRx Mode (...the MIRx Settings Window will open, too).
- Select the MIRx-ready Venue from the pull-down in the MIRx Settings Window (...the Output Channel's MIRx Settings button should already glow red).
- Load a Patch, Matrix or Preset into the Vienna Instrument (Pro) Player
- Provided all MIRx Mode options and MIR Pro Preferences are set as outlined above, MIR Pro will assign the proper Instrument Profile automatically. Consequently, the default MIRx Preset for the chosen Vienna Instrument patches will be loaded, too.
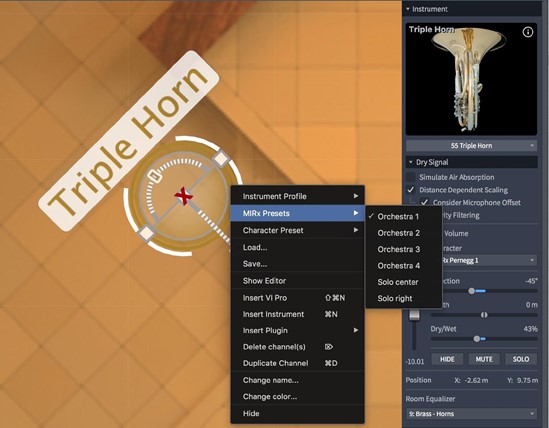
- Choose the MIRx Preset Alternative that fits your needs. Some Instruments have five or more individual Presets to offer! Look at the screenshots below to get the idea.
- Now keep adding Vienna Instruments until your orchestra is set up according to your needs.
- In case you want to add signal sources other than Vienna Instruments, assign the 99x - MIRx General Purpose Profile to your MIR Pro Icon manually and choose the desired MIRx Preset Alternative.
Selecting MIRx Alternatives can be done directly in the MIRx Settings window or in the rightclick context menu of the MIR Pro Icon.
The instrument shown in the screenshot offers several individual "Orchestra" positions and two solo positions close to the Main Microphone.
Example 1B: Creating a new MIR Pro setup using MIRx Mode in your Digital Audio Workstation (DAW)
Note
HINT: The main difference for MIRx Mode used with MIR Pro's plug-in version (compared to the deeply integrated version in Vienna Ensemble Pro 5) is that more manual input is necessary. This is due to the fact that MIR Pro, instantiated as a plug-in in your DAW, has no way of "knowing" what kind of signal it will be used for.
- Add a MIR Pro Plug-In to a stereo track of your host application.
- Open MIR Pro's Main Window.
- Activate MIRx Mode (...the MIRx Settings Window will open, too).
- Select the MIRx-ready Venue from the pull-down in the MIRx Settings Window (...the Output Channel's MIRx Settings button should already glow red).
- Select the MIR Pro Icon and assign the desired Instrument Profile (please see MIR Pro Manual for details).
- Provided all MIRx Mode Options and MIR Pro Preferences are set as outlined above, the default MIRx Preset for the selected Vienna Instrument patches will be loaded, too.
- Choose the MIRx Preset Alternative that fits your needs. (...see the screenshots for Example 1A).
- Keep adding MIR Pro Plug-Ins to other channels in your DAW until your orchestra is set up according to your needs.
- In case you want to add signals derived from other sources than Vienna Instruments, assign the 99x - MIRx General Purpose Profile to your MIR Pro Icon and choose the desired MIRx Preset Alternative.
Selecting MIRx Alternatives from the right-click context menu of the MIR Pro Icon. Please keep in mind that the Character Presets differ for each position, too!
Example 2: Converting an existing MIR Pro setup to MIRx Mode
Important
Always work on copies of existing projects. There's no easy way to "un-MIRx" a setup once it got converted. Turning MIRx Mode off does not restore previous settings!
- Open a MIR Pro project you created earlier.
- Open MIR Pro's Main Window.
- Activate MIRx Mode (...the MIRx Settings Window will open, too).
- Select the MIRx-ready Venue from the pull-down menu in the MIRx Settings Window (...the Output Channel's MIRx Settings button should be lit red now).
- Select all Instruments / MIR Pro Icons you want to change to MIRx settings.
- Click the button labeled "APPLY MIRx SETTINGS TO SELECTED ICONS".
- Select individual Instruments / MIR Pro Icons.
- Choose the MIRx Preset Alternatives that fit your needs (...see the screenshots for Example 1A and 1B).
Example 3: Using MIRx Presets for own creations
Unlike the original MIRx for Vienna Instruments Pro, there are absolutely no restrictions in MIR Pro's MIRx Mode to change any parameter at any time. This makes MIRx mode the perfect starting point for individual orchestra placements, be they just subtle variations of the original presets, or radical changes from them.
The little red "x" markings of the MIR Pro Icons and the two Microphone Icons will disappear as soon as a parameter's value is changed. Still, all other parameters have retained the values supplied by the previously assigned MIRx Preset. This allows for countless variations and adjustments, founded on the well-rounded overall settings of MIRx. (In case you want to go back to the preset values, select an instrument and click the "MIRx Settings" button in the MIRx Settings window, or press the key "x".)
The most meaningful first step to change an instrument's sound in MIR Pro is to use another Character Preset. The "Pure" setting means that no changes are applied to the sound of the incoming signal - this is what you would hear without the "Pre EQ" of MIRx in Vienna Instruments Pro. (For more ideas and ways to make use of the different techniques offered by MIR Pro please refer to the "Getting THAT Sound" section in MIR Pro's Manual.)
Of course you can also try to use MIRx settings in other MIR Venues than the ones used for the three original setups. When selecting a "non-MIRx" Venue from MIR Pro's Venue Selection dialog you will be presented with a dialog window asking whether you want to reset the MIRx specific settings or keep them intact:

Important
When changing to a Venue without available MIRx Presets, MIRx Mode will be disabled in any case!
While it might be tempting to transfer MIRx Presets to other Venues available from MIR Pro's RoomPacks, be aware that all settings have been created for one specific setup in one specific hall - Character Presets as well as Room EQs, Main Microphone Setup as well as the Secondary Mic's settings. Character Presets will usually translate quite well to other Venues, while Room EQs will have little value (other than the assignments to the different instances).
Finally, any aspect of a MIRx Mode Preset can be saved separately for later use in another context. The concept of MIR Pro Room Equalizer Banks which has been introduced especially for MIRx Mode will be discussed in the following section of this add-on manual. Please refer to the Vienna MIR Pro User Manual for more information about the Output Format Editor, Vienna Ensemble Pro Channel Sets and MIR Engine Projects.
Room EQ bank assignment and usage
The Presets created for MIRx - the convolution reverb extensions for Vienna Instruments Pro - rely a lot on specific Room EQ settings for different instrument families. While this is easy to achieve with MIR Pro's dedicated wet signal routing options when using it in Vienna Ensemble Pro 5, this was impossible to do with more conventional DAWs and the plug-in version of Vienna MIR Pro.
With the introduction of MIR Pro's Room Equalizer Bank feature this partial limitation has been overcome. 32 individual Room EQ settings can be assigned to any MIR Pro Icon, and an additional "0 / Default" setting is used for all "un-routed" Icons without a dedicated assignment. It's crucial to understand that the Room EQ does NOT affect the dry signals at any time (which means that it isn't meant to be used as "master bus EQ"). The Room EQ has always been one of the main tools to sculpt the room-sound derived from MIR's multi-impulse responses, and it has just become more versatile now.

Important
Room Equalizer Banks are available at any time and are not restricted to MIRx Mode!
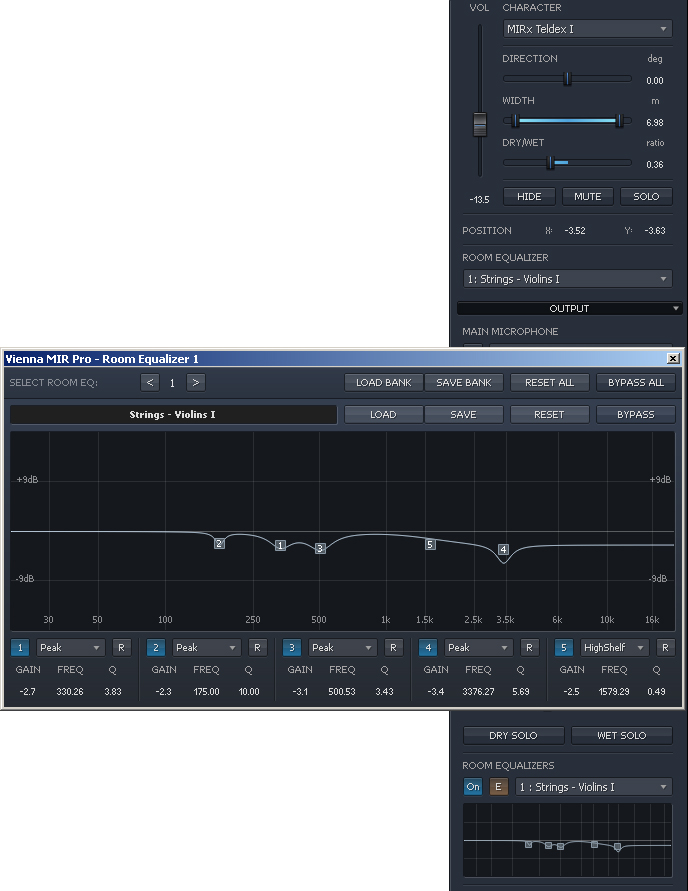
To assign a Room EQ setting to a MIR Pro Icon, click the new pull-down menu at the bottom of the MIR Pro's Instrument Channel on the right. Select the setting of your choice, or assign an unused slot. Open the Room EQ's edit window by clicking the "E" button right next to its On/Off switch in the Output Channel for detailed adjustments and file management.
Note
The Room EQ slot shown in the Output Channel's EQ windows will be in sync with the Icon/Instrument displayed in the Instrument Channel, unless another slot is selected in the Output Channel's Room EQ pull-down.
Please take a look at the screenshot on the following page:
The Room EQ's main window allows you to select any of the slots for detailed editing using the arrow buttons near the top. Providing a meaningful name right below the slot's number will make proper assignments and navigation considerably easier. This is the name that will also appear in the respective line of the pull-down menu in the Output Channel.
Complete collections of Room Eqs can be saved and loaded with the Load Bank/Save Bank buttons in the upper menu bar. Individual Room EQ settings can be saved and recalled at a later point by using the Load/Save buttons in the lower menu bar. Bypass and Reset functions are handled in a similar way for the whole bank as well as for individual slots.
Using Room EQ Banks
While it might be neither necessary nor feasible for every project to use 32 different EQ settings for the wet signals derived from MIR Pro, it can make all the difference to have three or four fine-tuned EQ curves for, e.g., strings, brass, woodwinds and percussion instruments.
Another typical approach sports special processing for bassheavy instruments, for vocals, or for any other kind of signals with special acoustic requirements.
For small adjustments it's a good idea to save an existing EQ curve, and to recall it after changing to the next unused slot. Don't forget to change the name to avoid confusion, though.
Note
Projects without Room EQ assignments and from previous versions of MIR Pro will always default to slot 0.
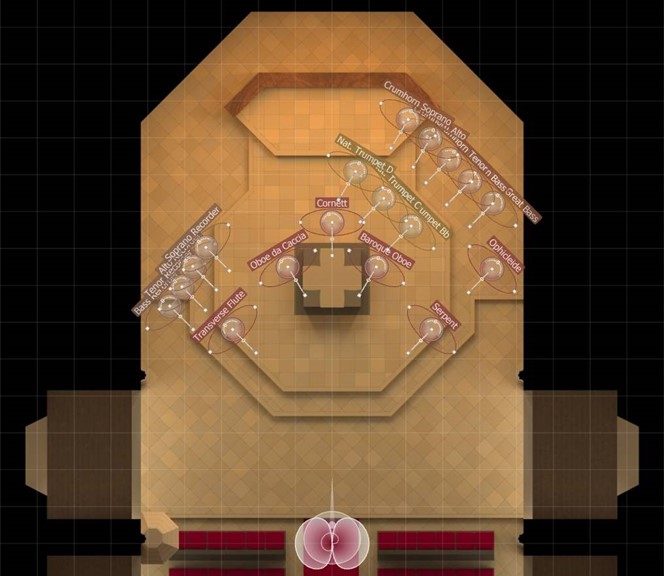
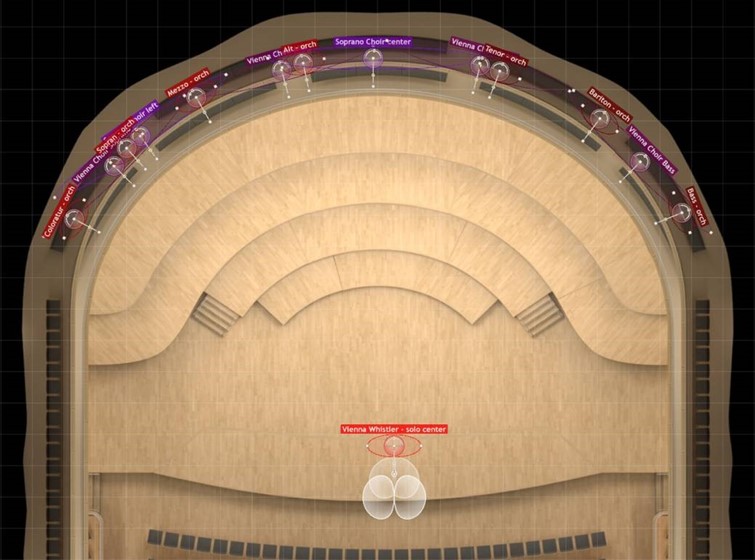
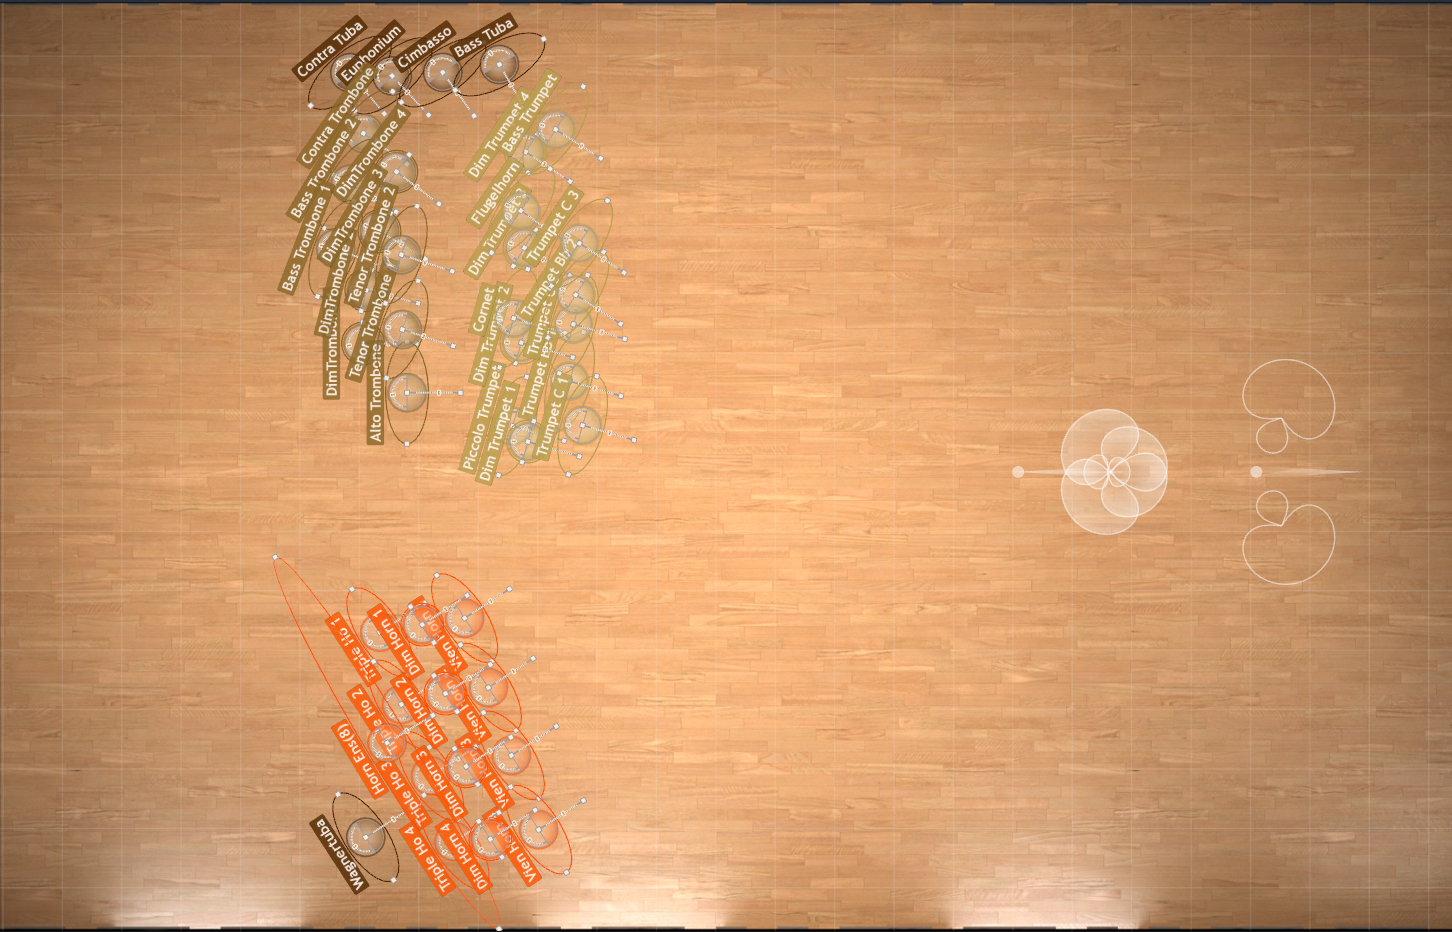
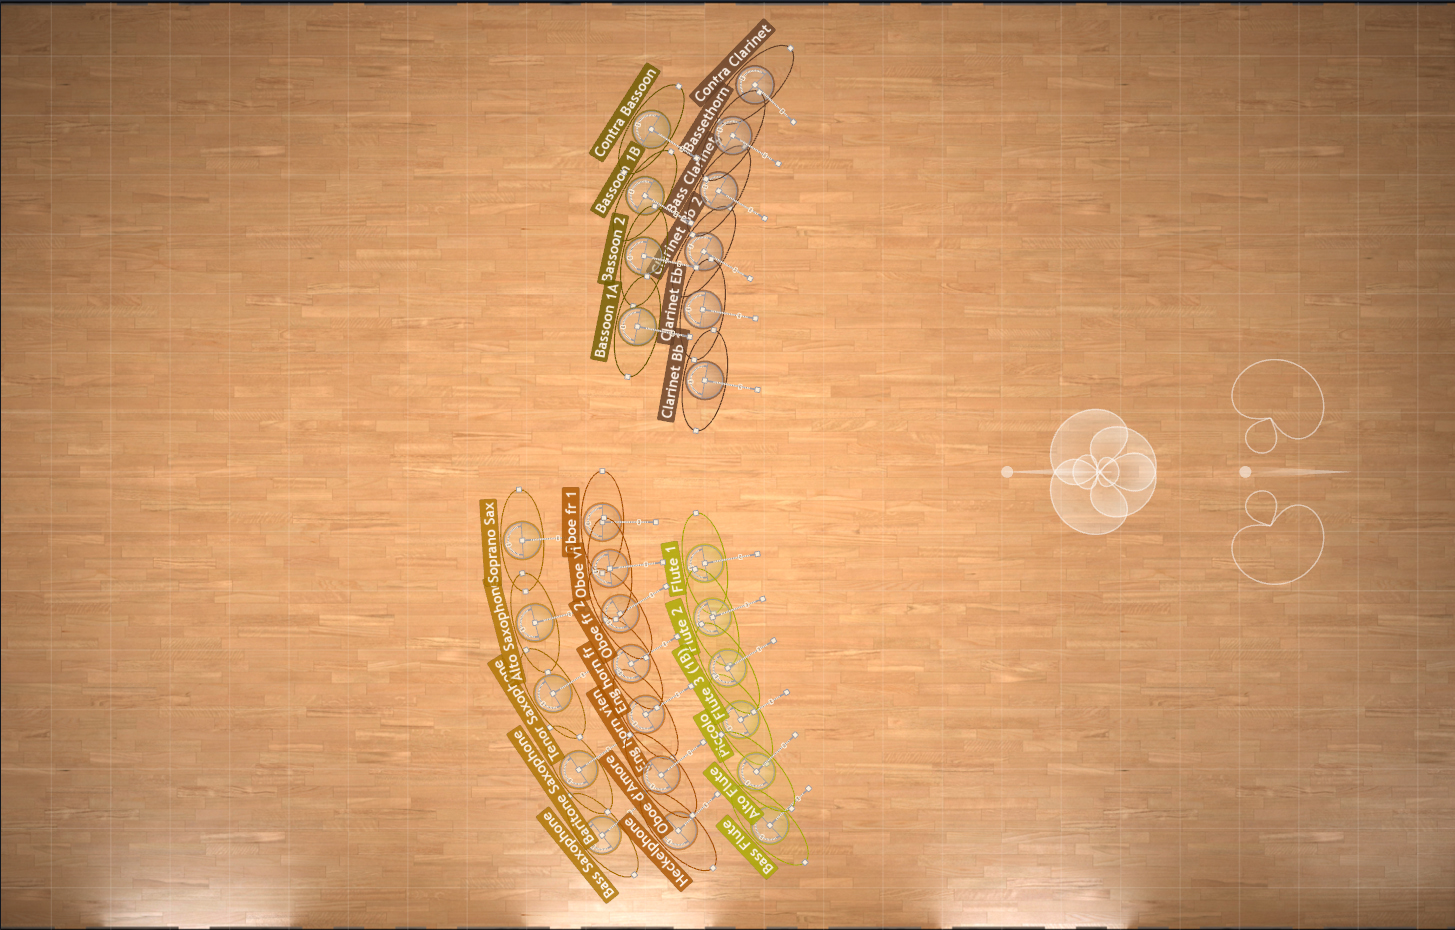
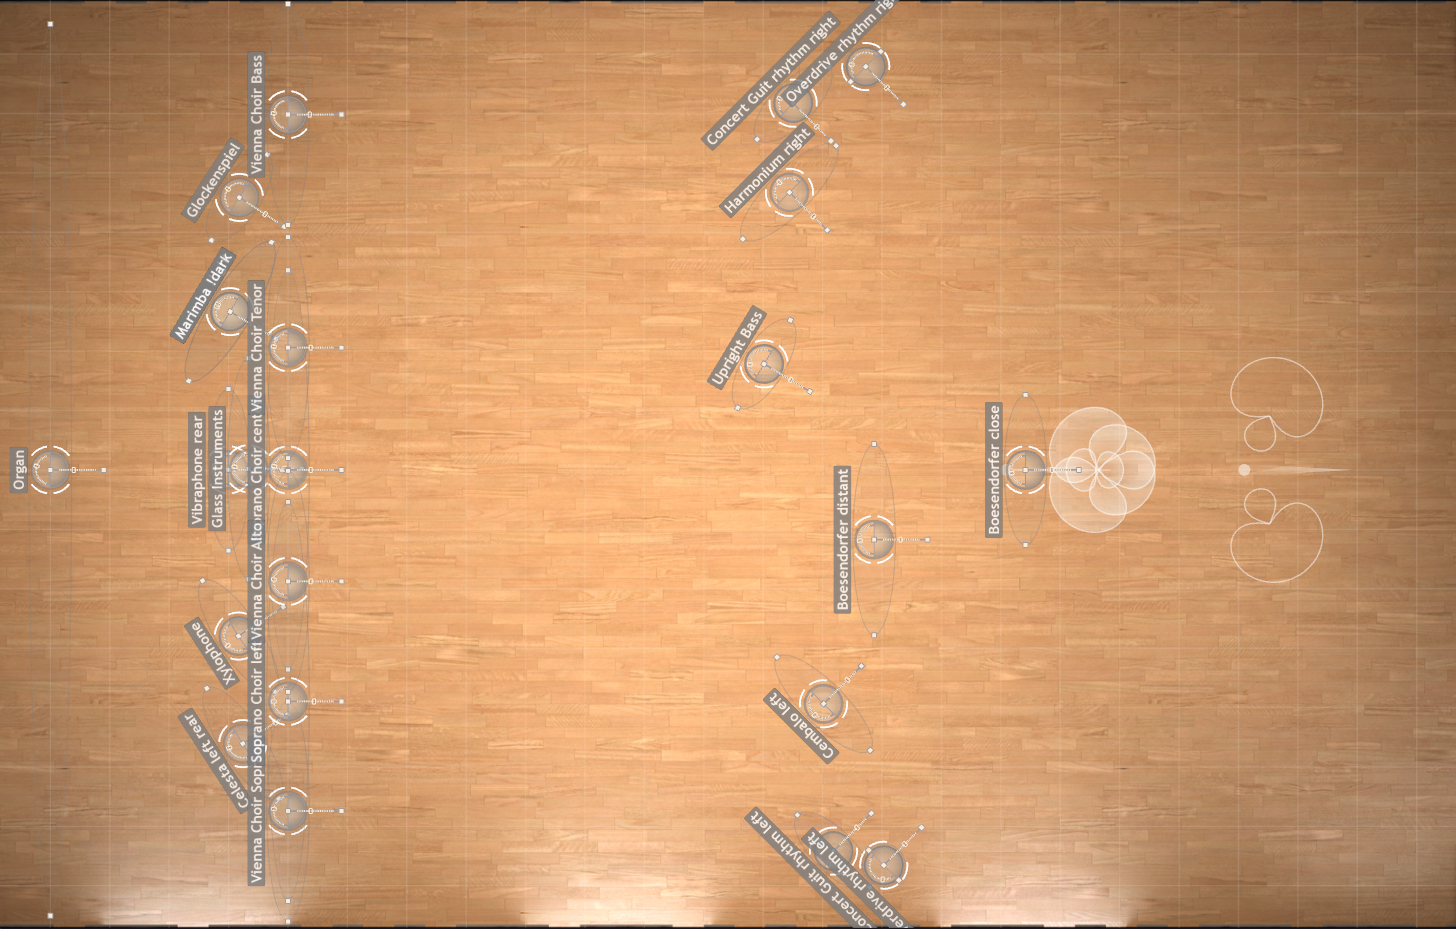
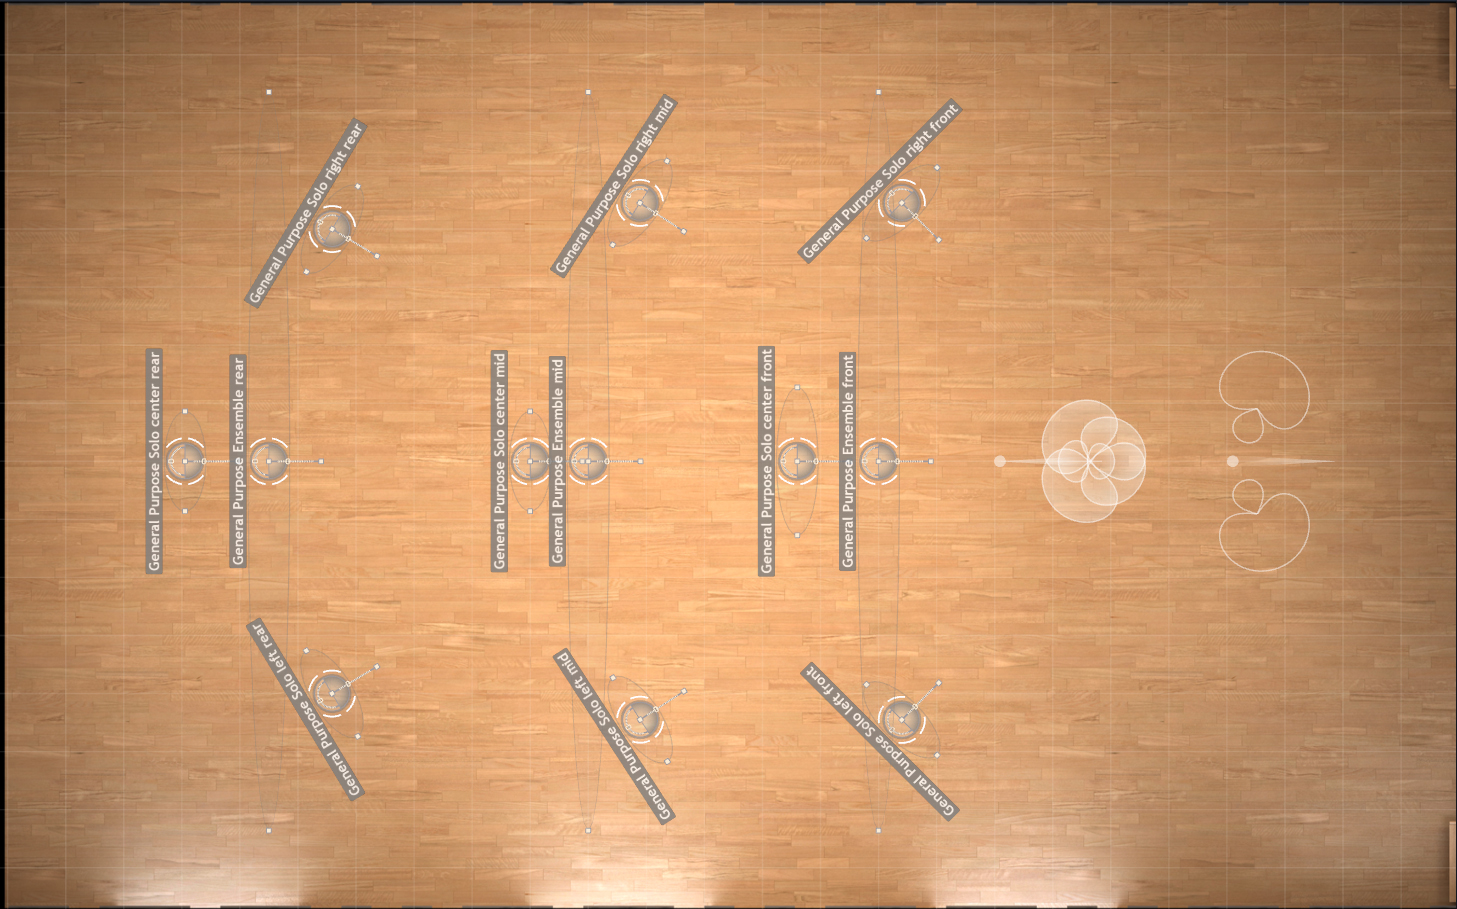
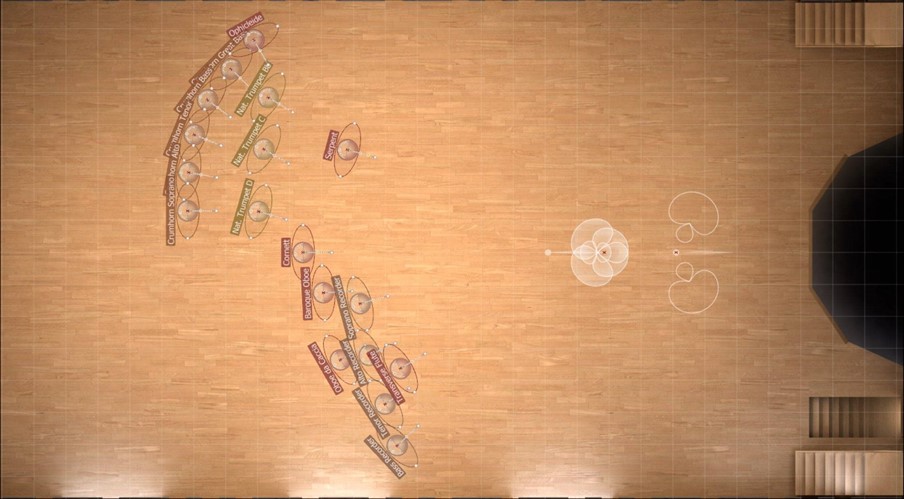
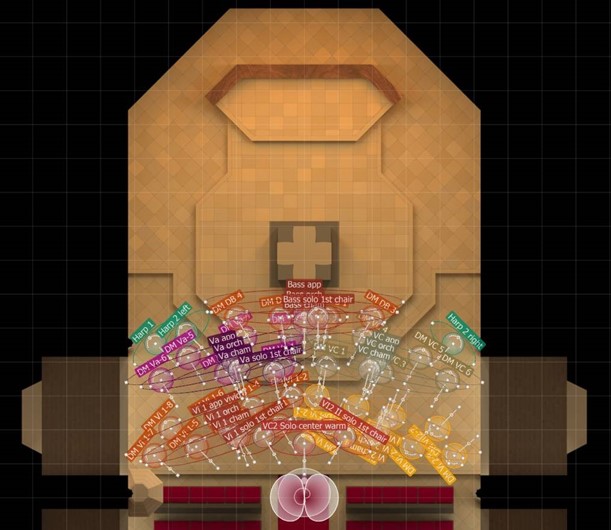
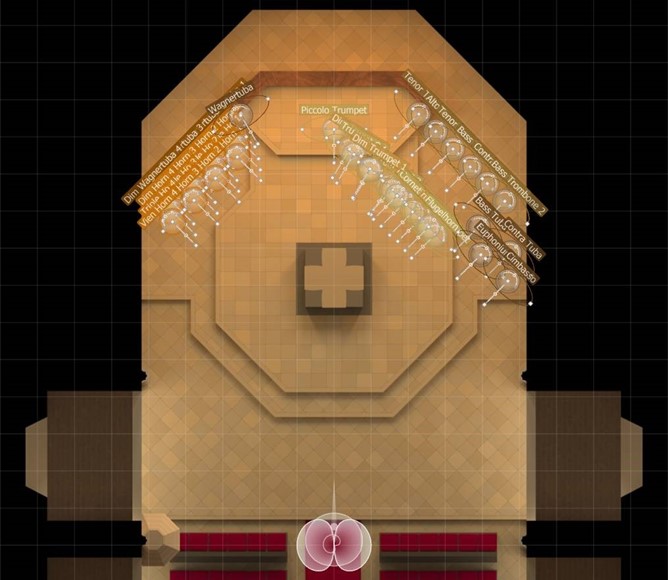
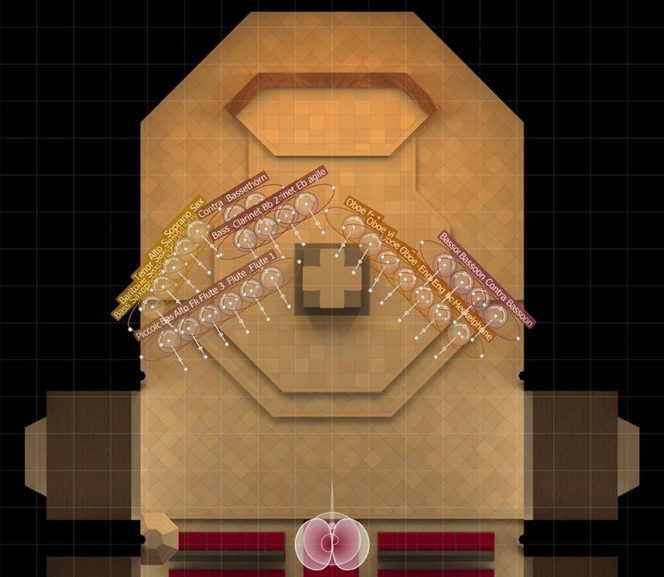
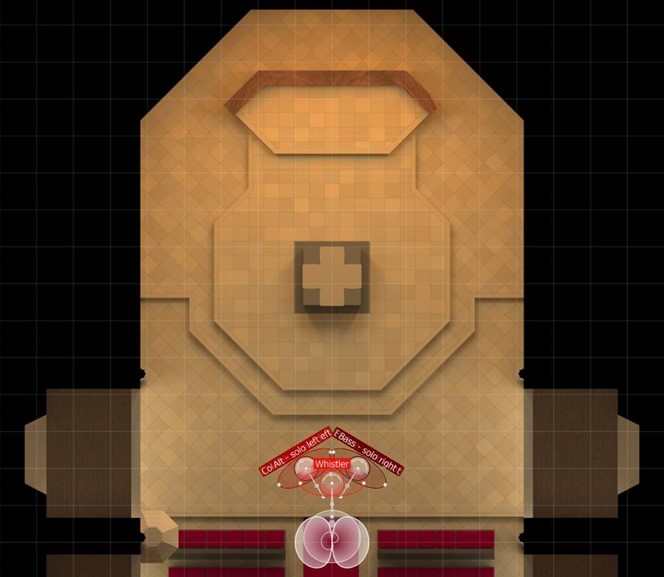
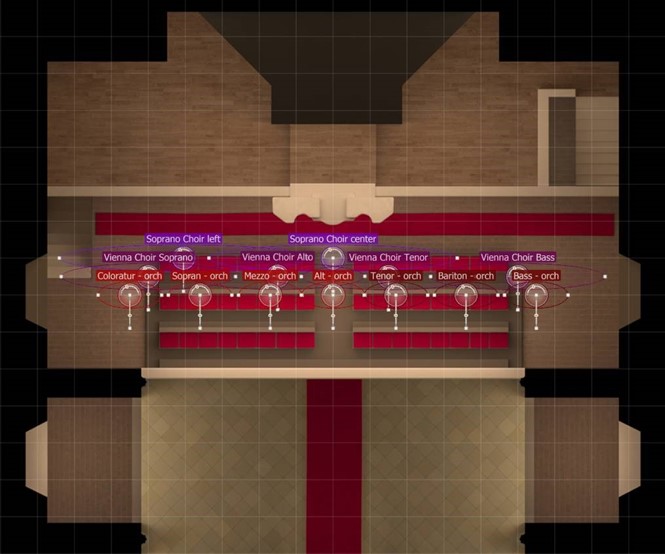
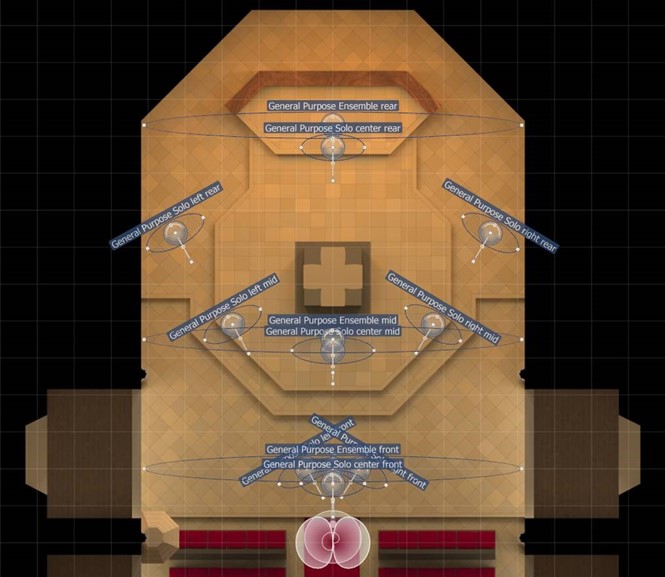
MIRx Settings - Overview
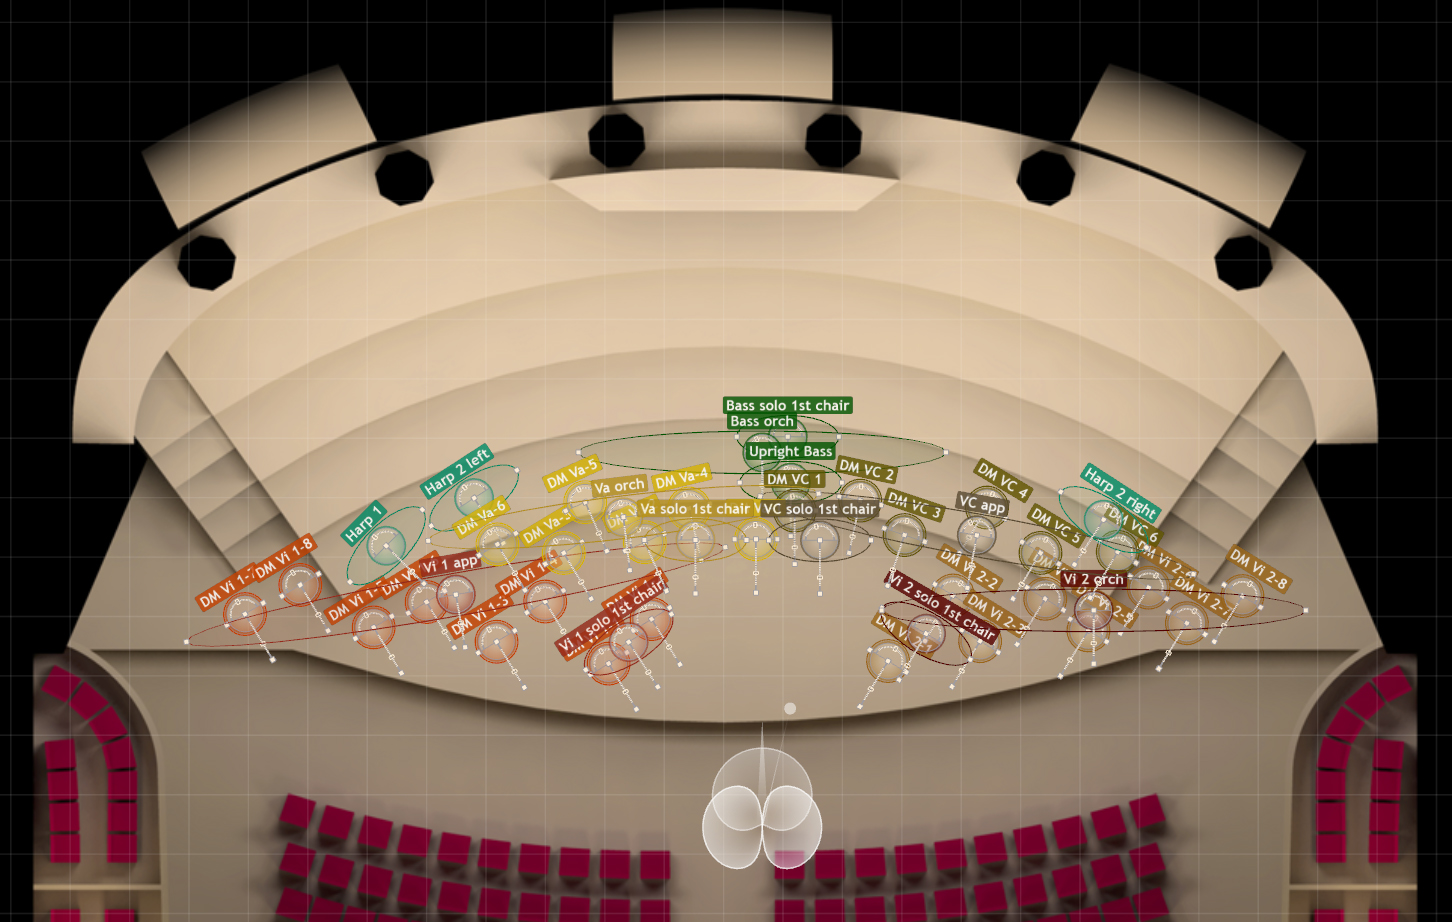
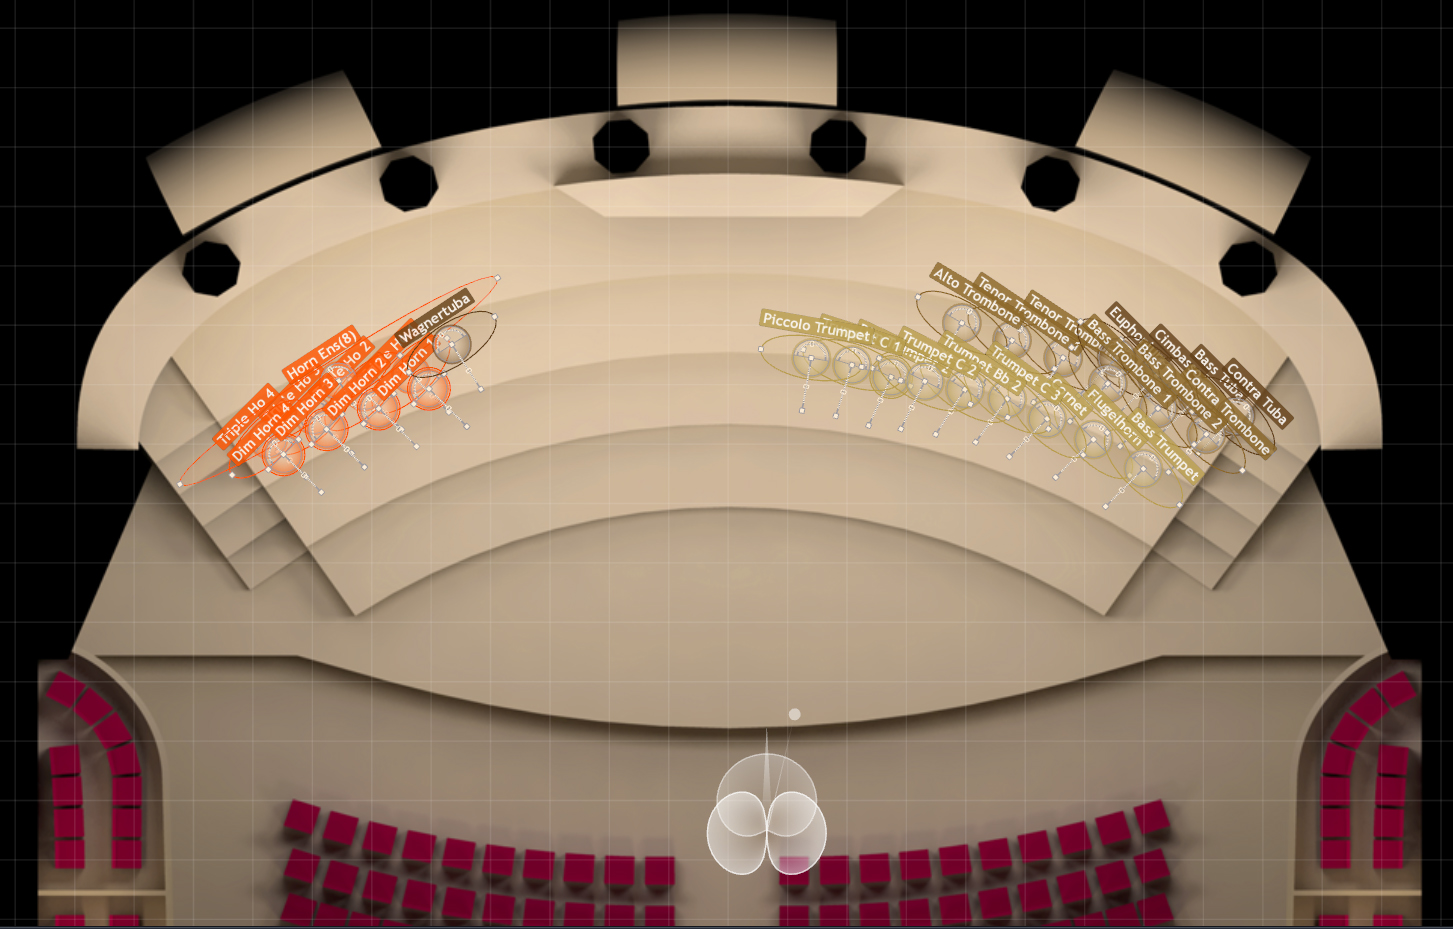
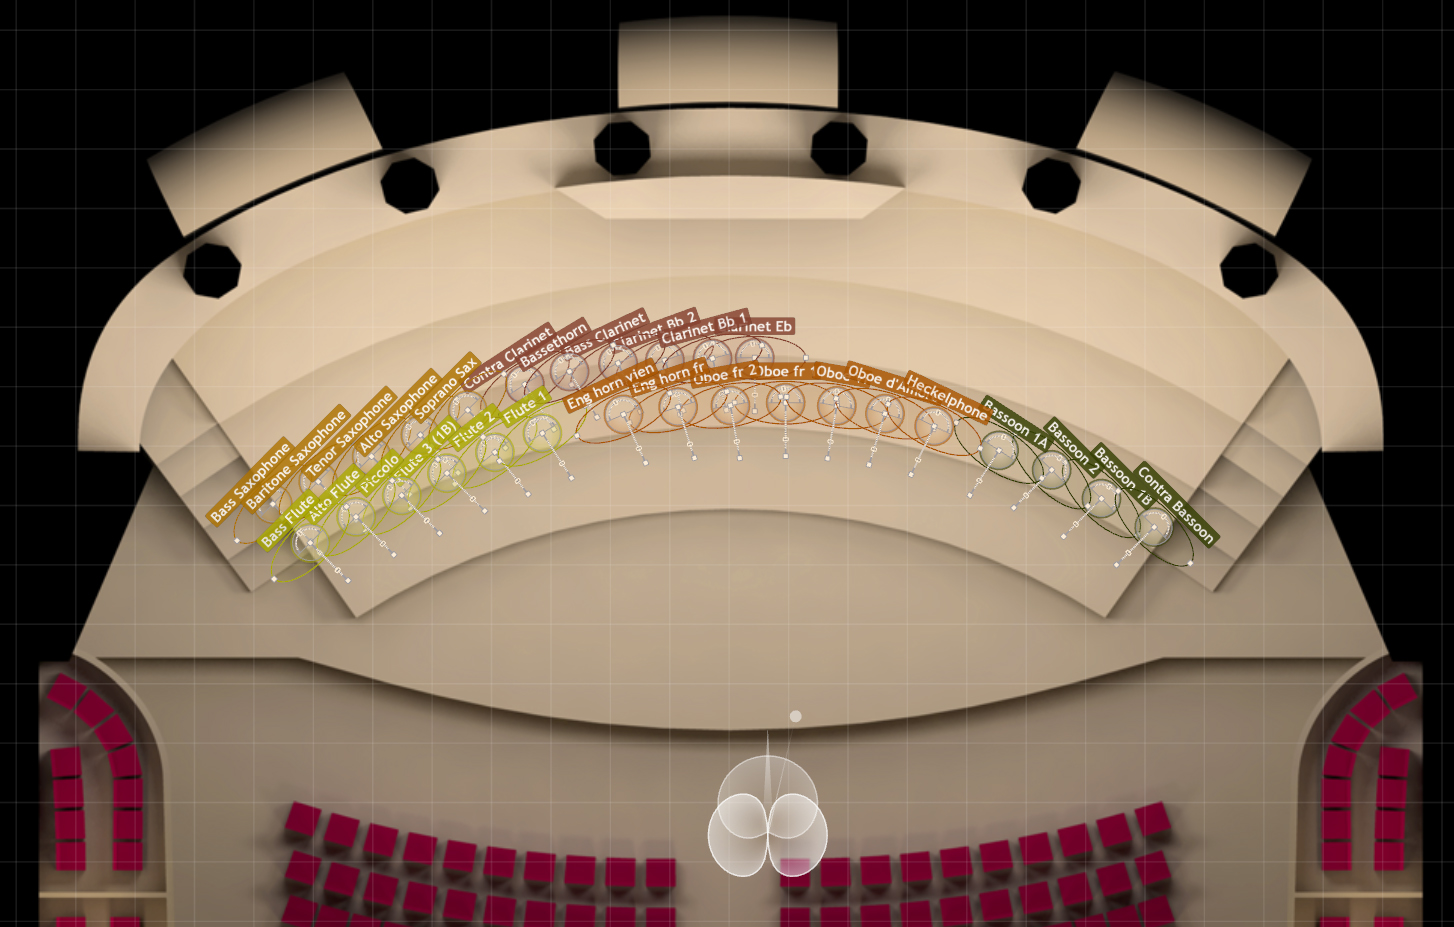
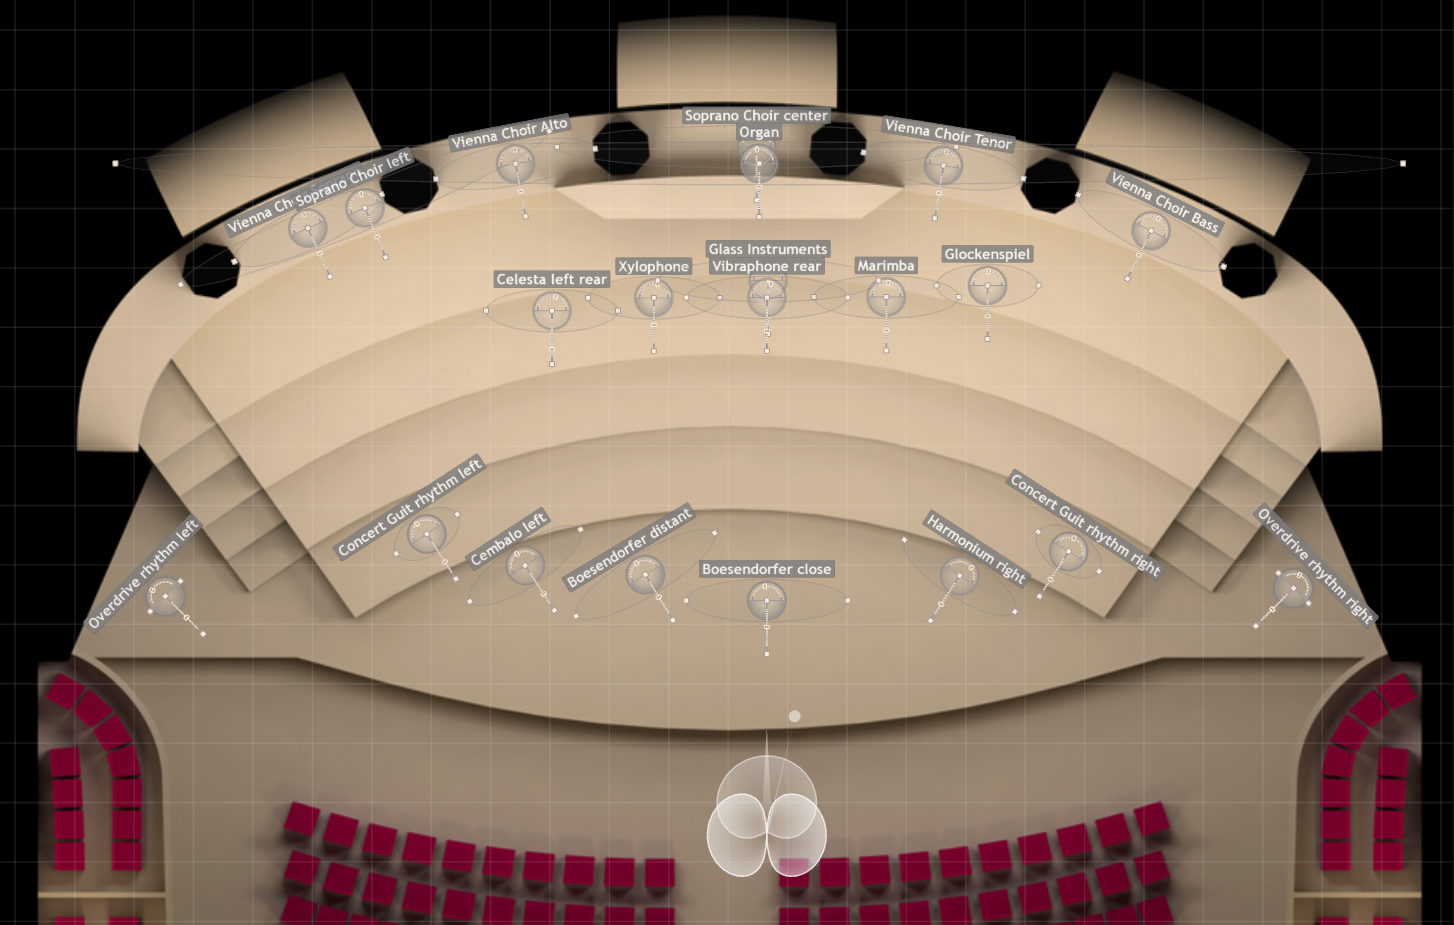
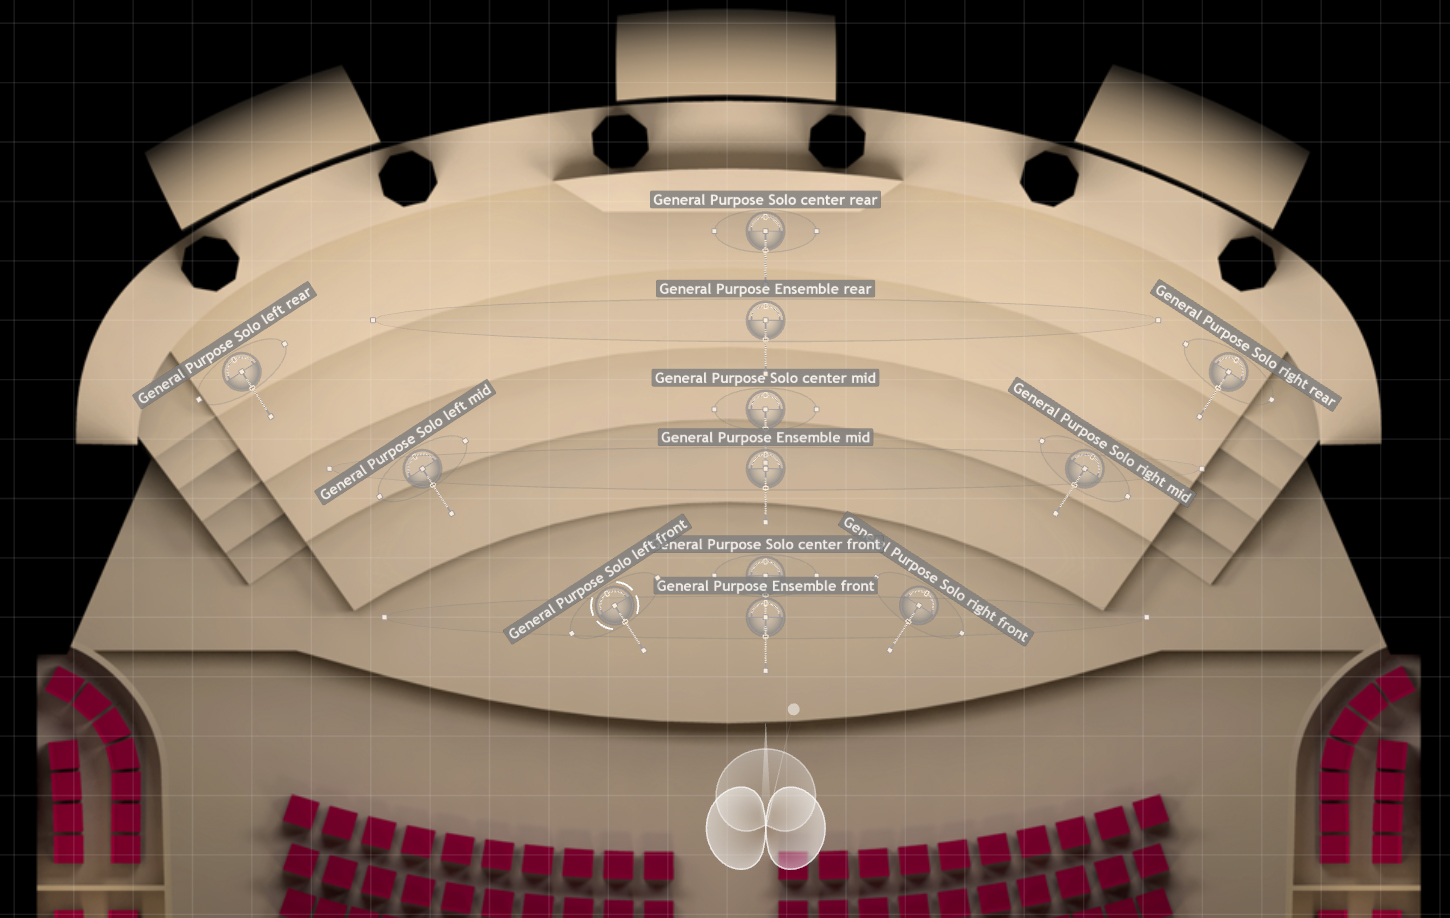
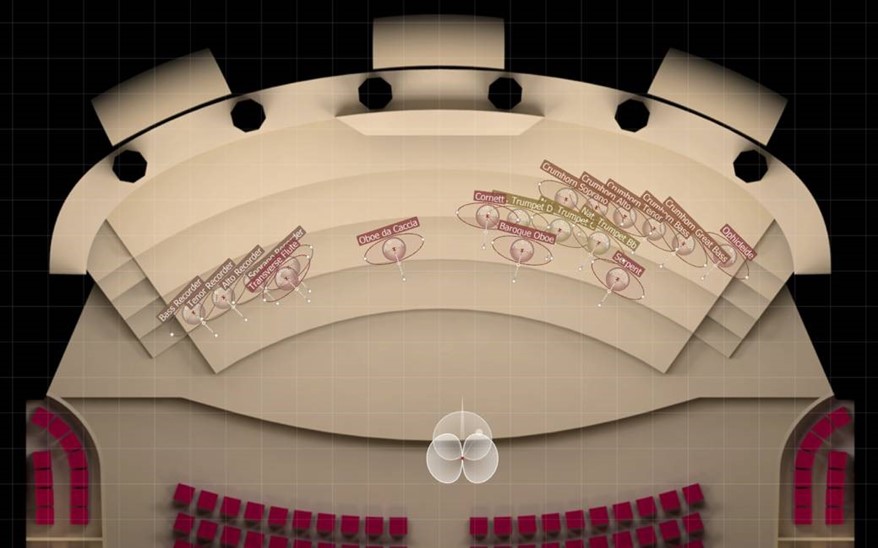
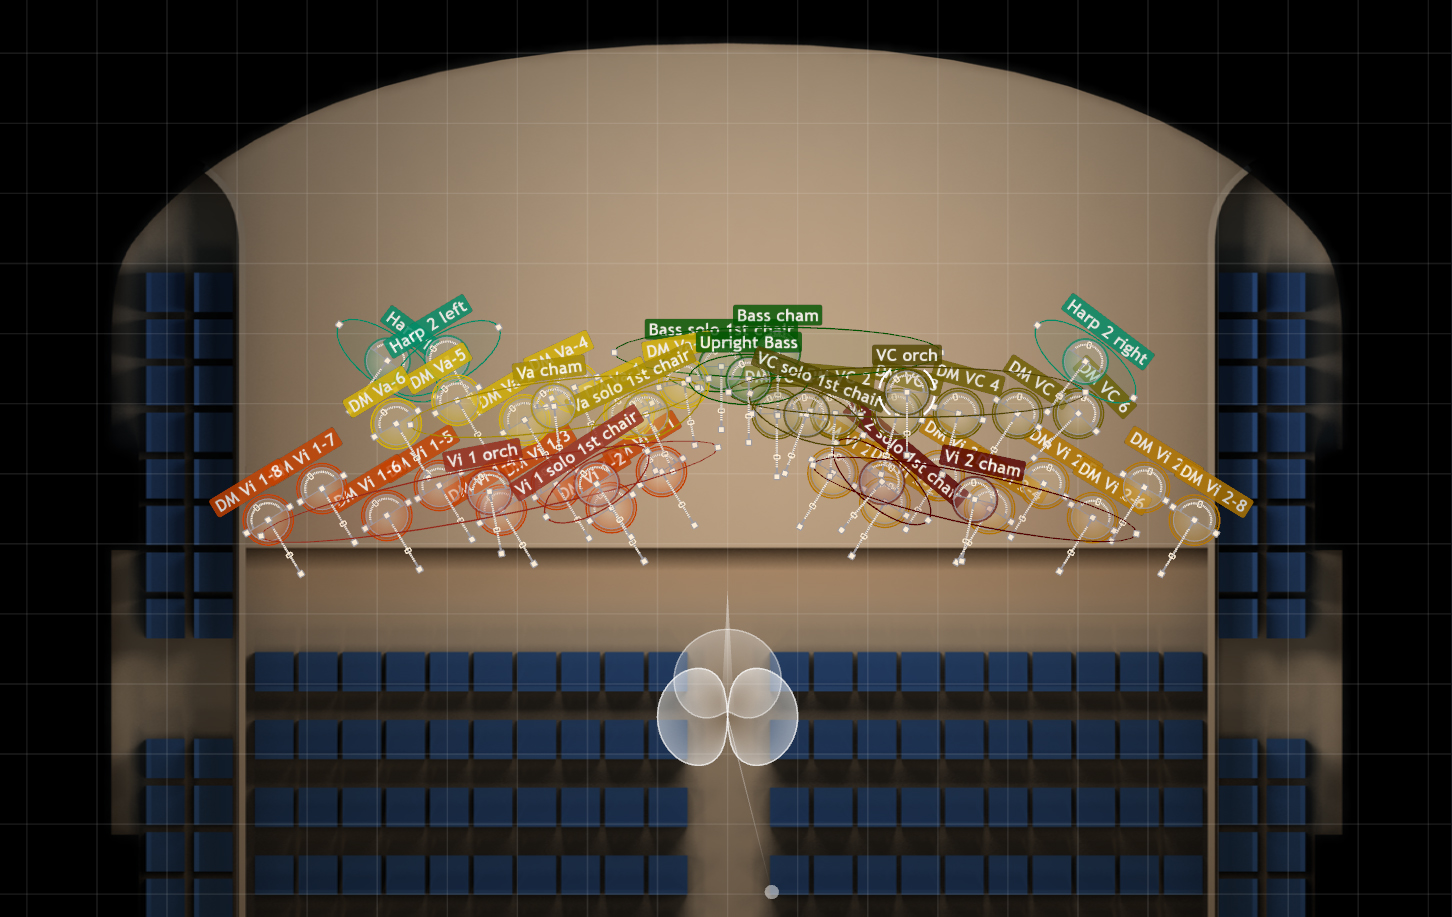
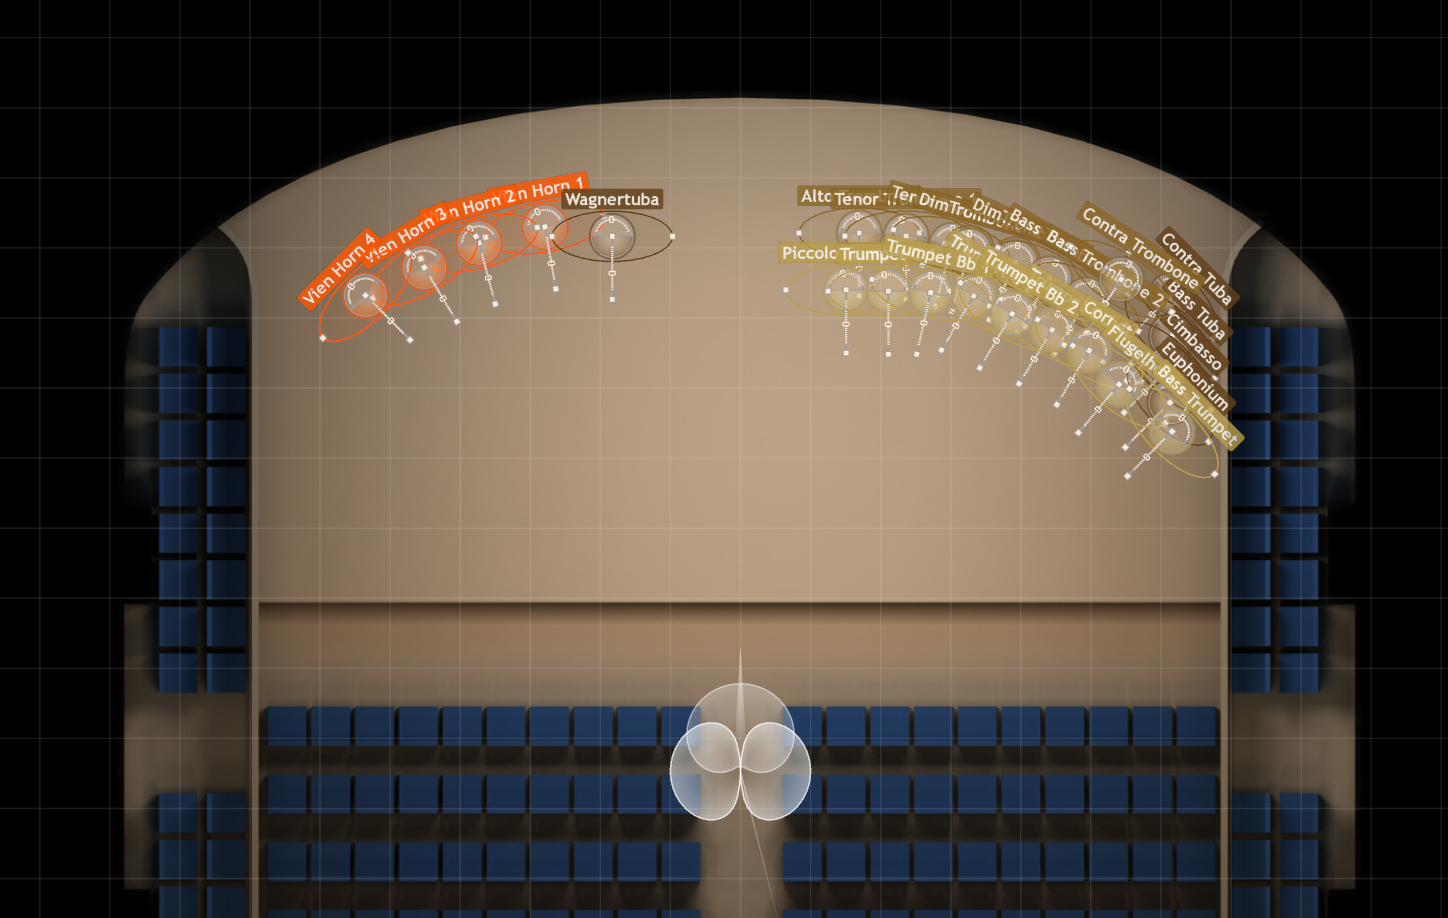
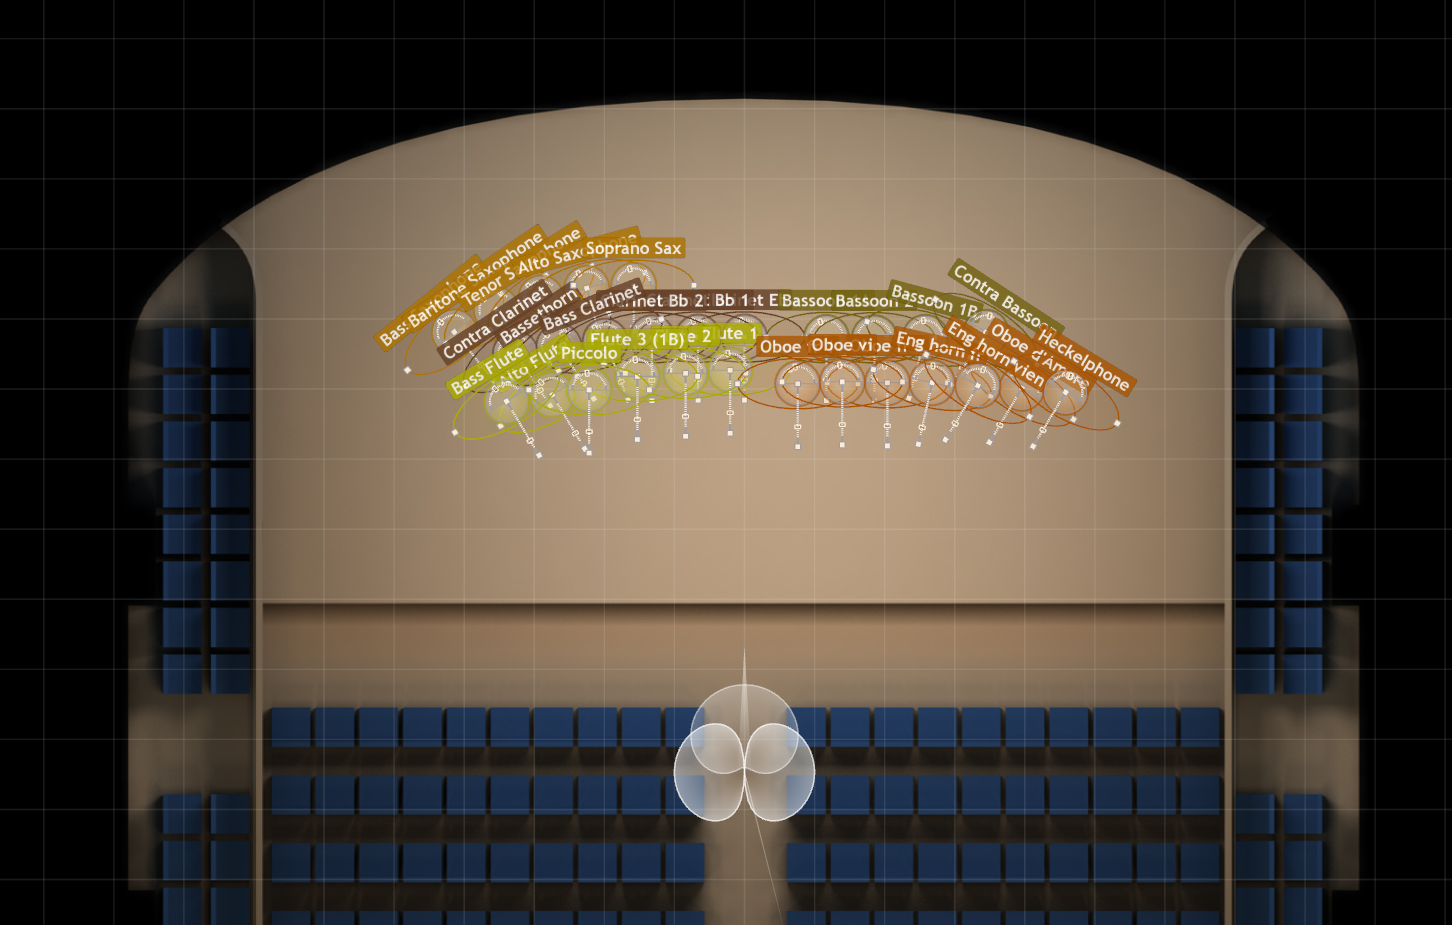
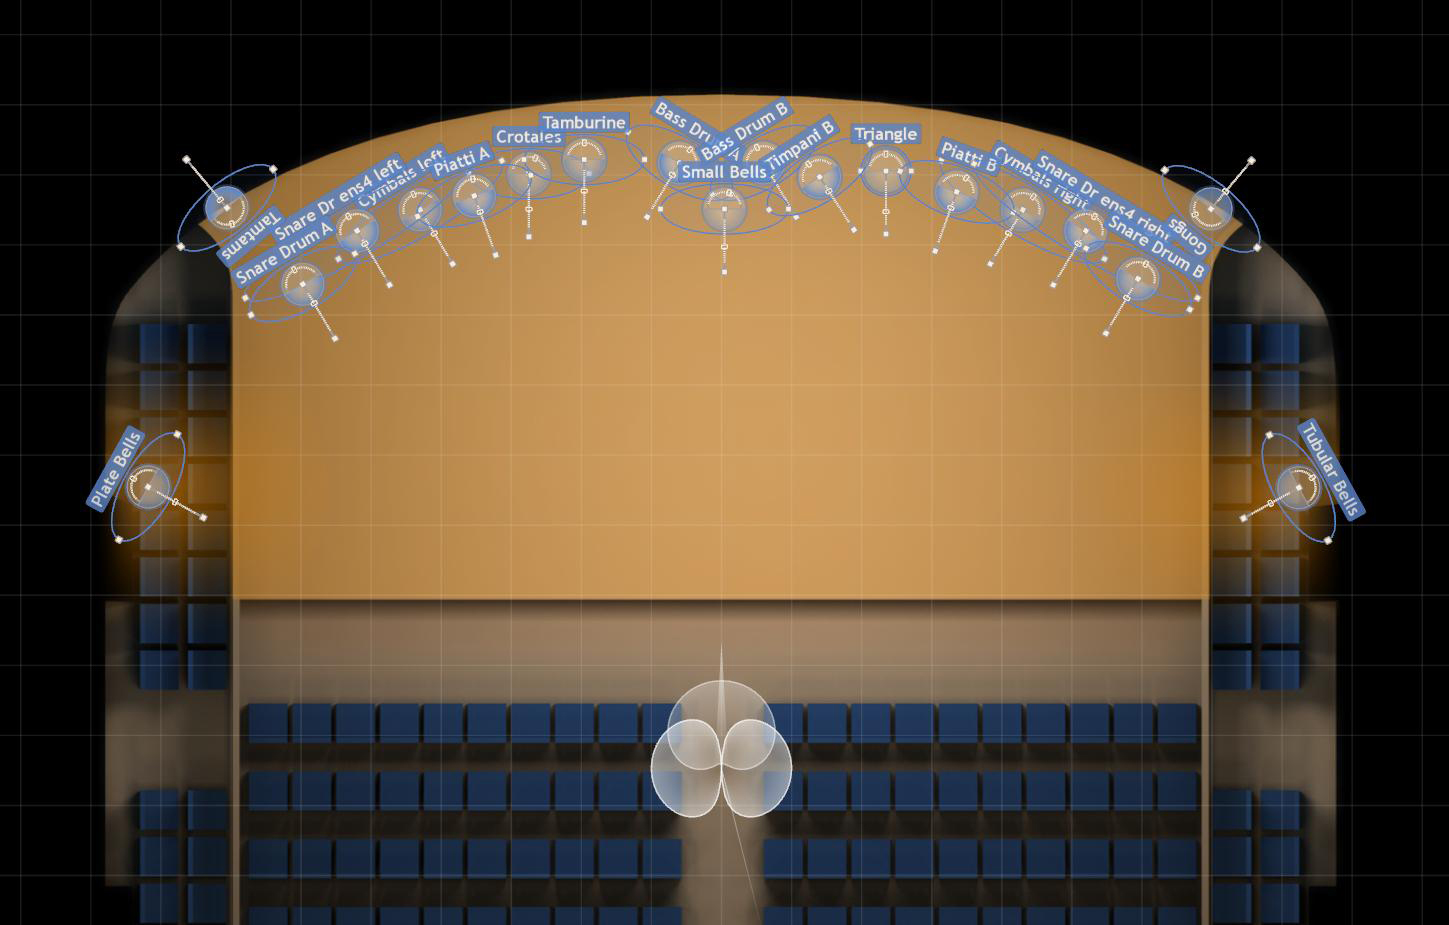
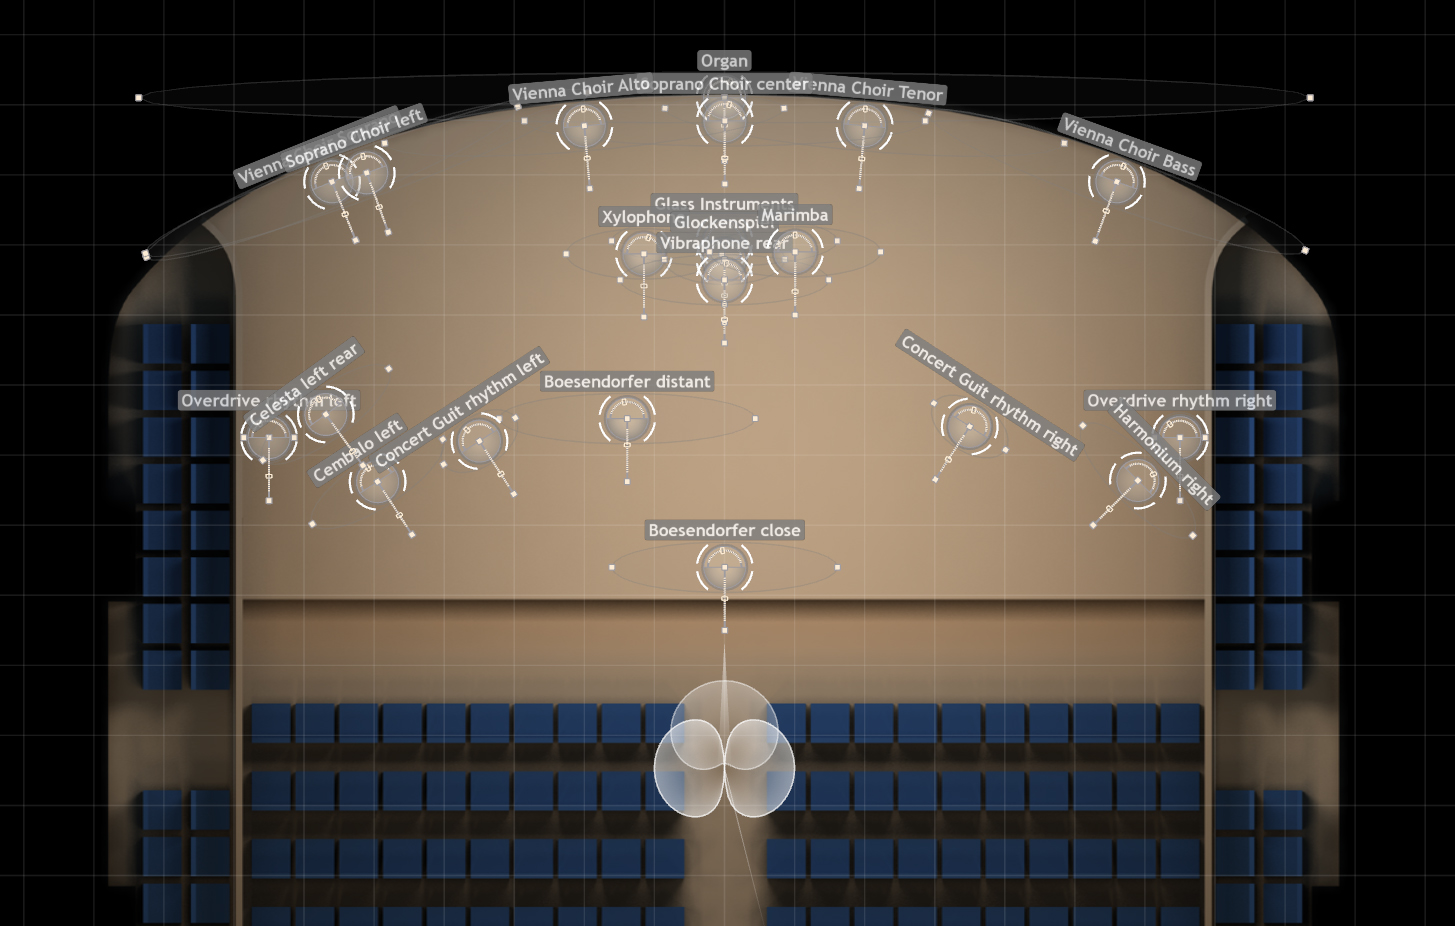
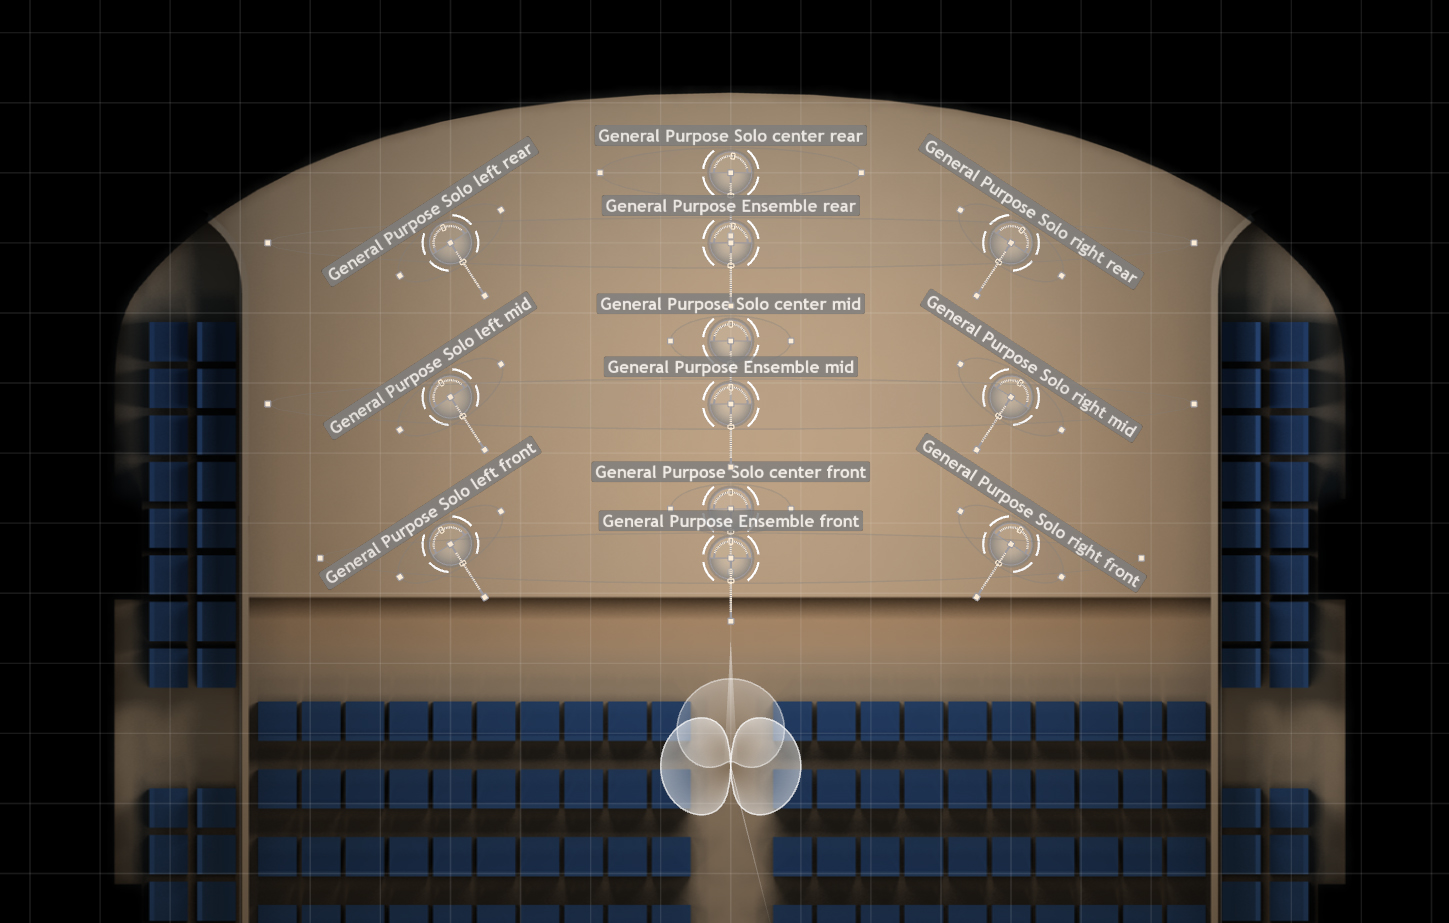
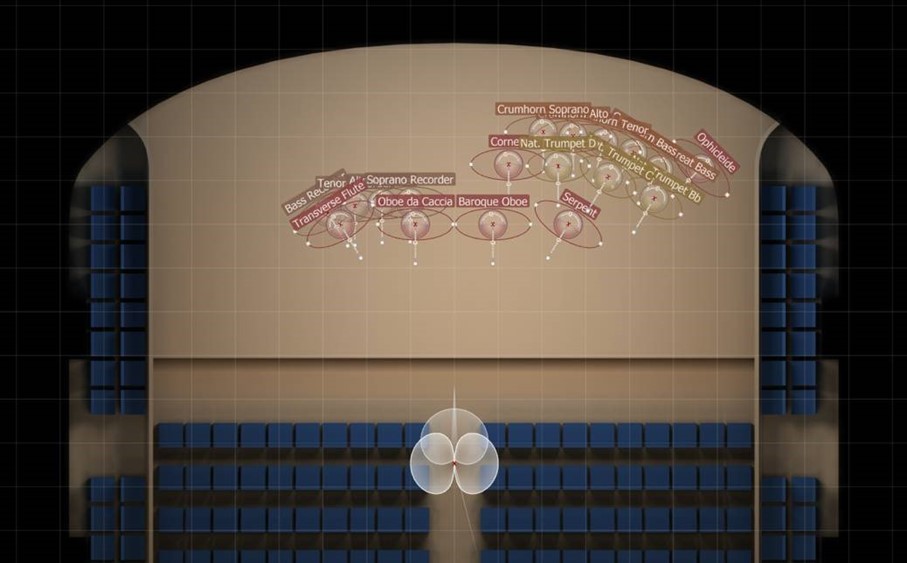
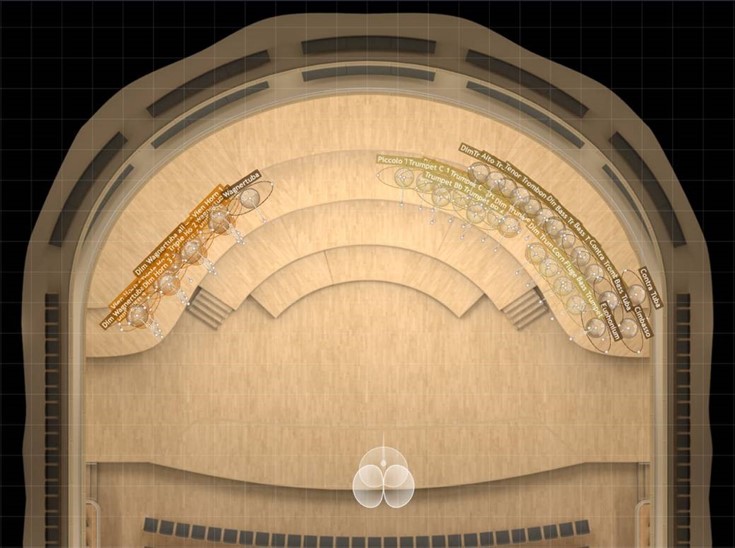
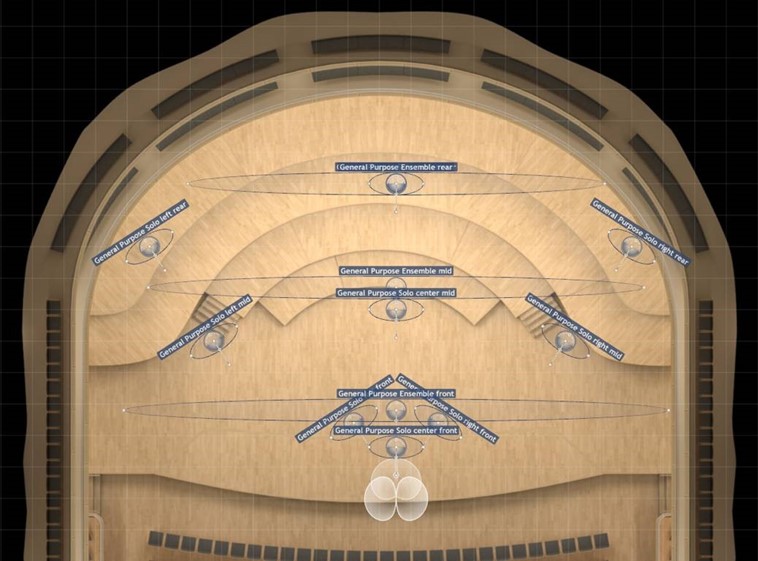
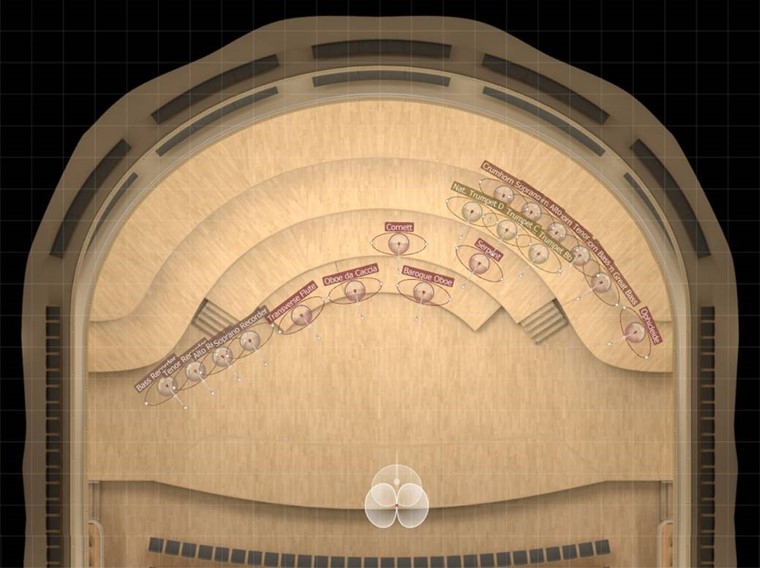
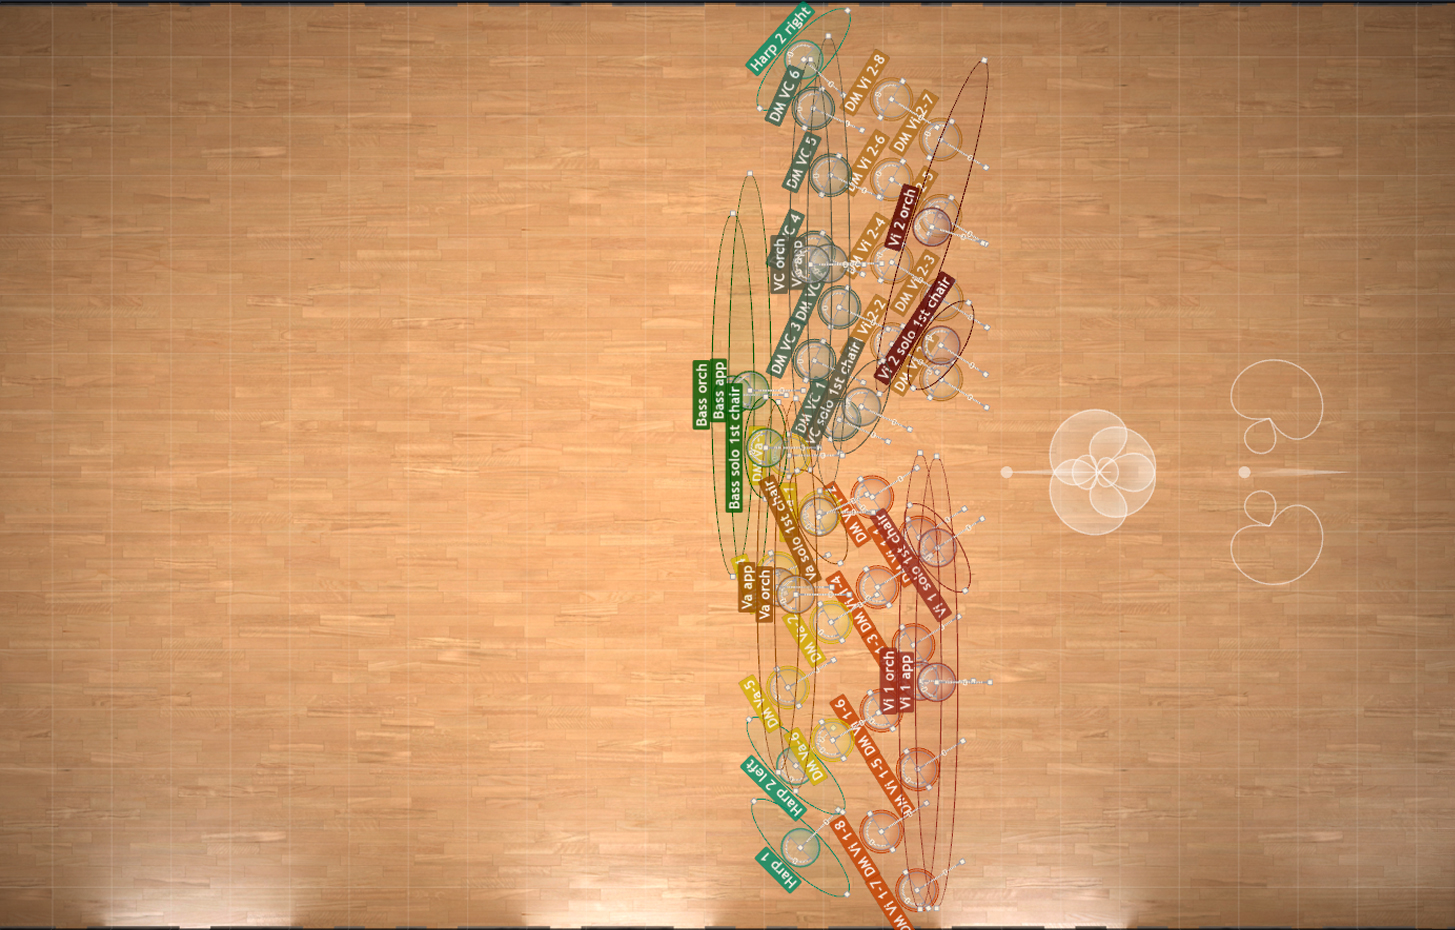
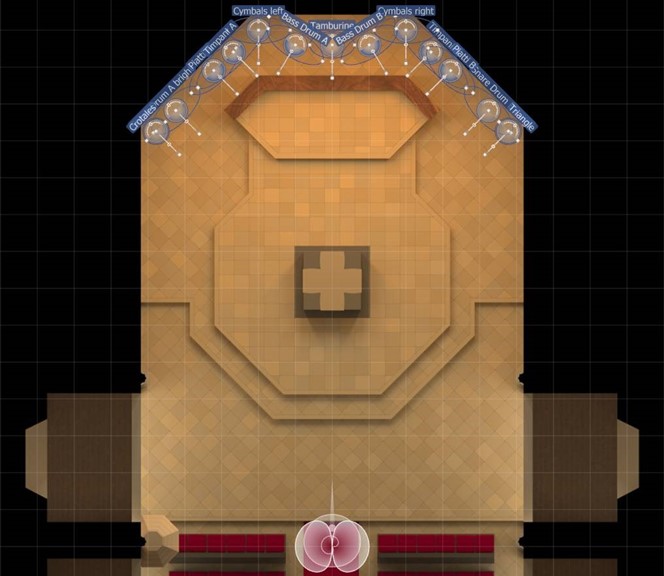
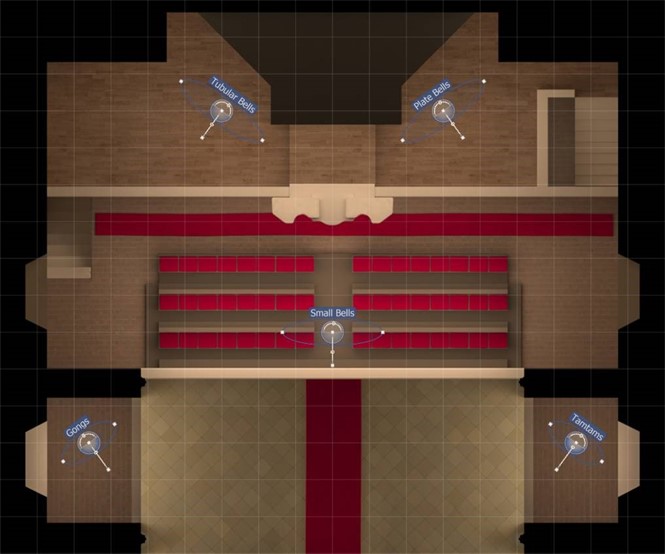
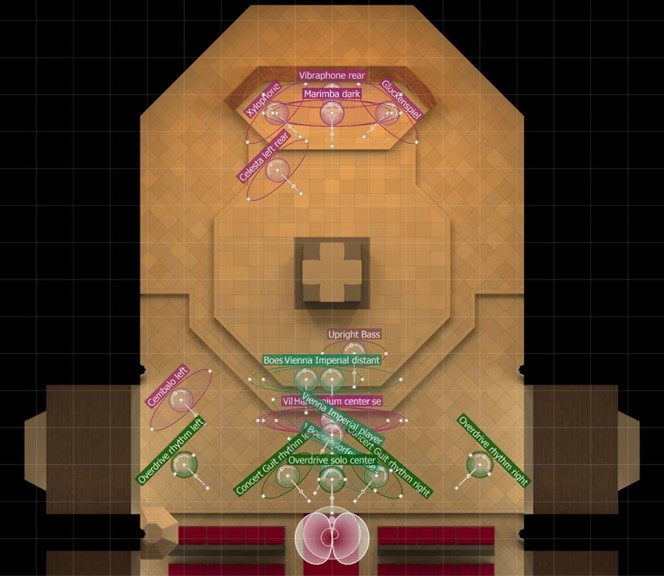
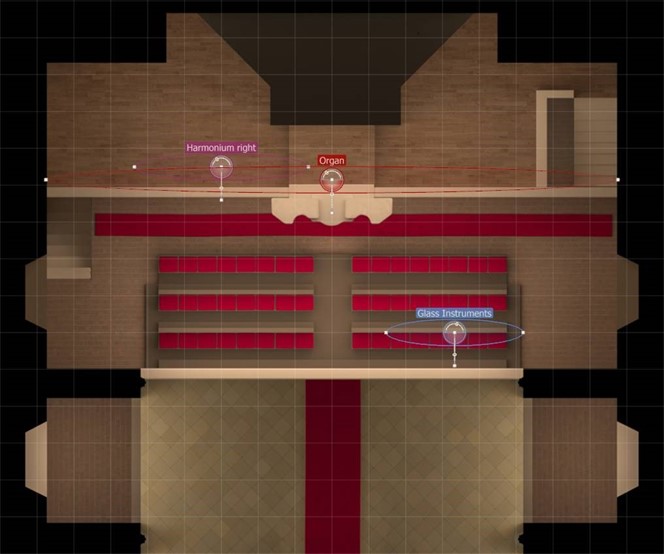
The following screenshots will give you an overview of all available positions for the displayed instrument group for the existing MIRx Venues.
- Each MIR PRO icon represents one virtual instrument.
- The MIR PRO icon provides information about direction, stereo width and placement of each instrument.
- You can see the main microphone positioned in front of the virtual orchestra.
- You will see a few unusual positions as well - that's simply because the instrument might actually sound best in a specific hall when the player is NOT looking straight at the conductor!
Konzerthaus Grosser Saal
Strings
Brass
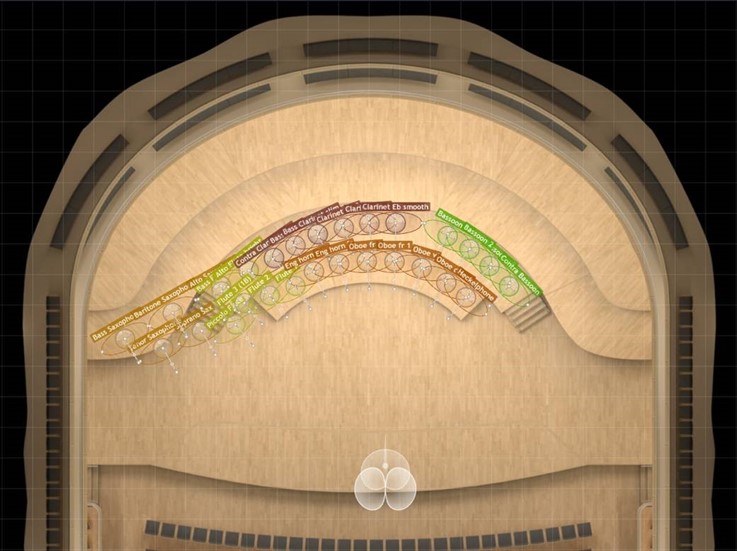
Woodwinds
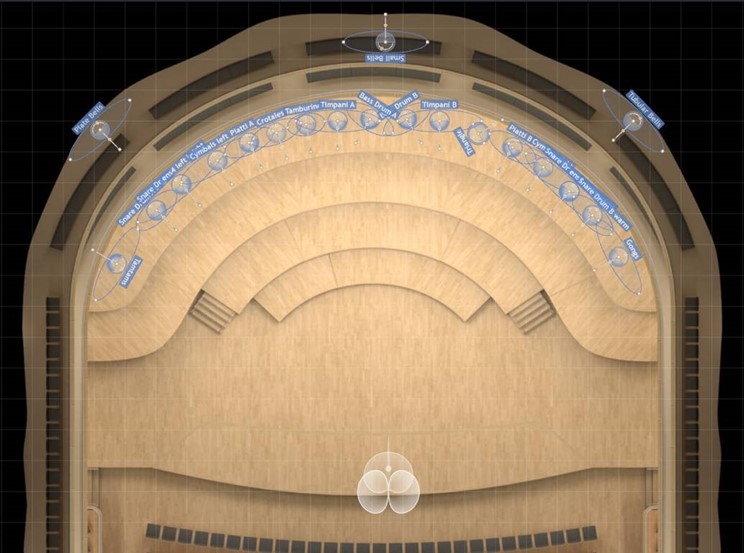
Percussion

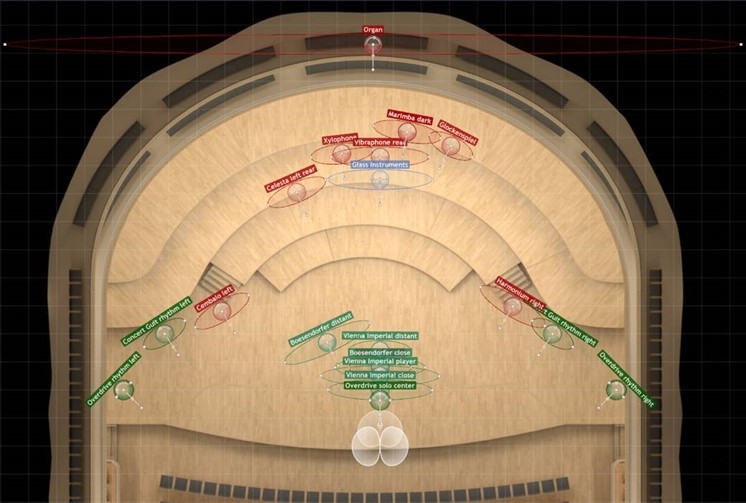
Additional Instruments and Choirs
General Purpose
Historic Winds and Recorders
Konzerthaus Mozartsaal
Strings
Brass
Woodwinds
Percussion
Additional Instruments and Choirs
General Purpose
Historic Winds and Recorders
The Sage Gateshead Hall One
Strings

Brass
Woodwinds
Percussion
Keys, Mallets, Guitars and additional instruments
Choirs and Voices
General Purpose
Historic Winds and Recorders
Teldex Studio Berlin
Strings(rotated 90°)
Brass (rotated 90°)
Woodwinds (rotated 90°)
Percussion (rotated 90°)

Additional Instruments and Choirs (rotated 90°)
General Purpose (rotated 90°)
Historic Winds and Recorders (rotated 90°)
Pernegg Monastery
Strings
Brass
Woodwinds
Percussion in the front
Percussion in the back
Keyed Instruments, Mallets and Additional Instruments in the front
Keyed Instruments, Mallets and Additional Instruments in the back
Voices in the front
Voices in the back
General Purpose
Historic Winds and Recorders