Creating a new Project
This section will guide you through the process of creating a MIR Pro / MIR Pro 24 Project step by step. Some of them will depend on the way you have integrated VE Pro in your setup (stand-alone mode, or integrated in your DAW on the same machine or via LAN). As mentioned before, please refer to the VE Pro manual if you need advice in this respect.
1. Defining the speaker setup in Vienna Ensemble Pro
Creating a new Project in VE Pro means a new Project for MIR Pro / MIR Pro 24 too, of course. Click the New Project icon on the Menu Icon Bar at the top, or select the respective command from the "File" pull-down menu.
A dialog window will open and ask you to select the desired channel configuration; please select a format from the list of pre-configured setups.
Important
MIR Pro / MIR Pro 24's Output Format is not the same as the overall channel setup! It is very well possible to have a MIR Pro / MIR Pro 24 stereo setup running in a VE Pro 5.1-surround frame. Likewise, choosing a surround setup for MIR Pro / MIR Pro 24's Main Microphone will not define VE Pro's global channel settings.
VE Pro will start a new Project now. By default, the application will create a Master Bus with the chosen number of output channels, including a full-fledged panner.
Tip
While it is not strictly necessary to do so, it might be a good idea to delete any panning devices from VE Pro's Mixer that aren't needed, just for the sake of clarity. In fact no panners are needed at all when working with MIR, as its engine takes care of all positioning issues by definition.
2. Venue Selection
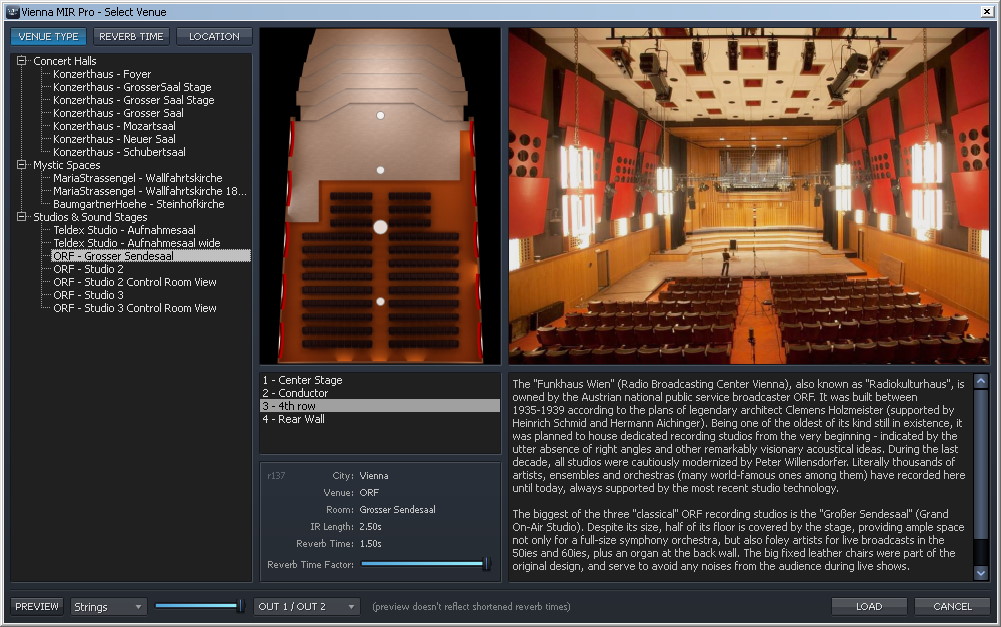
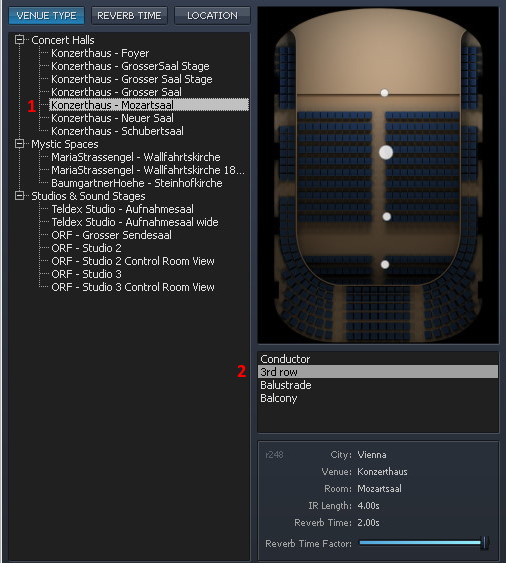
A click on the large Venue Selection bar below MIR's Main Window (a.k.a. Venue View) will open the Venue Selection dialog. First you will have to decide which Venue will fit your needs. You may sort them by location, average reverb time or room type. Listen to the pre-recorded "Previews" to get a rough idea of how selected instruments will sound on a certain stage from different distances. - A little slideshow and some words on the architectural and historical background of the selected Venue are always available to make the decision easier.
With the chosen Venue, you will have the choice from up to four Main Microphone positions. (A typical position is selected by default.) Pick the one that seems to be appropriate, but don't worry too much: You can change to a different microphone position on the fly later on.
Also, it is no problem at all to change Venues even in an existing arrangement. Be aware though that depending on the layout and size of the available HotSpot area, some instruments may not play without manual repositioning (see below), and the overall sound might change considerably.
Venue Selection Dialog Window
Selecting MIR Pro / MIR Pro 24's Main Microphone Position
Method A: Select a Main Microphone Position while choosing the Venue
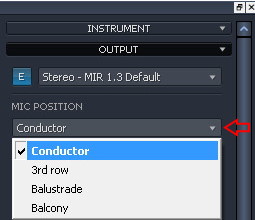
Method B: Select a Main Microphone Position within the chosen Venue directly from the pull-down in MIR Pro / MIR Pro 24's Output Channel
3. Save the Project with a meaningful name
Really. Do it now.
4. Output Format
It is VERY IMPORTANT to understand that MIR's impulse responses are recorded in a meta format called Ambisonics, which allows for decoding of a recorded signal to literally any possible delivery format. This encompasses the number of "virtual microphones", their polar patterns, the direction they are oriented towards, as well as their individual volumes. In other words: We can choose the actual microphones after recording has taken place. (Please refer to manual addendum "Think MIR - Philosophy and Underlying Concepts" for details.)
This gives us the unique possibility to arrange a Main Microphone setup depending on the size and form of a hall, the type of arrangement, and of course the desired Output Format (Stereo, Quadro, Surround ...).
Of course, the treatment of instruments in MIR's Venues has to match the treatment of the decoded impulse responses exactly; therefore, each and every signal source on MIR's stages is encoded to Ambisonics, too.
Quite understandably, the choice of a proper Main Microphone setup is as crucial as it would be in the case of a recording session with an orchestra in a real hall.
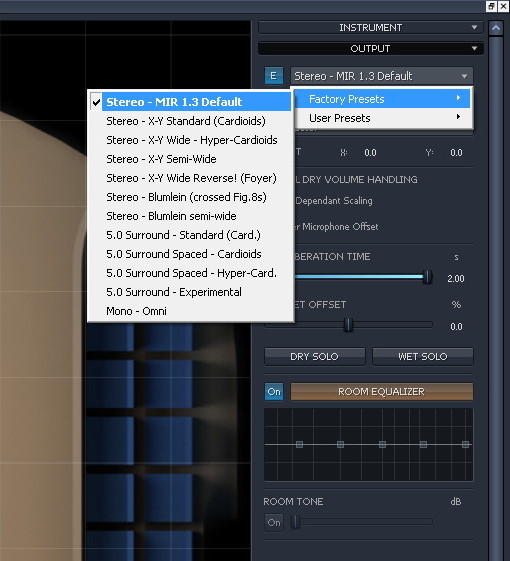
The Main Microphone's Output Format can be selected on the fly from the pull-down in MIR Pro / MIR Pro 24's Output Channel, or by right-clicking the icon that represents it on the Venue Map. We supply a number of presets with the most typical setups. As the changes are applied close to real-time (depending on the number of instruments already positioned on stage), just try which of them best fits your needs.
Using the mouse, the Microphone's icon may be dragged to different positions on the stage.
Important
These changes affect only the dry signal components, not the decoding of impulse responses! This feature is mostly used for centering and/or widening the acoustic imaging of an orchestra on the stage. Its behavior also depends on the "Global Dry Volume Handling" settings in MIR Pro / MIR Pro 24's Output Channel (which should all be switched "on" under normal circumstances).
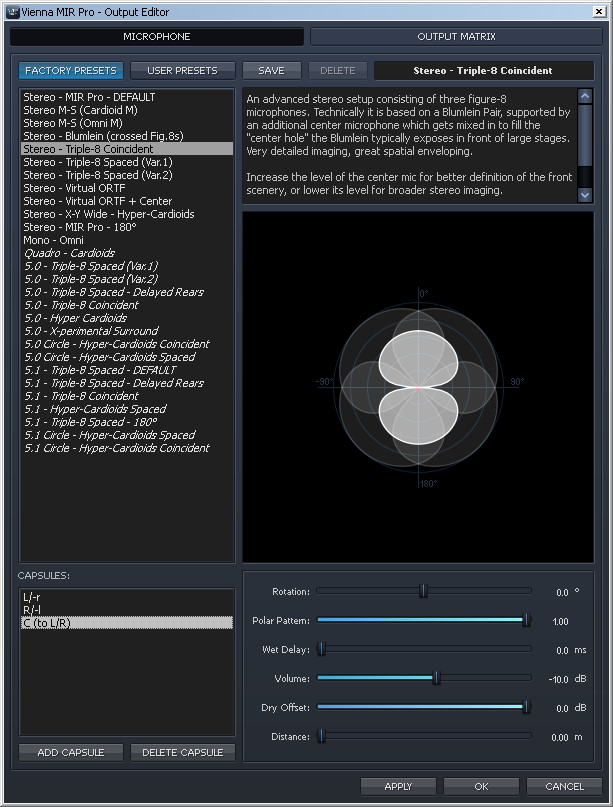
The real power of MIR Pro / MIR Pro 24's Output Formats unfolds when fine-tuning a setup for a specific situation (or creating one from the scratch). This is achieved with the help of the Output Format Editor which can be opened either by clicking on the "E" (for "edit") button next to the pull-down, by double-clicking the Main Microphone icon on the Venue's stage, or from the context menu that opens upon right-clicking on the Microphone's icon.
Important
As mentioned before, choosing an Output Format does not change the channel configuration of the underlying VE Pro!
Selecting an Output Format for MIR Pro / MIR Pro 24's Main Microphone (preliminary)
Method A: Context Menu (right-click on the Main
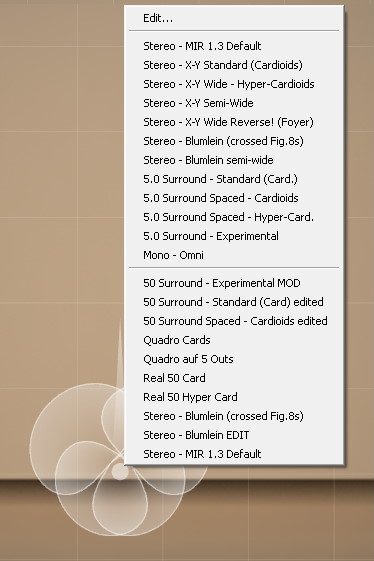
Method B: Using the pull-down in MIR Pro / MIR Pro 24's Output Channel Microphone Icon)
Main Microphone Output Format Editor
Main Microphone Output Matrix
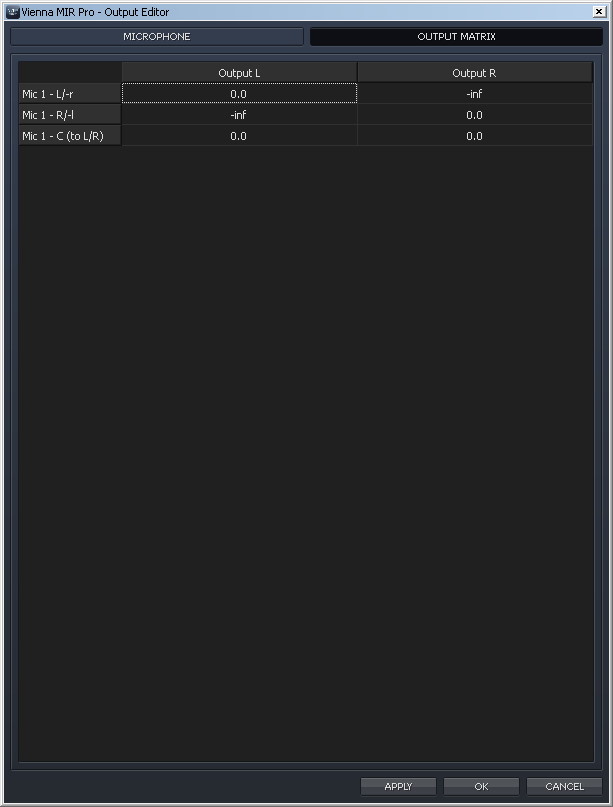
This routing matrix will allow the free assignment of any number of virtual microphone capsules to any number of physical outputs.
This feature paves the way for advanced multi-microphone arrays and multi-channel downmixes.
5. Adding Vienna Instruments and other signal sources to MIR Pro / MIR Pro 24
VE Pro allows for three (or actually four) different kinds of signal sources:
- Vienna Instruments and Vienna Instruments Pro
- Synchron Player (Use the Mixer Preset "MIR Unprocessed" for all SYNCHRON-ized products)
- 3rd-party virtual instrument plug-ins (which also encompasses the Vienna Imperial Piano and MIR Pro / MIR Pro 24's RoomTone - see below)
- Audio inputs
- Internal busses
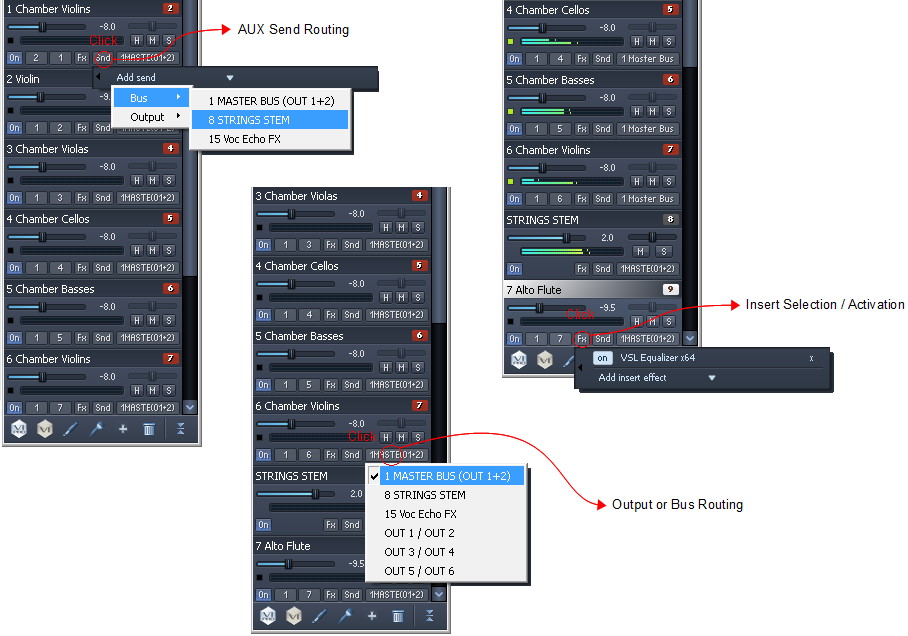
All of them can be connected with MIR Pro / MIR Pro 24 using the MIR Connector plug-in. By default, this VE Pro-exclusive plug-in routes a signal from VE Pro to the MIR Venue, where it is represented by a MIR Icon, and back to VE Pro with both the positioned dry signal component and the individual room information created for this single signal ("Inline" mode). Using the Wet Signal Routing that's part of the Connector plug-in, the Wet part of MIR's output can be split from this channel for many different kinds of applications (see the tutorial screenshots of this manual).
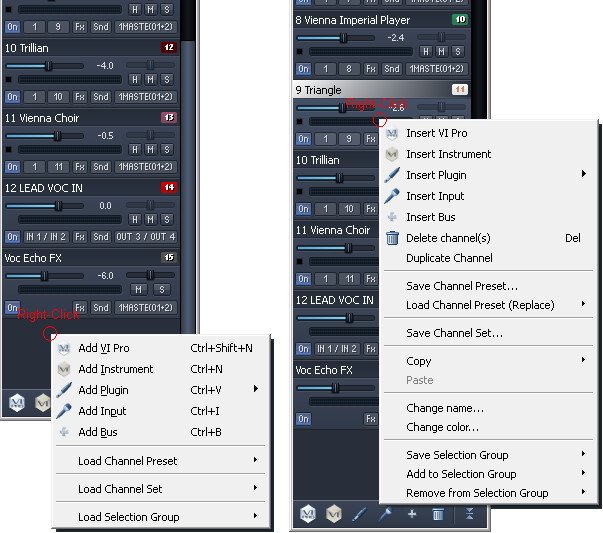
New channels can be added either by clicking the appropriate icon in VE Pro's Channels List window, from the "Channel" Main Menu pull-down, or by right-clicking almost anywhere in VE Pro's GUI.
As soon as the option "Auto-add Vienna MIR" is activated by clicking on the rightmost icon in VE Pro's Main Menu bar, instruments can also be added by right-clicking MIR's Venue Map.
When a channel wasn't automatically connected with MIR Pro / MIR Pro 24, this can of course be achieved by manually selecting Vienna MIR Pro / MIR Pro 24 as a "plug-in" from VE Pro's "Effect +" menu.
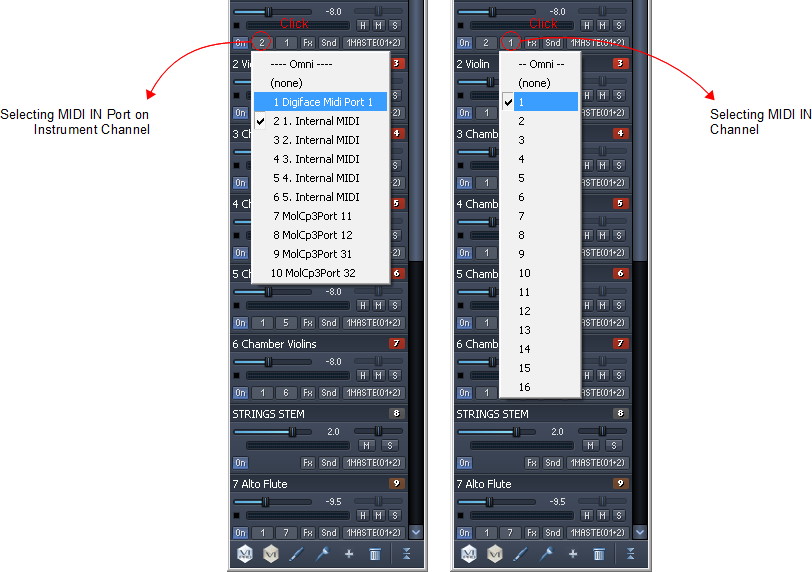
The first thing to do after adding a signal source to a MIR Pro / MIR Pro 24 arrangement should be the selection of the right Instrument Profile (see below). If you're adding a virtual instrument plug-in, don't forget to assign its MIDI Input Port and its MIDI Input Channel, too.
A user-definable Preference will assign the name of the selected Instrument Profile to the Channel, too.
Also set by a Preference, the color of the Icon can be determined by the instrument family it belongs to.
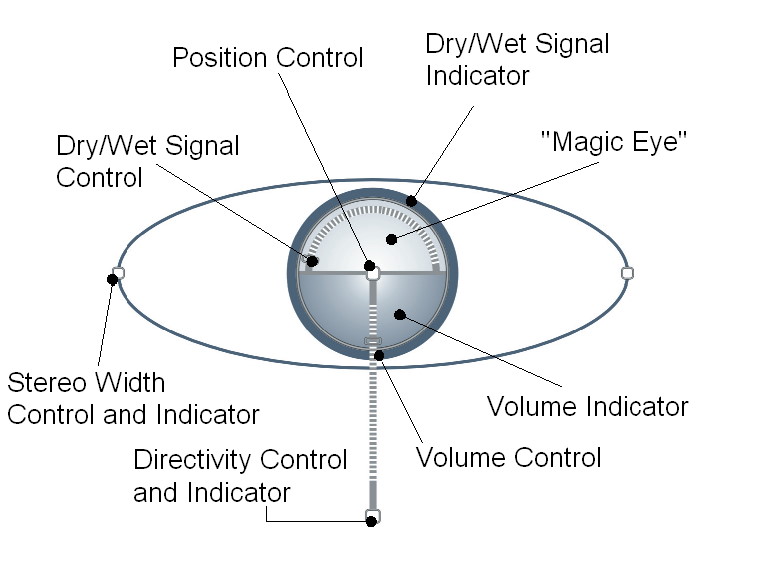
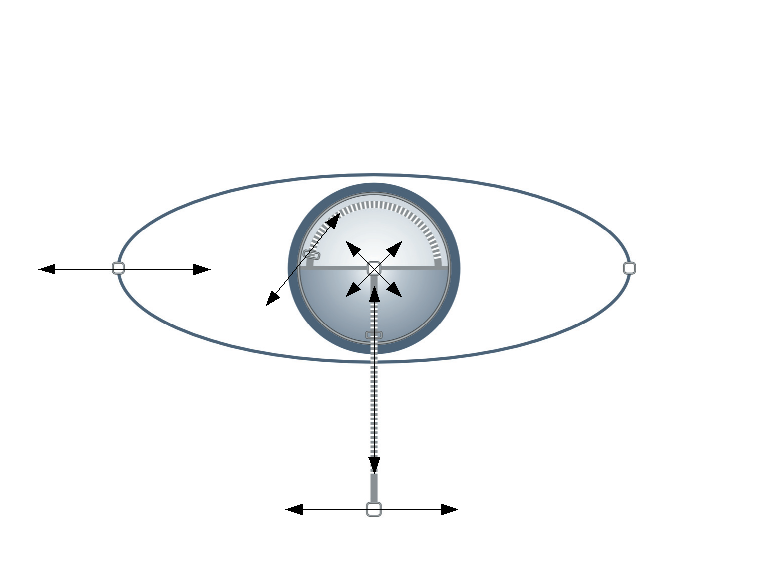
The MIR Icon on the stage of a MIR Venue is a specially developed tool to control most relevant aspects of a signal source in a room and thus in a mix. Every time you change the Icon's position, stereo width or direction on the stage, a new set of impulse responses is pre-rendered in the background (indicated by the Activity Gauge in the upper left corner of MIR Pro / MIR Pro 24's Main Window - see image). These pre-rendered IRs are created temporarily (they won't get saved to disk) and contain virtually all features that are relevant for MIR Pro / MIR Pro 24: They are unique regarding the signal source's position, direction, width, instrument profile, and the chosen Output Format.
The Mir Icon - Function Overview
The MIR Icon - Color Codes
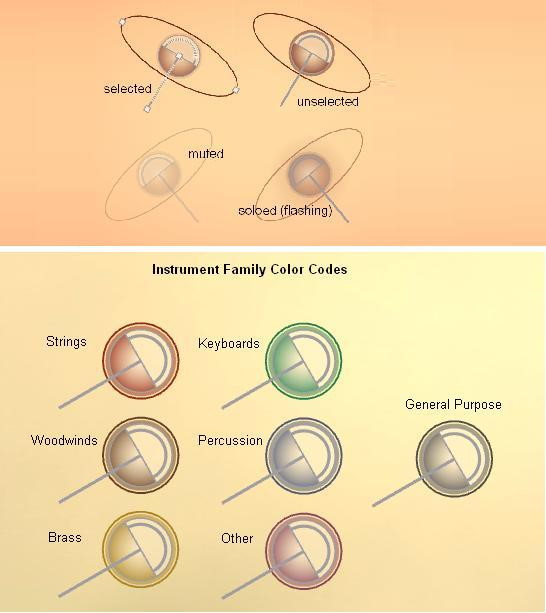
These are the default colors supplied automatically on Instrument Profile selection.
Colors can be changed freely by using the Change Color dialog from the Context Menu in the Mixer, the Channels List or the Icon itself.
6. Instrument Profiles
Understanding the concept behind MIR's unique Instrument Profiles is almost as IMPORTANT as having some insight into the variable Output Formats described above, if you want to make use of MIR Pro / MIR Pro 24's features to their full extent.
As you may remember, MIR's impulse responses are not only taken from a multitude of sources and main microphone positions. MIR Pro / MIR Pro 24 handles directionality (i.e., "room") both from the listener's perspective (the microphone) as well as from the signal source's perspective (the instrument).
This is why we implemented detailed, individual Instrument Directivity Profiles for almost every Vienna Instrument. The underlying data were gathered over (literally) years of extensive research and development, and are now saved within so-called Profiles. Measured with the aid of our newly developed method (based on sectorized microphone swarms), we gathered an enormous database of spatial frequency profiles for all kinds of instruments and other sources. Taking into account these directivity-dependent changes in sound, we can now supply MIR Pro / MIR Pro 24 with a direction-dependent acoustic fingerprint. This is made possible by the way we recorded the multi impulse sets of each room: The impulses were sent into the room in the same sectorized way we used for measuring the instruments - in 60° steps, plus the room's ceiling and floor.
Instrument Directivity Profiles are not directly visible to the user, but selected from a list in accordance with the required Vienna Instrument's samples.
Apart from directivity information, Instrument Profiles contain data about other aspects, too:
- Natural Volume
- The Stereo Width inherent in the original recording
- Instrument and / or ensemble size
- Natural timbres and possible changes to them
- Typical playing techniques and ways of sound production
In combination with all these aspects saved in an Instrument Profile, the directivity patterns greatly enhance the possibilities of MIR, and thus the achievable realism of a virtual orchestral performance.
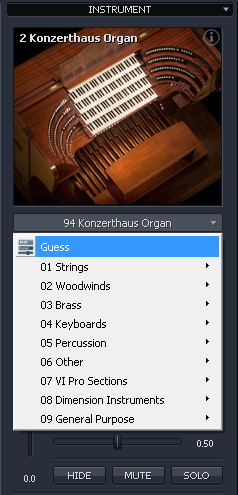
Please select the appropriate Profile from the pull-down menu below the Instrument Display in the Instrument Channel. Virtually every Vienna Instruments is listed here. (IMPORTANT: This is NOT a list of the valid Vienna Instruments licenses on your computer!) In addition we supply "General Purpose" Profiles for use with any source MIR Pro / MIR Pro 24 is able to process.
Important
Assigning an Instrument Profile does not mean that the respective sample data gets loaded in an Vienna Instrument. This has do be done manually.
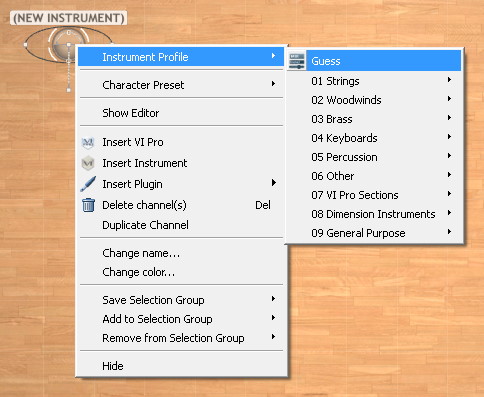
Selecting Instrument Profiles
Method A: Open the context menu (right-click the selected MIR Instrument Icon) and select the proper Instrument Profile manually.
Method B: Use the pull-down in MIR Pro's Instrument Channel
Method C: Depending on the way you use Vienna Instruments Pro 2, MIR Pro / MIR Pro 24 can do an educated "guess" and select the appropriate Instrument Profile all by itself. - That said, it is quite understandable that this doesn't make much sense for VI Pro instances that will play samples from different instruments, e.g. Percussion. As a rule of thumb, Instrument Profiles have to be selected manually for all sources, except for VI Pro 2 used for a single instrument or ensemble.
7. Character Presets
Thanks to its Instrument Profiles, MIR Pro / MIR Pro 24 "knows" a lot about the instruments on its stages. This makes it possible to supply very deep and customized ways of handling them. Applying one of MIR's built-in Character Presets provides for the seemingly simple but highly efficient way of shaping an Instrument's timbre or "character".
Individual Character Presets are available for every single Vienna Instrument (with the exception of a few less commonly used percussions) - a total of more that 750 hand-crafted settings! Usually there will be at least five "colors" to choose from just by clicking on the pull-down menu bar. In addition, depending on the instrument there may be one or several special settings.
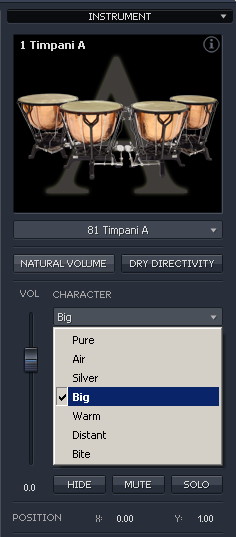
In cases where there are no customized settings for an instrument, or if a General Purpose profile is employed, more generalized presets are used. These presets are marked with an asterisk (*) after their name.
8. HotSpots
Not all areas in a room are possible positions for an instrument or other signal source (represented by the MIR Icon). As soon as you grab an Icon with the cursor, you will see certain parts of the room highlighted in a warm yellowish tone. These are so-called HotSpots, showing all valid areas for an instrument's position in a certain room. In a hall, this of course is the stage, but most of the time there's some more eccentric places, too, like balconies or selected spots within the auditory. - If you prefer to see those valid areas all the time, simply switch on the dedicated "HotSpots" button at the bottom.
If you try to put an Icon into a spot outside the valid areas, it will get muted. Especially after changing the Venue for an existing setup, Icons may suddenly reside outside the valid HotSpot areas. While this won't do any harm, it is advisable to pull those Icons back onto the stage or other valid areas; otherwise, the auditory results will be unpredictable since Instruments outside the valid areas remain muted.
Tip
You can (ab)use this as some kind of "parking lot" for instruments that haven't found their place within an orchestra yet.
MIR Pro / MIR Pro 24 Venue Hotspots
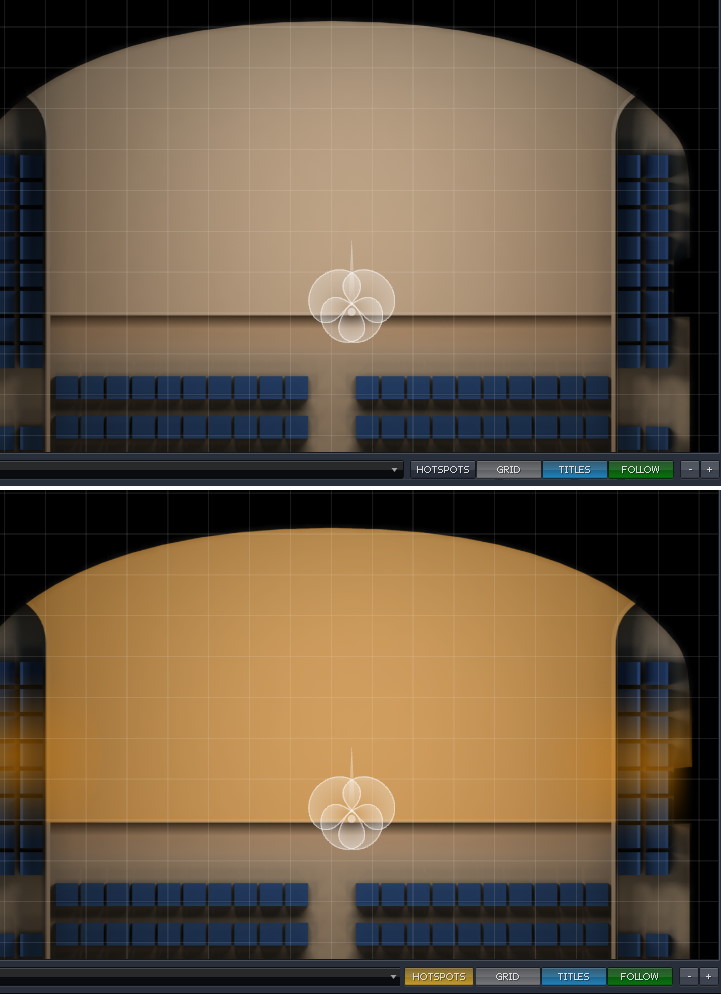
Icons can be positioned freely on the Venue's main stage area.
Depending on the chosen Venue, there may be several off-stage HotSpots available, too.

The area of all valid instrument positions within a MIR Venue ("HotSpots") can be made visible permanently.
Any Icon placed outside this area will be muted.
9. Setting Up and Controlling an Arrangement
Following the steps described above, you will be able to set up a complete arrangement in Vienna MIR Pro / MIR Pro 24 pretty fast.
In some situations the visual appearance of your virtual orchestra might become a bit crowded - this is where the "Hide" function will help a lot. Hidden Icons will play the same as visible ones, only lacking visibility.
A typical example is the addition of a solo violin to a violin ensemble for increased musical expression. The solo violin will very likely sit "on top" of the ensemble, obscuring both Icons' accessibility. Making use of the Selection Group feature introduced by VE Pro 5 allows full control over hidden Icons directly on MIR's Venue Map without actually touching it. (Please refer to the VE Pro manual for a detailed description of Selection Groups and their handling).
Another very helpful feature is the possibility not only to copy, but also to save and import already set-up channels as Channel Presets and Templates. Importing allows for a partial recall of settings, too, so you don't have to start from scratch every time when you have already spent some time setting up a specific channel and then realize that some aspects had already been working well in a previous one.
10. Mixing - Getting "That" Sound
The combination of the new, "holistic" approach of Vienna MIR with the more conventional, "analytic" methods of VE Pro forms a scalable environment for both straightforward as well as highly complex musical mixing tasks. As soon as you need additional colors or processing options not supplied by the MIR Pro / MIR Pro 24 engine itself, you can switch to VE Pro's mixer and add any tool you have in mind.
The same is true for automation and remote control. As soon as a static setup is not enough, automation is just a click (or two) away. (Please refer to the VE Pro manual for a detailed description of Automation and MIDI Remote Control).
But don't let yourself get overwhelmed by all those options. Getting "that sound" is easier - and especially more intuitive - with MIR Pro / MIR Pro 24 than you might think by just reading these lines. We have compiled a long list of suggestions already: "Collected Hints for Your Daily Work with Vienna MIR". They are part of the following Tutorial Section.
...and don't forget to save your work.
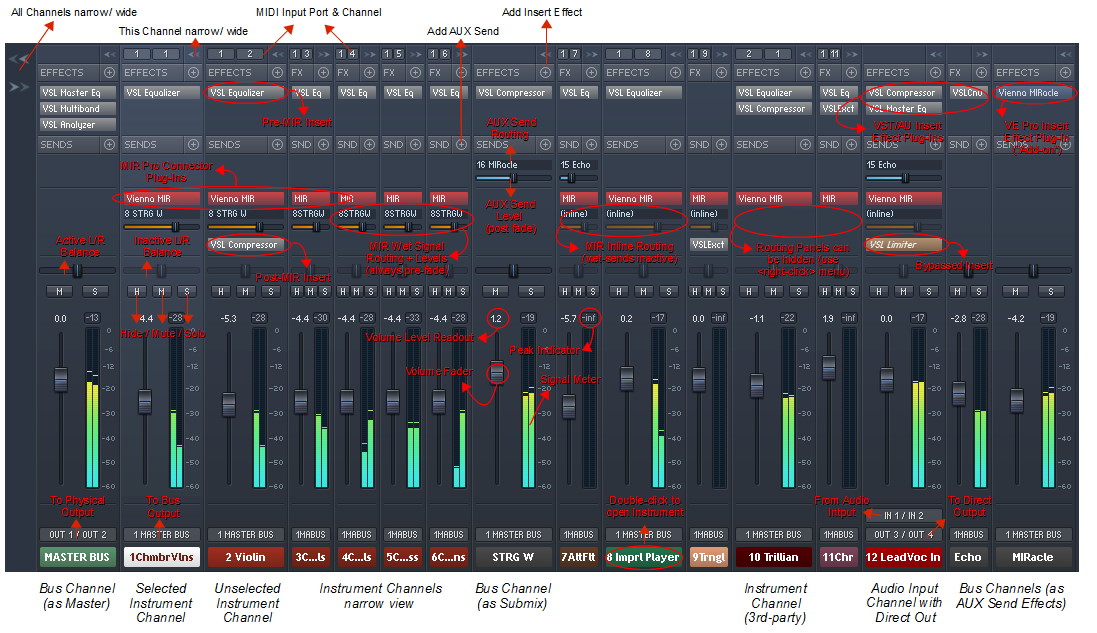
VE Pro Mixer - Functions Overview
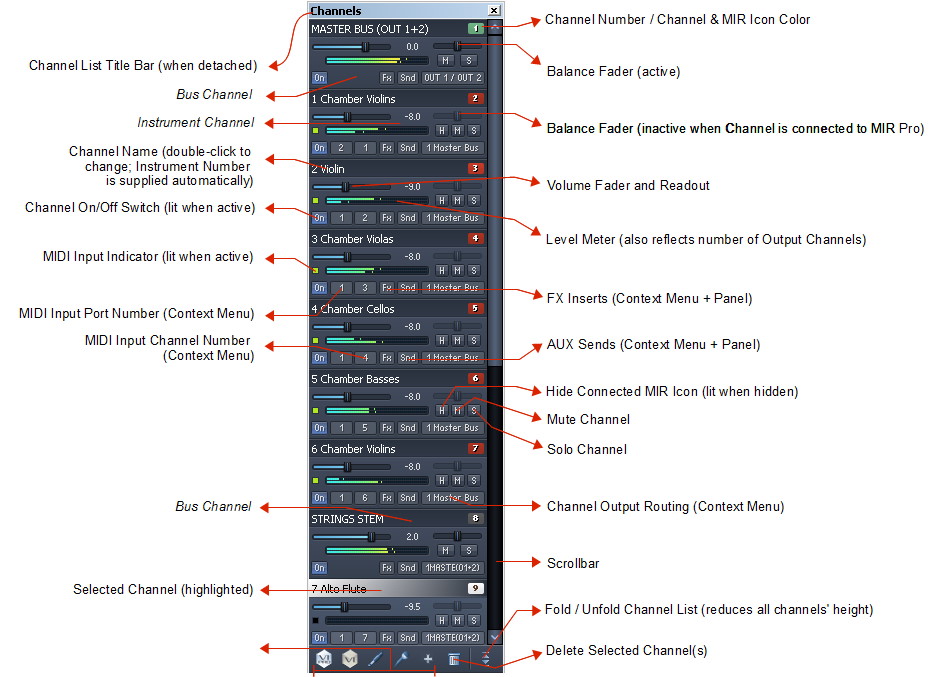
Channel List - Functions Overview
Channel List - Context Menus
Channel List - Routing Methods
Channel List - MIDI Input Routing
Channel List - Narrow View
