Addons
The "modular" concept of VE Pro / MIR Pro / MIR Pro 24 offers the unique opportunity to add special features without actually changing the software engines themselves. Three of these add-ons will be part of MIR Pro / MIR Pro 24 from the very beginning:
Room Tone
Every hall has a unique sonic signature even when there's actually nothing to be heard. This natural noise floor gives the human ear a sense of spaciousness and enveloping beyond the actual reverb. Digital audio systems, on the other hand, are more or less free of any background noise; while this is a good thing in most cases, it makes us miss this certain feeling of "being there" when re-creating a room out of nothing but impulse responses.
Room Tone is a separate sample player plug-in which is used and controlled by MIR Pro / MIR Pro 24 exclusively. It provides individual, seamless loops of this typical "sound of silence" for each microphone position in every hall MIR offers. It can be seen as natural dither, which makes sure that none of MIR's reverb tails simply disappear in cold digital black (i.e., absolute silence), but blend into the noise bed of the same provenience.
The Room Tone Fader allows you to control the noise floor level, as its proper volume is very context dependent. The neighboring "On" button switches Room Tone on or off (highlighted in blue is "on").
RoomTone will properly decode to any chosen output format, as it is recorded in Ambisonics like all the impulse responses themselves.
To avoid confusion, there can always be just one Room Tone channel active in any MIR Pro / MIR Pro 24 project. It can be instantiated automatically for any new project by a Preference.
Room EQ
EQ-ing is maybe the most basic as well as the most important way of sculpting the sound of an audio signal. While EQs are omnipresent in the age of digital audio, good ones are still rare – especially when they don't try to mimic some analog archetype. Vienna MIR EQ is said to be amongst the best of its kind (being a direct descendant of the much-lauded Vienna Suite 64-bit Master EQ). For long-time users of legacy Vienna MIR this will also replace the formerly built-in "Master EQ".

Important
Room EQ is applied to all wet signal components derived from MIR Pro / MIR Pro 24! If you need instrument-specific control, please use the MIR plug-in's routing options.
MIRacle: Algorithmic Reverb Add-On – Functions Overview
MIRacle is a tailor-made algorithmic reverb add-on for sweetening and enhancing MIR's sound.
"I don't want it to sound just realistic. I want it to sound flattering!!"
Vienna MIR Pro / MIR Pro 24 comes with MIRacle – a tailor-made algorithmic reverb add-on for sweetening and enhancing MIR's sound. It is derived from Vienna Suite's critically acclaimed Hybrid Reverb, enhanced by some advanced features for use with MIR Pro / MIR Pro 24. Technically, MIRacle is a VE Pro-exclusive plug-in, license-wise tied to MIR Pro / MIR Pro 24.
MIRacle is meant to be used as artificial acoustic "flavour" for the authentic spatial positioning supplied by the actual MIR Pro / MIR Pro 24 engine. This is a tribute to the often-used technique of adding synthetic, "hyped" reverb on top of an orchestral recording derived from the combination of main and close microphones.
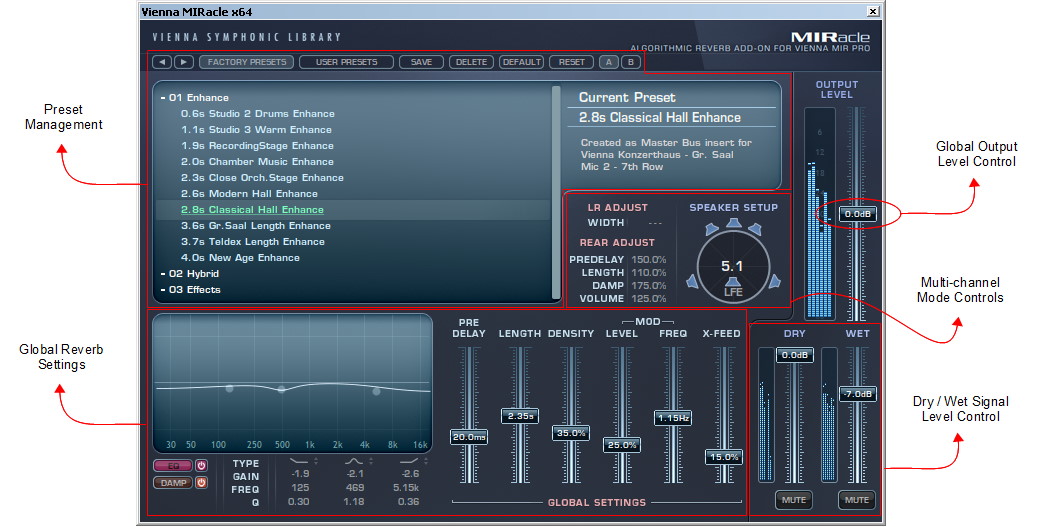
Please select MIRacle from the top of the "Effect +" menu in a VE Pro channel. A double-click on the newly added insert opens its GUI. This is a short rundown of MIRacle's main controls:
Predelay: The amount of time (in milliseconds) between the dry signal and the onset of the algorithmic reverb.
Length: The length of the reverb tail.
Density: Adjusts the complexity and richness of the reverb tail. Please note that this setting also affects CPU usage.
Mod Level: Controls the level of modulation in the tail. Higher values might create a sense of pitch shift in steady instruments. Helps to create a more vivid sounding decay and frequency spread. The modulation engine is turned off when setting Mod Level to 0%, and CPU usage will be somewhat lower.
Mod Frequency: Controls the frequency of modulation in the algorithm. Modulation frequencies will be spread out randomly around the set value.
X-Feed: Controls the crossfeed level from left to right inside the reverb algorithm. 0% means that an input signal only on the left channel will yield an output signal only on the left channel. 100% will produce an even distribution in the stereo field, resulting in a more consistent sound.
Filter Response Display: Shows the response curve and frequency analysis for the current settings. The (horizontal) frequency range is from 20 Hz to 20 KHz, the (vertical) amplitude scale displays a range of 36 dB (-18 dB to +18 dB). Drag the filter handles to graphically adjust the filter’s boost/cut and/or frequency. When adjusting the filter handle,
Shiftlocks the frequency;Altlocks the gain. Double-clicking a handle resets the respective band’s gain to the default.L/R Width: In stereo mode, this control enhances (or reduces) the perceived stereo width of the reverb tail. Settings above 100% will add that certain "bigger-than-life" feeling to reverbs that appear to be too "narrow". CAUTION: This feature is inactive in multi-channel operation.
For multi-channel operation, there are a few additional controls which will get active as soon as VE Pro is used in a configuration with more than two (stereo) channels. MIRacle will automatically adapt to the chosen configuration.Rear Adjust: This section allows for the relative offset of some critical parameters used for the rear channels in surround setups.
Speaker Setup: The displays follows the chosen channel configuration of VE Pro. Clicking one of the speaker icons will mute/unmute the reverb output of the respective channel.
Please look at the setup examples given on the following tutorial pages to get an idea about MIRacle's vast possibilities.
Using MIRacle
A Most Basic Setup
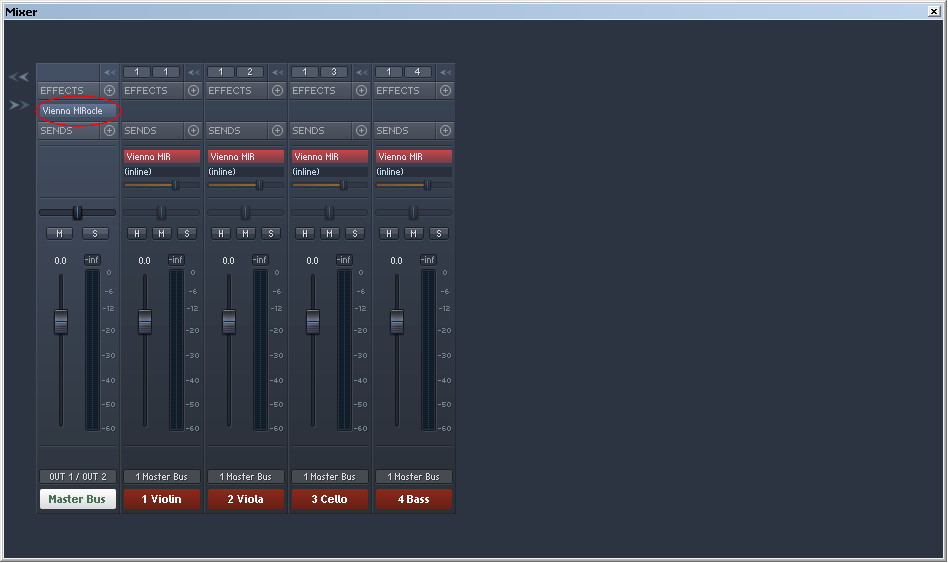
Vienna MIR Pro comes with a tailor-made algorithmic reverb add-on for sweetening and enhancing MIR's sound.
Provided that your final mixing stage is within VE Pro, the easiest way to use it is to insert it in VE Pro's master bus. MIRacle will automatically adapt to the chosen output format. Make sure that the Dry Signal is not muted, choose a Preset that fits your needs, and adjust the volume of MIRacle's reverb signal.
MIRacle comes with a number of presets. They are roughly sorted by their average reverb length and the planned application area: Presets labeled "Enhance" will fit a setup where the algorithmic reverb just adds color and modulation to the room derived from a MIR Venue. "Hybrid" presets are typically meant to be used with drastically shortened MIR Reverb times (see below).
Using MIRacle with Post-MIR AUX Sends
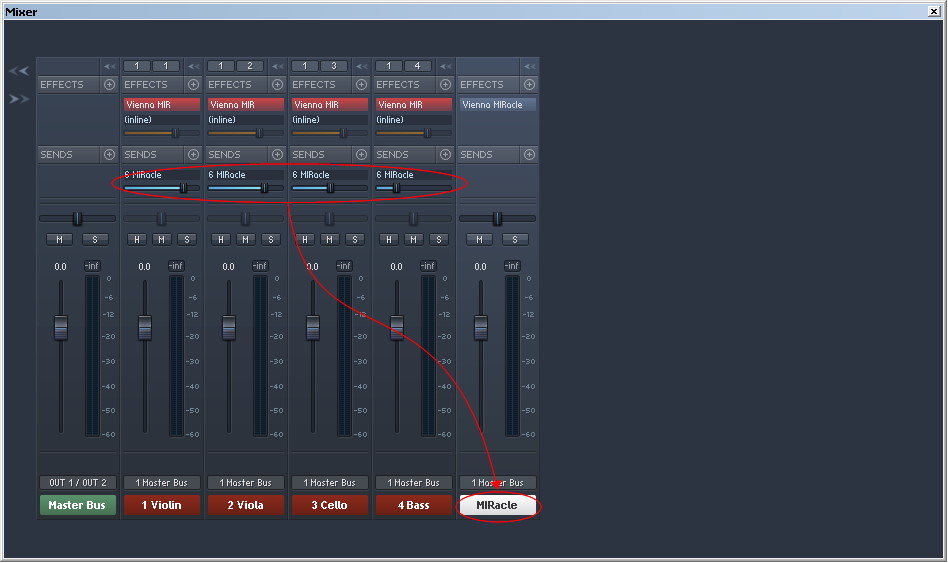
Using MIRacle with a conventional AUX send setup will allow for much more control.
Just add a new bus to VE Pro's mixer and select MIRacle as an insert. Make sure that the Dry Signal is not routed through the plug-in, and don't connect MIRacle's output to MIR Pro again.
Open an AUX send after the MIR plug-in on each instrument channel. Use individual AUX send levels from the mixer's instrument channels to achieve the sound you're after.
Using MIRacle and MIR Pro as Hybrid Reverb (1)

An even more elaborated setup uses the combined powers of both MIR Pro and MIRacle as a powerful hybrid reverb (a mixture of convolution-based and algorithimc effects).
In this scenario you will send only MIR's wet signals to MIRacle. This submix is the "dry" input from MIRacle's point of view, so make sure that it is not muted there. A typical setup is to scale MIR's Reverberation Time to only 50% or less of its original length, while adding a rich and modulating algorithmic tail to the (still intact!) positional cues derived from MIR's virtual stage.
Tip
For a "Hybrid Reverb"-approach, reducing the original reverb time of a MIR Venue to values as small as 0.3 to 0.5 seconds is a good starting point.
Using MIRacle and MIR Pro as Hybrid Reverb (2)
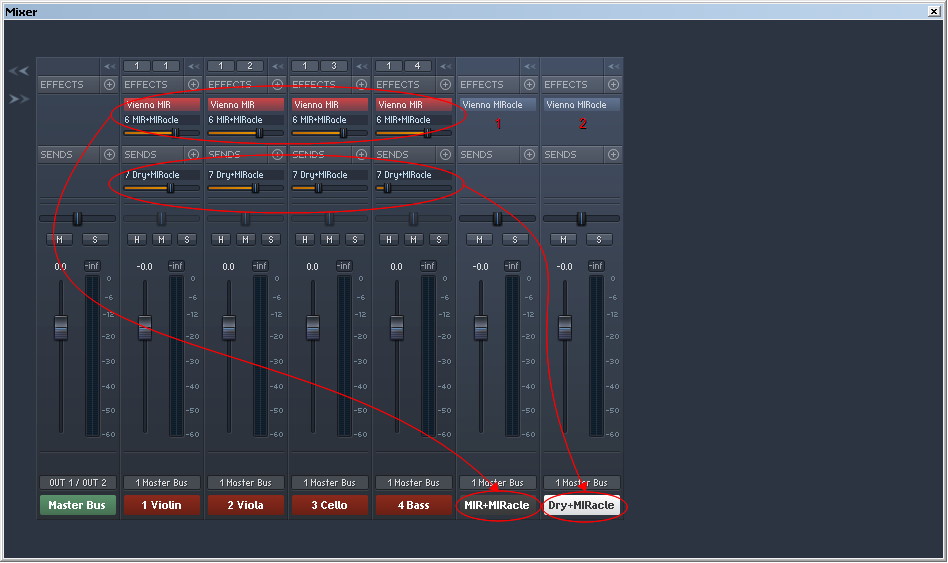
Taking it to extremes, you could also add varying amounts of algorithmic reverb to the dry signals – for an even more exciting sound of the resulting overall reverb.
Starting from the setup layed out on the previous page, simply duplicate the bus that contains MIRacle. Open its GUI and make sure to mute its internal Dry Signal Path, as we are going to send some un-reverberated instruments into it.
Add an AUX send after the MIR Connector Plugin on every instrument's channel (which now contains only the positioned dry signal from MIR, as we already are sending the wet signal to MIRacle 1). Make sure to set them to "pre-fade" operation (the fader color changes from light blue to orange).
Now send as much of the dry signals as you like to the second MIRacle instance and adjust the levels according to taste. The result should be a lush and dense, yet convincingly spatial reverb.